 |
Managing Tasks in Microsoft Project 2000 |
| << Quality Concept, Producing quality software, Quality Control |
| Commissioning & Migration >> |

Software
Project Management
(CS615)
Lecture
# 43
11.
Application Tools
11.1
Managing
Tasks in Microsoft Project
2000
Project
management is a highly specia1ized and
professional task. The
chances
that a
project can go haywire are
very high because project
management includes
numerous
activities, such as planning, resource
allocation, risk management,
and
estimation.
You can automate all these
activities using a tool, Microsoft
Project
2000.
Activities
such as project planning, resource and
cost allocation, and project
tracking
can be done easily using the
various user-friendly features of
Microsoft
Project
2000.
Microsoft
Project 2000 is a popular project
management tool that also enables
you
to
schedule and track your
project plan. In Microsoft
Project,
every
unit of work,
which
consumes effort, time, and money, is
called a task.
You
use Microsoft
Project
to specify tasks and the expected
duration of each task. Using
the task-
related
information, Microsoft Project
prepares a project schedule.
The schedule
displays
a plan consisting of the
start and end dates of each
task.
In
addition, it plots a pictorial
Gantt chart. The Gantt
chart view depicts
the
extension
of tasks across days along
with the corresponding
resources.
11.2
Creating
Tasks
To manage
a project efficiently, it is important to
treat the project as
a
decomposable
entity that can be analyzed and
resolved. A problem first
needs to
be broken
into units and then analyzed
for solutions because it is
always easier to
focus on
micro level units. Microsoft
Project enables you to
perform these tasks.
It
assumes that you have
performed the WBS exercise
for the project. The
WBS
exercise
helps you to come up with
indivisible units called tasks.
Therefore,
a task
is an
activity that has a defined
start and end dates.
For
example, XYZ Inc. has to
develop an ERP project. They
plan to complete the
project
in five phases: analysis, design,
development, testing, and
implementation.
During
the analysis phase, the
WBS exercise is performed and a list of
tasks is
defined
for each of the subsequent
phases. Using Microsoft
Project, you can
create
tasks for each phase,
specify their duration, and
assign resources to
them.
You can also
set relationships between
tasks to identify the
successor and
predecessor
tasks.
11.3
Types
of Tasks
370
Software
Project Management
(CS615)
Microsoft
Project enables you to
create three types of
tasks:
·
General
·
Milestone
·
Recurring
General
Tasks
General
tasks are the usual
tasks that are independent
and have no special
characteristics
related to their duration or
time. For example, Analysis
is a general
task that
XYZ Inc. plans to conduct. To
create the Analysis task,
you can use the
Project
menu on the Microsoft
Project worksheet. The steps
to create the
Analysis
task are
as follows.
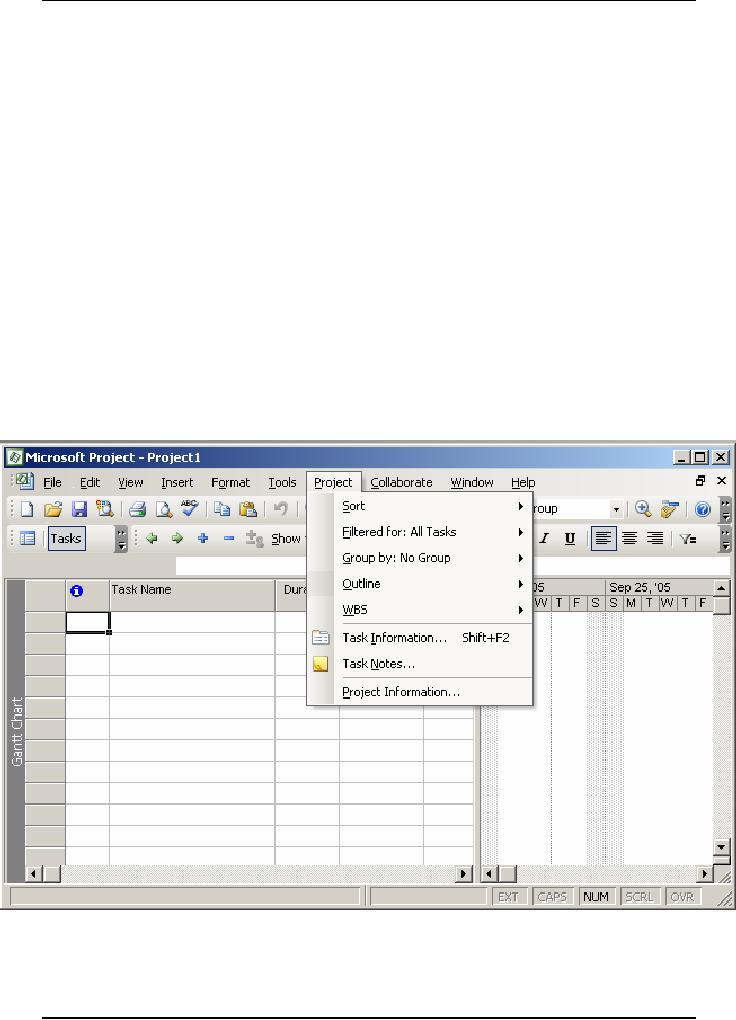
1. Click
the Project
menu.
This
displays the Project menu
that contains all the
task-related commands.
Figure
11.1
displays the Project
menu.
Figure
11.1: Project
Menu
371
Software
Project Management
(CS615)
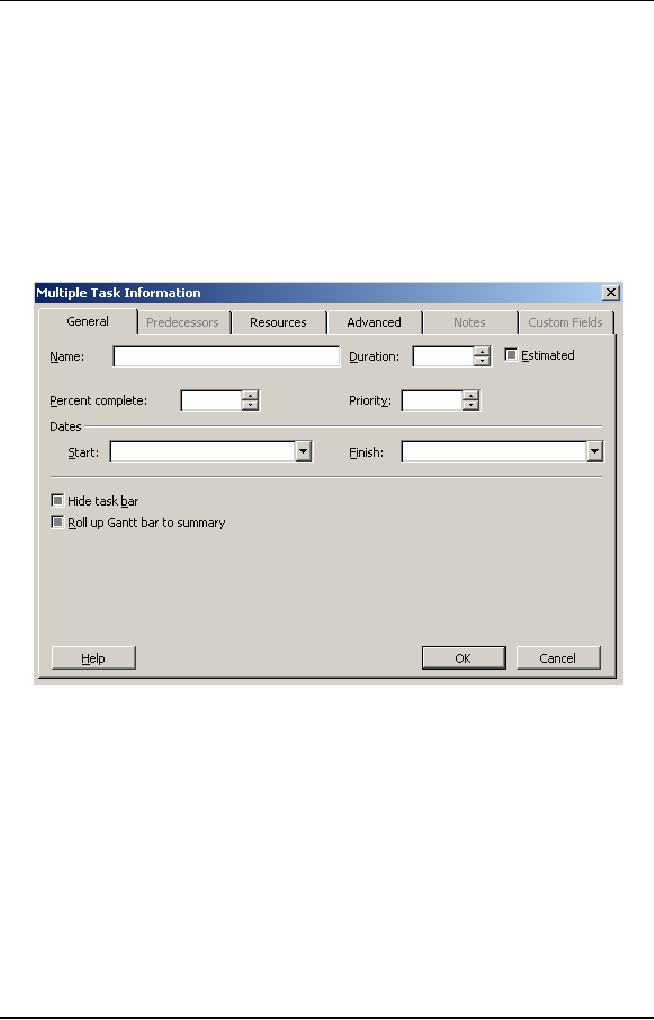
2. Click
the Task information command
on the Project menu.
This
displays the Task
Information dialog box where
you specify the
details
of the task being created.
As shown
in Figure 11.2, the Task
Information dialog box
contains five
tabs: General,
Predecessors, Resources, Advanced, and
Notes. You
use
the
General tab of the Task
Information dialog box
because you need to
create a
general task. The other
tabs have specific purposes
for each task.
For
example, you can specify the
details for a task by using
the Advanced
tab.
For the same task,
you can use the Notes tab to
add notes.
Figure
11.2: Different
Tabs in the Task Information
Box
Tip:
In
addition to the access key
I,
you can
display the Task Information
dialog
box by
using the Shift and F2
shortcut key
combination.
3. Type
Analysis
in
the Name
text
box.
4.
Specify the duration of the
Analysis task as 5d
in
the Duration
text
box.
The
duration of a task signifies the
period for which the task
lasts in a project
schedule.
The start date is preset as
the current date unless
you enter a specific
date.
The finish date for
the task is displayed as five days
after the current
date
in the
Gantt chart view. Duration
can be specified in minutes, hours,
days,
weeks,
months, or years.
372

Software
Project Management
(CS615)
If you
are not sure of a confirmed
duration, you can specify an
estimated
duration
of a task.
Figure
11.3 displays the Task
Information dialog box where
task details
are
specified.
Figure
11.3: Task
Information Dialog Box
Tip:
To
specify an estimated duration for a
particular task, you can
precede or
succeed
the duration with a question
mark. Alternately, you can select
the
Estimated
check box next to the
Duration text box.
5. Click
OK
to
confirm the details provided
by you.
After a
task is created, you; can specify the
subtasks below it. For
example,
Project
scope determination is a subtask of the
Analysis task. To specify
the
subtask,
you first create the
Project scope determination subtask by
using the
Task
information dialog box.
Next, you specify a summary
designation for the
Analysis
task. A summary designation
indicates that the task
represents a
parent
task for a group of related
tasks below it. The
start date of a
summary
task is
the start date of the
first subtask. Similarly, the
finish date of the
summary
task is the finish date of
the last subtask under the
summary task.
To
designate Analysis as the
summary task, perform the
following steps:
373
Software
Project Management
(CS615)
1. Create
a task named Project
scope determination using
the Project
menu.
You need
to create this task below
the Analysis task.
2. Select
the Project
scope determination
task.
3. Click
the Indent
icon on
the Formatting
toolbar.
The
Indent icon is the green
arrow pointing towards
right. Clicking this
icon
indents
the selected task to the
right. Notice in Figure 11.4
that Microsoft
Project
formats the summary task in
bold. Alternatively, you can
use the left
indent
icon to make the Analysis task as a
summary task.
Figure
11.4: Creating
Summary Tasks
Similarly,
you create the rest of the
tasks listed in the project
plan of XYZ Inc.
and
specify subtasks below them.
You store the list of tasks and
their details in a
file
with an extension .mpp in
Microsoft Project.
Milestone
Tasks
Milestone
tasks are the second
type of tasks that you can
create using
Microsoft
Project.
These tasks have no duration.
They serve as markers or reference
nodes
for
significant accomplishments in a project.
Examples of a milestone task
are
project
startup, project end, pilot
implemented, and SRS document
sign off.
Creating
a milestone task is similar to creating
any other task. The
only difference
is that
after the task is created, you select an
additional option named Mark
task as
milestone
in
the Task Information dialog
box.
374
Software
Project Management
(CS615)
For
example, in the analysis
phase, XYZ Inc. has a
milestone task named
Analysis
Complete. To indicate that
Analysis Complete is a milestone
task,
perform
the following steps.
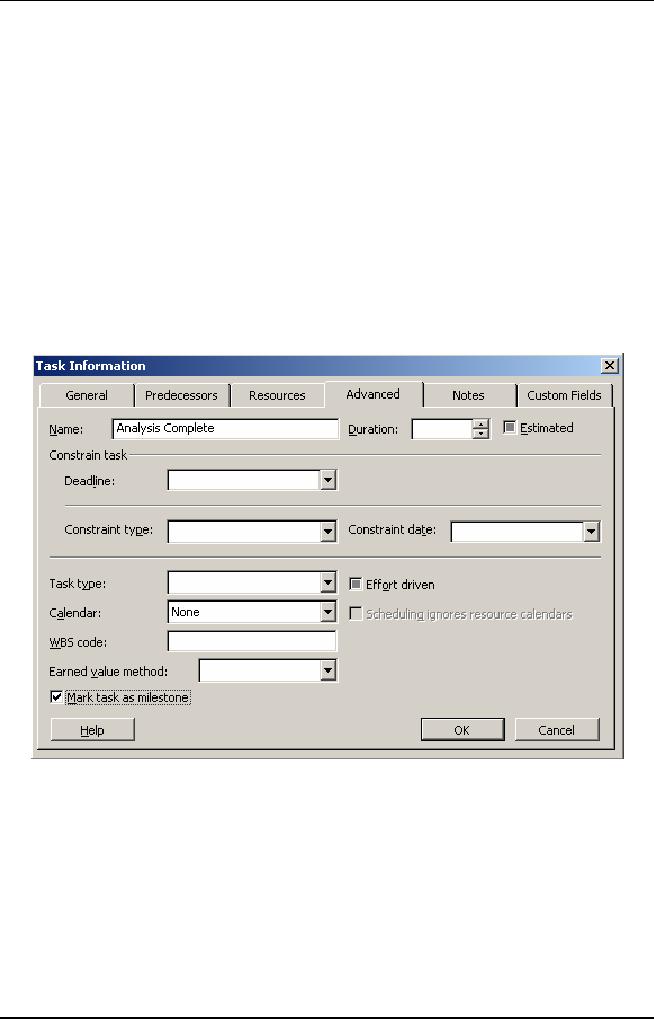
1. Click
the Advanced
tab
in the Task
information dialog
box.
This
tabbed page contains specialized
options that enable you to
create
milestone
tasks. It also contains options to
specify constraints and deadlines.
2. Type
Analysis
Complete in the
Name
text
box.
3. Select
the Mark task
as
milestone
check
box.
You do
this to specify a task as a milestone
task.
4. Click
OK
to
close the Task
Information dialog
box.
Figure
11.5 displays the Mark task
as milestone check box
selected.
Figure
9.5: Creating
Milestone Tasks
A
milestone task is displayed as a task
with no duration next to it in
the Gantt
chart
view. Similarly, you create
other milestone tasks in the
Project file.
Recurring
Tasks
Recurring
tasks, as the name suggests, occur
repeatedly at regular intervals.
For
example,
a weekly project meeting
with all the team members is a
recurring task.
You can
schedule a recurring task in a project
plan cycle as daily,
weekly
monthly,
or yearly. You make this selection
after deciding the
seriousness of the
375
Software
Project Management
(CS615)
nature of
the task. The seriousness of
the nature of the task
determines how often
the task
needs to recur.
For
example, if it is a simple meeting to
take stock of the situation,
you can select
the
weekly option. Similarly,
you can annually schedule a
high level meeting of
the board
of directors. However, if an ongoing
project is faltering due to
frequent
slippages,
you need to closely monitor
the activities of the
project. To monitor
the
project
activities effectively, you can
convene a meeting every
day.
You can also
schedule the start and end
dates of a recurring task.
For example, for
XYZ Ltd.
you need to create the
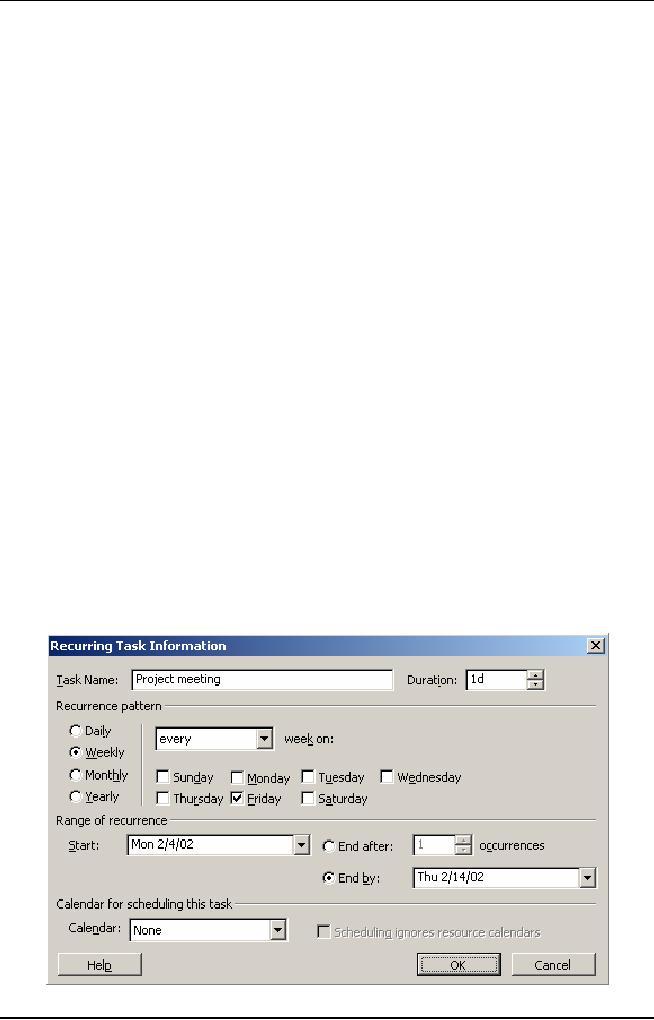
recurring task Project Meeting
under the
Analysis
task. The Project Meeting
task recurs every Friday
until March 14,
which is
the project end date. You can
create this task by using
the Insert menu,
and then
specify the details in the
Recurring Task Information
dialog box. To
create
the recurring task you
perform the following
steps.
1. Select
the task row where you
want the task to
appear.
2. Click
the Insert
menu.
3. Click
the Recurring Task command
to display the Recurring
Task Information
dialog
box.
4. Type
Project meeting in the Name
text box.
5. Select
the Friday check box in
the Recurrence pattern group
box. This step
specifies
that the task should recur
every Friday. Note that
the Weekly option
button is
selected by default.
6. Click
the End
by option
button.
This
ensures that the weekly task
should continue only until
February 14. Figure
11.6
displays this step.
376

Software
Project Management
(CS615)
Figure
9.6: Creating
Recurring Tasks
7. Select
February
14 from
the calendar.
8. Click
OK
to
close the Recurring
Task Information dialog
box.
A
recurring task appears with a special
circular arrow symbol in the
indicator
field. In
the Gantt chart view, it
appears at intervals on all
the days it is scheduled
until
the last date
specified.
11.4
Adding
Constraints to Tasks
Constraints
are defined as1illitations
that negatively affect the
schedule and
quality
of a project. Some of the
typical project constraints
are mentioned below:
Duration
of a project
Resources
of a Project
Performance
goals of a project
A
constraint also affects other
constraints. For example,
you may need
more
resources
if you reduce the project
duration. You may also have to
forgo some of
the goals
and features of the project if
you decide to reduce the
project duration.
Therefore,
it is important that you
decide the tradeoff
judiciously.
In
Microsoft Project, you can
specify constraints as limitations
that are enforced
on a
task. For example, you can
specify that a task must
start on a particular
date
or not
finish later than a
particular date. Therefore,
schedule-related constraints
are
available in Microsoft
Project.
·
As soon as possible
(ASAP)
·
As late
as possible (ALAP)
·
Start no
later than (SNLT)
·
Finish on
later than (FNLT)
·
Start no
earlier than (SNET)
·
Finish no
earlier than (FNET)
·
Must
start on (MSO)
·
Must
finish on (MFO)
ASAP
When
you use this constraint,
Microsoft Project schedules a specific
task as early
as possible.
For this reason you do
not mention a specific date
for such a task.
Microsoft
Project automatically assigns
this constraint when you
schedule a new
task from
the start date of a project.
To change this constraint to a
specific
constraint,
you can assign a specific
start date to it.
ALAP
When
you use this constraint,
Microsoft Project schedules a specific
task as late
as possible.
This is the reason why no
specific date is mentioned
for such a task.
377

Software
Project Management
(CS615)
Microsoft
Project automatically assigns
this constraint when you
schedule a new
task from
the finish date of a
project. To change this constraint to a
specific
constraint,
you can assign a specific
finish date to it.
SNLT
You select
this constraint to specify
the latest possible start
date of a task. For
example,
you want to conduct a
training program on quality
standards for the
development
team. You want to conduct the
training program before
the
development
phase begins so that you
have enough time on hand.
Therefore, you
select
the SNLT constraint and
specify the start date
that is before the start of
the
development
phase. This means the
training begins on or before the
specified
date. You
also keep in mind the
duration of the training.
Suppose it is a two-day
training
program and the project
development start date is
February 15.
Therefore,
after
selecting the SNLT
constraint, you will enter
the start date of the
training as
February
13.
FNLT
You select
this constraint to specify
the latest possible date by
which a task can be
completed.
For example, you want
the project proposal task to be
completed on or
before
the analysis phase, which is
scheduled to start from
February 20.
Consequently,
by enforcing this constraint on
the project proposal task,
you
ensure
that the finish date
for this task is the same as
the start date for
the analysis
phase.
SNET
This
constraint enables you to
schedule the start date of a
task as early as possible.
This is
different from the ASAP
constraint because the ASAP
is a vague
constraint
with no specific start dates
for a task. However, by
choosing the SNET
constraint,
you can specify an early
start date for a task.
For example, the task
to
create
test cases is dependent upon the
construction and the unit
testing phases.
Therefore,
the task to create test cases
cannot begin unless the
earlier two tasks
are
over. In this case, you
would enforce the SNET
constraint on the creation
of
test
cases and specify a start
date. This start date
cannot be before the end
date of
the
preceding tasks. Consequently, you can
create test cases any time
on or after
this
start date but not
before.
FNET
You select
this constraint when you do
not want a task to be complete
before a
scheduled
finish date. For example,
during the unit-testing task
you discover there
were
many bugs that were
addressed by the developers.
This makes you
skeptical
about
the quality of the product.
Therefore, you want to
extend the finish date
of
unit
testing and enforce the
constraint FNET on it.
Consequently, you will not
be
able to
finish the unit-testing task
before the specified
date.
378

Software
Project Management
(CS615)
MSO
This
constraint indicates that
you must begin a task only
on the specified start
date
and not
later or before that. This
is an inflexible constraint. It is
usually enforced
during a
short cycle duration project
when you are unsure
whether each task
mayor
may not start on time.
This may disturb the
planned schedule of the
entire
project.
You can enforce the MSO
constraint for critical
projects depending
upon
client
requirements.
MFO
If you
use the MSO constraint, it
is most likely that you
would use the
MFO
constraint
also. Using the MFO
constraint enables you to
focus on completing a
particular
task. It is useless if you
enforce a strict start date
with no strict finish
date
for completing a task. You can again
enforce this constraint for
critical
projects
depending upon client
requirements.
You
enforce or use a constraint on a task by
specifying the details in
the advanced
page of
the Task Information dialog
box. In that dialog box,
you can also specify
the
start and the end dates of a
constraint depending upon
the type of
constraint
that
you choose.
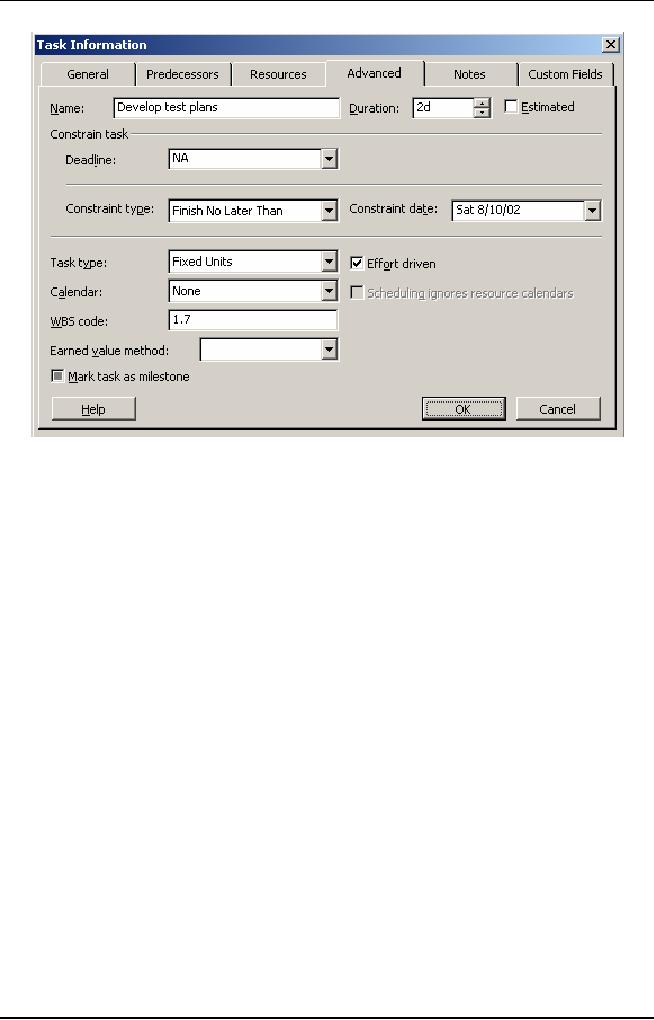
For
example, for XYZ Inc. you
need to add a constraint to
the Develop test
plans
task.
This task is a subtask of the Testing
task. After creating both
the tasks, you
specify
the duration of the Develop
test plans task. You want
that the task should
not
carry on for more than
two days. You also need to impose a
constraint that the
task
should not finish later
than August 10. However,
the management would
appreciate
if the task finishes before
that.
To add
the constraint to the
Develop test plans task, you
use the constraints
feature
in the Task Information
dialog box. To access the
constraints feature,
you
perform
the following steps:
1. Click
the Advanced
tab
in the Task
Information dialog
box.
2. Type
Develop
test plans in the
Name text box of the
Advanced
tabbed
page.
3. Type
2
in
the Duration
text
box
This
specifies the maximum time
allotted to complete the
task. 4. Click the
Constraint
type box.
4. Click
the Constraint
type box.
5. Select
the Finish
No Later Than option in
the displayed list.
6. Click
the Constraint
date list.
7. Select
August l0
as
the finish date from
the calendar that is
displayed.
Figure
9.7 displays this
step.
379
Software
Project Management
(CS615)
Figure
9.7: Adding
Constraints
8. Click
OK
to
close the Task
Information dialog
box.
The
Develop test plans task is displayed
with an icon for Finish No
Later Than
constraint
in the Task sheet of the
Gantt chart view.
Tip:
After
specifying a constraint type and
its date, it is a good idea to
specify the
details
of choosing a particular constraint
type and its date.
Subsequently, you
may
want to share this
information with your
colleagues in meetings. This can
be
done by
clicking the Notes tab in
the Task Information dialog
box and entering
your
comments.
11.5
Adding
Deadlines to Tasks
Deadlines
are strict finish dates
for a particular task.
Microsoft Project considers a
deadline
to be a target date to complete a
task. You add a deadline to a
specific
task if
you track the progress of
that task. Setting realistic
deadlines to tasks also
enables
you to schedule the subsequent
tasks.
Deadlines
are important because they
depict the finish date of a
task. Therefore,
you can
track whether a task has
exceeded the planned time or
is completed
before
time. If the task is taking
longer than expected, you can take
remedial
measures
such as adding resources. Adding
deadlines does not affect
project
schedule
nor does it enforce a date
constraint. However, it marks a task
that has
crossed
its deadline with an
indication mark next to
it.
380

Software
Project Management
(CS615)
In the
.mpp file that you
are creating for XYZ Inc.,
you need to set July 15 as
the
deadline
for the task Assign
development staff; which is a subtask of
the
Development
task. To set the deadline,
you perform the following
steps:
1. Create
the task Assign
development staff by using
the Project
menu.
2. Select
the Assign
development staff task.
This is
the task for which you
need to set a
deadline.
3. Click
the Advanced
tab
in the Task
Information dialog
box.
4. Click
the Deadline
list
box in the Advanced
page.
This is
done to specify the deadline
for the Assign development
staff task.
5. Select
July
15 in
the calendar to specify the
deadline date.
6. Click
OK
to
close the Task
Information dialog
box.
Similarly,
you can add deadlines for
the other tasks for
the XYZ Inc. project.
11.6
Setting
Dependencies between
Tasks
There is
dependency between tasks
when a particular task cannot
begin until its
preceding
task is completed. For example,
the creation of the
high-level design of
a project
cannot start until the
client signs off the SRS
document. The SRS
document
serves as a prerequisite for
the immediate subsequent
phase.
In
Microsoft Project, you can
specify four types of
dependencies:
·
Finish-to-Start
(FS)
·
Start-to-Start
(SS)
·
Finish-to-Finish
(FF)
·
Start-to-Finish
(SF)
FS
In
dependency relationships of tasks,
the name of the relationship consists of
the
start or
finish dates of the
predecessor task and the start or
finish date of the
successor
task. For example, the
relationship between the task to
finish the SRS
document
and the task to begin the
high level design is FS.
This is because you
link
the finish status of the
predecessor task to the start status of
the successor
task. FS
is the default relationship
when you link any
two tasks.
SS
In
addition to FS, you can also
begin two tasks at the
same time. For
example,
you can
begin the task to do functional
testing and integration testing of
the
testing
phase simultaneously. The
dependency in a SS relationship occurs
when
both
the predecessor and the
successor tasks start at the
same time. This is
because
these tasks do not share
any common component nor
are they dependent
on each
other. Therefore, the link
between them is SS.
381

Software
Project Management
(CS615)
FF
You can also
begin two tasks that
finish simultaneously. In such a
case, the
dependency
relationship between the two
tasks is called an FF relationship.
For
example,
the task to prepare a checklist
for implementing a software
product
cannot
end unless implementation testing
for that software product is
complete.
SF
Finally,
you can have a SF relationship
between tasks. This relationship
indicates
that a
task cannot end until its
preceding task starts. This relationship
usually
takes
place when a project is scheduled
from the project finish
date. This
relationship
helps to minimize the risk
of delay of a predecessor task if
the
successor
task is dependent on the start of the
predecessor task. For
example, the
testing
phase can only start after
the coding phase is
complete.
11.7
Lag
and Lead Time between
Tasks
While
adding dependencies to tasks, you can
also specify lag and lead times
for
any
two interdependent tasks. Lag
time is defined as the
excess time that is
allowed
to lapse between predecessor and
the successor tasks. This
results in a
delay in
the start of the successor
task. For example, you
may use this option
if
you
feel that the tasks of
the analysis phase are
taking more than the
planned time
to
complete. Consequently, you
might not want to start
the high--level design task
as
planned but postpone it. In
this case, you would
calculate the maximum
lag
time
for the high-level design to
start.
You
specify the lag time
for a task as a positive value in
the Lag field cell of
the
Predecessors
page. This page exists in
the Task Information dialog
box.
Lead time
is defined as the overlap
that exists between two
dependent tasks. For
example,
you could decide to start
testing units when
developers have
partially
completed
creating the applications
for a project. Therefore,
you move ahead of
the
schedule of a successor task before
time.
You
specify the lead time for a
task as a negative value in the
same Lag field
cell
of the
Predecessors page. This page
exists in the Task
Information dialog
box.
Consider
an example to link two
tasks, procuring resources and
drafting a project
plan.
According to the plan,
securing resources is a predecessor task
while drifting
a project
plan is a successor task. You
need to link the two
tasks using the
start-to-
finish
relationship because it is anticipated
that the task to draft a
plan cannot start
before
the resources are procured
and incorporated in the project
plan. During the
course of
the project, you feel
that the successor task
cannot begin as
planned
because
procuring resources is too
time-consuming. You analyze and deduce
that
the
project plan can only be
drafted four days after
resources are
procured.
You link
the two tasks by using
the Edit menu. After
linking the two tasks,
you
set
the type of relationship as
start-to finish. Assume that
for the XYZ Inc:
382
Software
Project Management
(CS615)
project,
you need to link the
Develop code and Developer
primary testing tasks.
You have
created the Development
summary task before. Now,
you create these
two
tasks under the Development
summary task. Then, you
set a relationship
between
the tasks. Finally, you set
a four-day lag time between
the two tasks. To
link
tasks and set the lag
time between them, perform
the following steps:
1. Create
a task named Develop
code by using
the Project
menu.
2. Create
a task named Developer
primary testing below
the Develop
code task
by using
the Project
menu.
3. Select
Develop code.
4. Select
Developer primary
testing with
the Ctrl
key
pressed.
5. Click
the Edit
menu.
6. Click
the Link
Tasks command.
The
two tasks are displayed as
linked to each other in the
Gantt chart view as
you
see in
Figure 11.8.
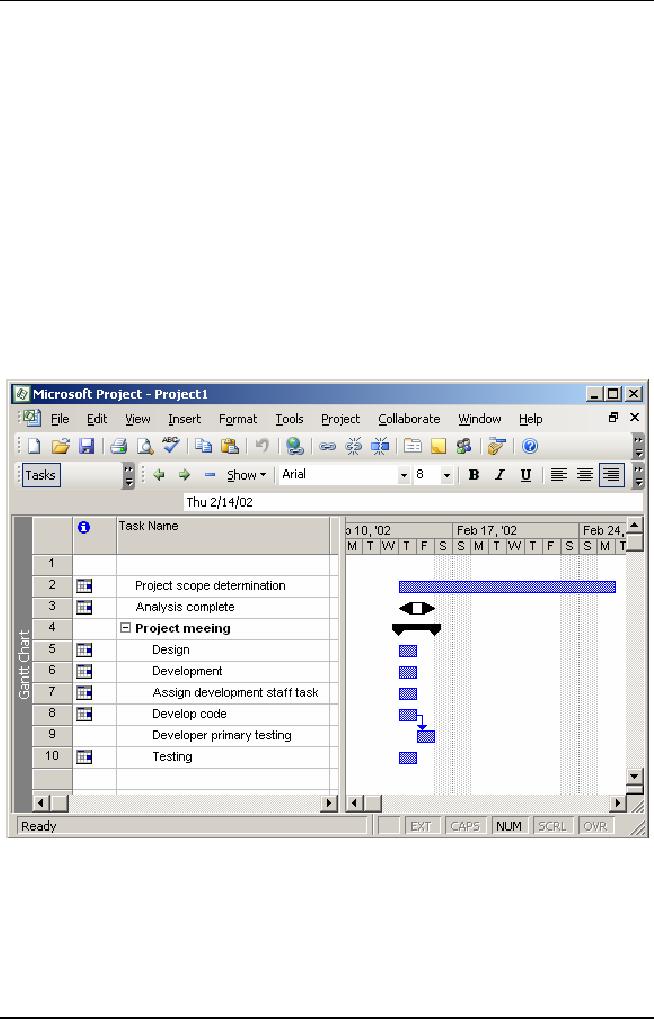
Figure
11.8: Linking
Tasks
383
Software
Project Management
(CS615)
7. To
estab1ish the start-to-finish,
relationship between the two
tasks, select
the
Developer
primary testing task and
click the Project
menu.
8. Click
the Task
Information command.
This
information displays the
Task Information dialog box
wherein you can
establish
a defined relationship between
the two tasks by using
the
Predecessors
tab.
9. Click
the Predecessors
tab
in the Task Information
dialog box.
10.
Select the Start-to-Finish
(SF) relationship
in the Type
field
cell.
This
defines a start-to-finish relationship
for the tasks.
11.
Type 4d
in
the Lag
field
cell to specify four days
lag time between
the
two
tasks. This step is displayed in
Figure 11.9.
Figure
11.9: Specifying
Value for the Lag
Field
12.
Click OK
to
close the dialog box.
The
tasks Develop code and
Developer primary testing
appear linked to each
other
with the symbol of
Start-to-Finish relationship in the
Gantt chart view.
11.8
Splitting
Tasks
384

Software
Project Management
(CS615)
A split
in a task is defined as an abrupt and sudden
interruption in the
planned
schedule.
The need to split tasks
arises because practically no task can
be
completed
without a break. Due to resource
crunch, a planned task is
normally
halted
for some time.
For
example, at XYZ Inc., both
the tasks to train
developers and to test a software
module
require a Windows 2000 Server.
However, depending upon the
criticality
of the
tasks, you can split one of the
non critical tasks. In this
case, you decide to
stop
testing the software module
and continue training the
developers. To specify
the task
using Microsoft Project, you
first create a Testing task as
the summary
task.
After creating the Testing
task, you create the
Unit testing task under
the
Testing
task. Next, you split
the Unit testing
task.
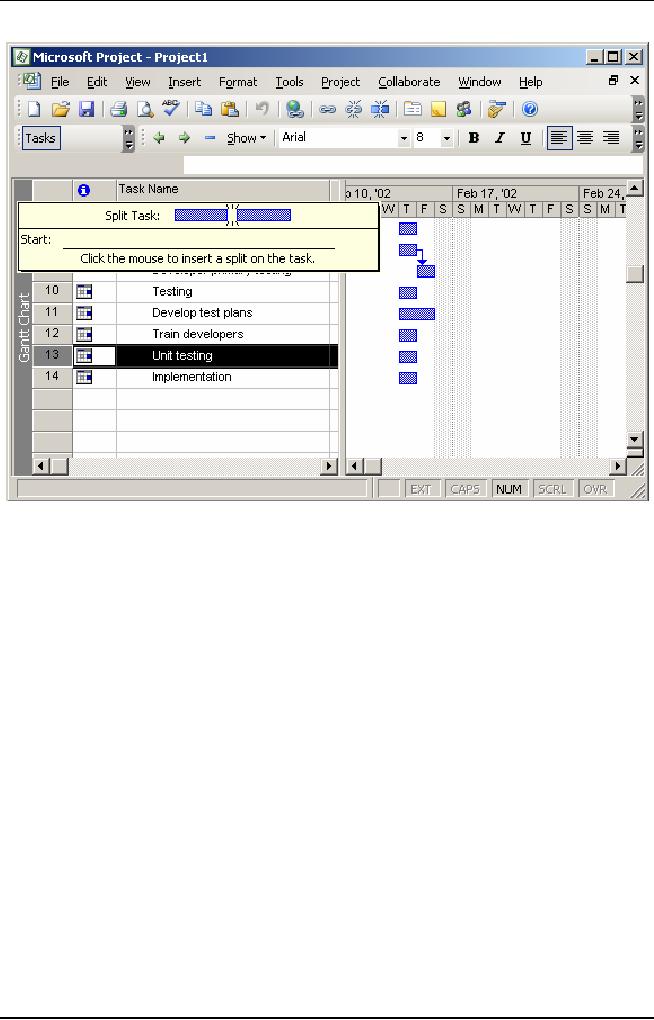
To split
the Unit testing task,
you perform the following
steps:
1. Create
a task named Unit
testing below
the Testing summary
task.
2. Select
the Unit
testing task.
3. Click
the Edit
menu.
The
Edit menu contains the
command that enables you to
split a task.
4. Click
the Split
Task command
on the Edit menu.
Upon
clicking the Split Task
command, the shape of the
cursor changes. In
addition,
a small yellow box with a
tool tip suggesting how to
split a task
hovers on
the task view of the
Microsoft Project
window.
5. Drag
the changed mouse cursor over
the task in the Gantt chart
view.
385
Software
Project Management
(CS615)
Figure
11.10: Splitting
Tasks
In Figure
11.10, you can see the task
being split into the
required number of
days.
To split
a task for a specified number of
days, you drag the mouse
pointer to a
particular
date. For example, a task is
scheduled to start from May
5. You want a
part of
the task to start again from
May 15. Therefore, there is
a gap between May
5 and May
15. To start the task again
from May 15, you drag
the last end of the
task and
release the mouse pointer on
May 15 in the Gant Chart
view.
11.9
Assigning
Resources and Resource Costs to
Tasks
Resources
are means that help
convert input to a task into
output for the
task.
Resources
are assigned to tasks for
the following
reasons:
·
To track
the costs of each
resource
·
To track
the work completed and the
material resources used in a
project
There
are two types of resources,
work and material. Work
resources refer, to
the
people and
equipment. At the end of a project,
these resources are not
consumed.
Unlike
work resources, material resources
are used completely by the
end of the
project.
For example, to complete the
task of writing the code for
a module, you
need
human and material resources. You need
material resources such
as
hardware,
software, and electricity.
386
Software
Project Management
(CS615)
Assigning
resources to a task is a two-step
process. First, you add
the available
resources
to a project. You can do this by adding
resources by using the
View
menu and
then clicking the Resource
Sheet command on the View
menu. When
you
click the Resource Sheet
command, Microsoft Project
changes the default
Gantt
chart view to the Resource
Sheet view. Figure 11.11
displays the Resource
Sheet
view.
Figure
11.11: Resource
Sheet View
Suppose
for the XYZ Inc. project,
you want to add a hardware
resource in the
Develop
prototype task. The steps to
add the resource are as
follows:
1.
Create a
task named Develop prototype below
the Analysis summary
task.
2.
Select
the Develop prototype
task.
3.
Click
the Tools menu.
4.
The
Tools menu contains the
command to add a resource.
5.
Point to
the Resources
command.
6.
When
you point to the Resources
command, the Assign
Resources command
of the
Resources command of the
Resources submenu is
displayed.
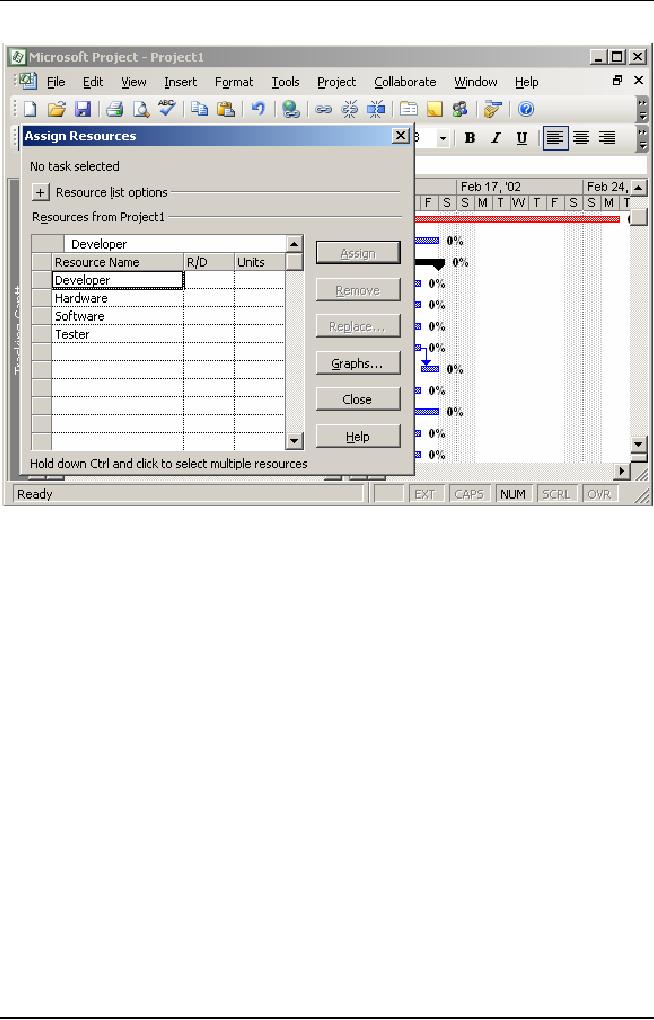
7. Click
the Assign
Resources
command. Figure 11.12
displays the Assign
Resources
dialog box.
387
Software
Project Management
(CS615)
Figure
11.12: Assigning
Resources to Tasks
The
Assign Resources dialog box
contains two fields, Name
and Units. The Name
field
indicates the name of the
available resources in the resource
pool or a
project.
The Units field indicates
the number of resources that
can be used for a
particular
resource.
You can
use the Assign Resources
dialog box to assign units
for both work and
material
resources. The unit for work
resources is specified in terms
of
percentage.
However, the unit for
material is specified as a numeric
value.
For
example, you may select
three computers or five
workstations for the
development
team of a project. These values are
not more than the
predetermined
value
set for a resource in the
Max.Units field of every resource in
the Resource
Sheet
view.
Select
the hardware resource for
the Develop prototype task.
You close the
Assign
Resources dialog box by
clicking the Close button.
The hardware resource
is added
next to the Develop
prototype task.
11.10
Assigning Costs to
Tasks
388

Software
Project Management
(CS615)
Cost is an
important aspect of project
scheduling. Controlling costs
ensures the
optimal
use of resources. For example, to
complete a specific task in a
project
plan,
you can assign more
resources to that task.
Alternatively, you can
increase
the
duration of that task depending on
the cost of the resources
that are used by
that
task.
You can
assign two rates for
any type of a resource. The rate
for work resources
are
calculated on an hourly basis.
However, the rate at which
the materia1
resources
are calculated can be:
·
Standard
rate: The normal rate at
which a resource is procured
·
Overtime
rate: The rate that you
pay if you overuse a work
resource
For
example, for the XYZ Inc.
project, you need to specify
the standard and the
overtime
rates for a work resource named
Tester. To do this, you
first assign the
work
resource Tester to the Unit
Testing task that you
created earlier.
After
assigning
the resource to the Unit
Testing task, perform the
following steps to
assign
rates to the
resource:
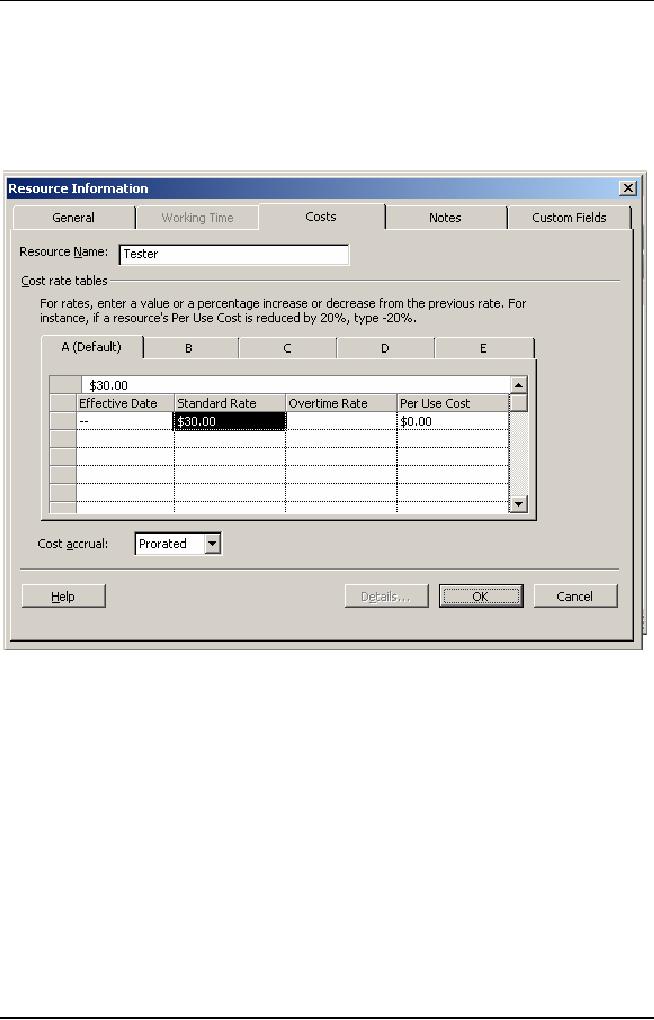
1. Click
the Resource
Sheet view of
Microsoft Project
The
Resource Sheet view is used to
display all resources and
their respective
costs.
2. Type
Tester in the first cell of
the Resource Name
column
3. Select
Tester.
You do
this because that is the
work resource for which you
need to specify
the
standard and overtime rates.
4. Click
the Project menu to display
the Resource Information
command.
5. Click
the Resource Information command on
the Project menu.
6. Click
the Cost tab in the dialog
box.
The
costs tab provides information
about the standard and overtime
rates and
the cost
per unit of a particular resource.
7. Type
$30.00/h in the first cell
of the Standard
Rate column as
shown in
Figure
9.13.
8. Type
$10.00/h in the first cell
of the Overtime
Rate column.
The
rates can also be entered as negative
values to denote the decrease in rate
as
compared, to
previous rates or as positive
values to denote a comparative
increase
in rate,
such as +20% or -20%.
9. Click
OK to close the Resource Information
dialog
box.
389
Software
Project Management
(CS615)
While
calculating costs for work
resources; Microsoft Project calculates
the resource cost
by the
hourly rates that you
specify and the time
required for completing a
task.
However,
when you assign a material
resource to a task, Microsoft Project
automatically
calculates
the total cost of the resource by
using the material resource rate
specified by
you and
the quantity of material
required for completing the
task.
Figure
11.13: Assigning
Costs to Resources
11.11
Tracking a Project
Plan
Project
management is a multiple-phase undertaking.
The first phase is the
project
initiation
or the project planning
phase. This phase is
followed by the
project-
tracking
phase. Finally, you wrap up
a project with the-project-end
phase. Project
tracking
is an extremely in important activity in
an organization. Unless a
project
is
tracked effectively, it might
never come close to termination. Project
tracking
also
ensures strict adherence to
project plans, requirements, and
schedules.
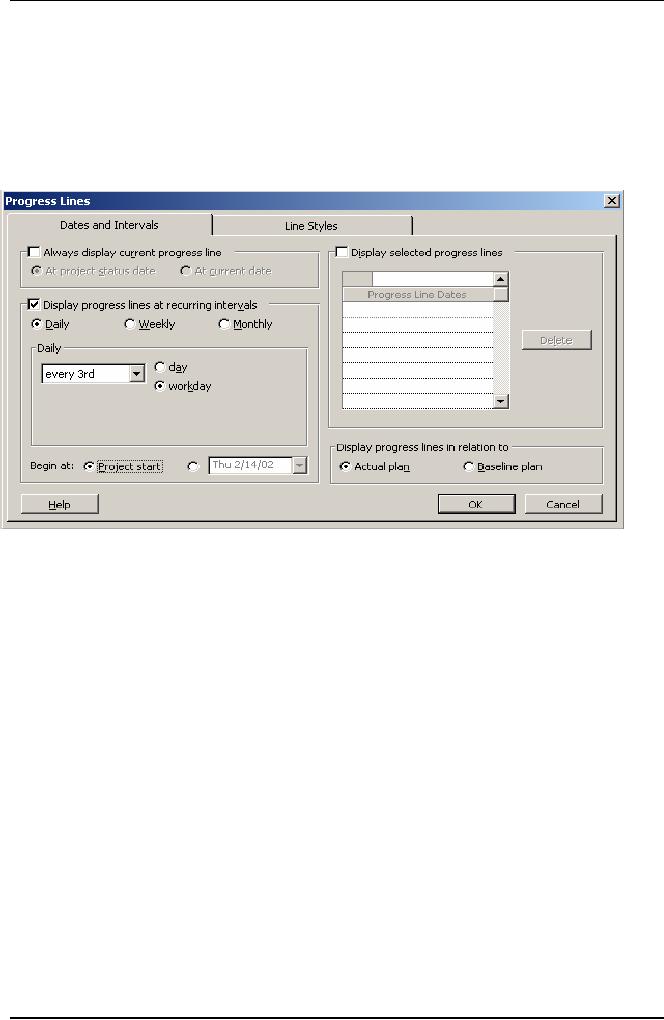
Progress
Lines
To track
a project plan, you first
view the progress of a
project. You can view
the
progress
of a project by applying progress
lines to the tasks in the
project. You
can
display progress lines in
three ways,
390

Software
Project Management
(CS615)
391
Software
Project Management
(CS615)
Figure
11.15: Progress
Lines in the Gantt Chart
View
Project
Baselines
Project
baselines are another way of
depicting the progress of a
project. Baselines
are
indicators that help you
compare the actual start
date with the planned
start
date of a
project. They also help compare
the actual cost incurred
with the
planned
cost for a project. After
preparing a project plan for
tasks, you can save
the
plan as a baseline. This serves as an
ideal plan for you to
compare the actual
performance
of the project with the
baseline that you
save.
To save a
project plan as a baseline, perform
the following steps:
1. Click
the Tools
menu, and
point to the Tracking
command.
2. Select
the Save
Baseline command
on the Tracking
submenu.
3. In the
Save
Baseline dialog
box, select the Save
baseline and Entire
project
option
buttons to save a baseline of the
entire project.
4. Click
OK
to
close the Save
Baseline dialog
box. You can also save a part
of
the
project plan by saving a few
tasks as baselines by clicking
the Selected
tasks
option button.
To view
the deviation from a baseline
performance to the actual
performance
of a
project, perform the
following step:
392
Software
Project Management
(CS615)
5. In the
Project
Information dialog
box, click the Statistics
button to
view the
project
statistics for the
Sample-Project.mpp dialog box.
This dialog box is
displayed
in Fig 11.16.
Figure
11.16: Displaying
Project Baseline
Information
The
dialog box displays critical
and summarized information about
the variance
values of
the start and finish dates
of a project, work completed in
hours, cost, and
duration
in days. Higher the variance
of a column, higher is the
degree to which a
project
does not conform to the
baseline plan. The actual
values are displayed
in
the
dialog box.
You can compare
the baseline values for all
these factors with the
actual values of
a task to
conduct project plan
analysis.
11.12
Recording and Updating Tasks
One
way of tracking a project
schedule is by determining the
actual work done by
a resource.
After doing that, you
compare it against the total work to be
done
initially.
Using these factors, you can
calculate the remaining work
that needs to
be done in
the rest of the project
cycle.
393

Software
Project Management
(CS615)
For
example, you need to check
the status of the Test
component modules task in
the XYZ
Inc. project .This task
exists under the Testing
summary task. You use
the
Task Sheet view to record
the actual work done by a resource and
calculate
the
work that remains to be
done. To do that, perform
the following steps:
1. Select
the task Unit testing for
which you want to view
the task completion status.
This task
exists under the Testing
summary task.
2. Click
the View menu.
3. Click
the Table Entry
command.
4. Click
the Work command on the
Table Entry submenu
After
doing this, four fields
appear: Work, Baseline,
Actual, and Remaining.
You update
the Actual field value
with the current amount of
work done.
Microsoft
Project automatically updates
the Remaining value after
comparing the
Actual
value with the value in
the Work field.
Alternatively, you can update
the
value of
the remaining field to a
number that you feel is
correct. Consequently,
Microsoft
Project updates the
Tota1figure in the Work
field. It also displays
the
difference
in the previous Work and the
current Work, values in the
Variance
field.
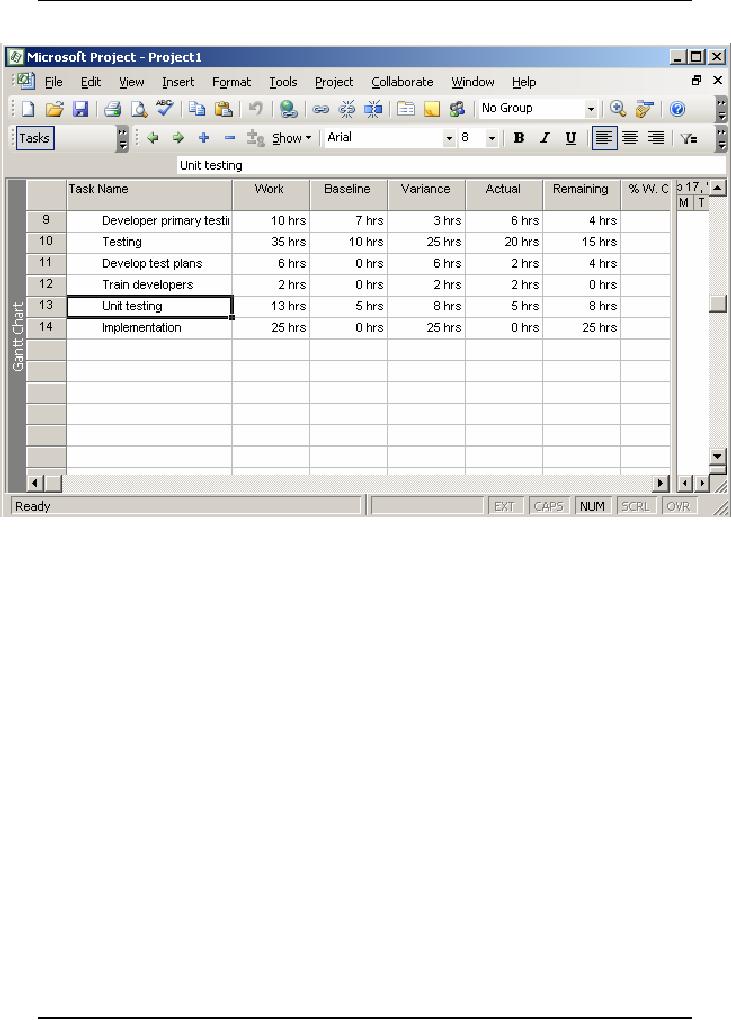
For
example, the Work field in
Figure 17 displays the value
20. You update the
Actual
field with the value
13. Consequently, the
remaining field would
automatically
show 7. However, you can
modify the Remaining field
to display
the
value 10 if seven days are not
adequate. Notice that the
Work field displays
the
value 27, and the value in
the Variance field is
3.
394
Software
Project Management
(CS615)
Figure
11.17: Updating
the Status of Tasks
Note:
You can also update
the percentage of work
completed by specifying
the
value in
the Percent complete spin
box. The Percent complete
spin box is
present in
the General tab of the Task
Information dialog
box.
Consequently,
Microsoft Project updates
the actual and remaining
work in
the
work sheet of tasks.
11.13
Rescheduling Tasks
Using
Microsoft Project, you can reschedule
the tasks of a project.
Rescheduling
involves
modifying the start or
finish dates of a task. For
example, you need to
reschedule
the start date of the
Create user manuals task.
This task exists
below
the
Development summary task. To
reschedule an incomplete task,
perform the
following
steps:
1.
Create a
task named Create user manuals under
the Development task.
2.
Make
the Development task a summary task by
using the left indent
Icon.
3.
Select
the Create user manuals
task.
4.
Click
the Tracking command on the
Tools menu.
5.
Click
the Update Project command
on the Tracking submenu, to
display the
Update
Project dialog box. Figure
11.18 displays this dialog
box.
395

Software
Project Management
(CS615)
Figure
11.18: Rescheduling
Tasks
6.
In the
Update Project dialog box,
select the Reschedule uncompleted
work to start
after
option. This option is used
to reschedule an incomplete
task.
7.
Specify a
new start date for
the Create user manuals
task.
8.
Select
the Selected tasks option to
reschedule a task. If you
need to reschedule
entire
project, choose the Entire
project option.
9.
Click
OK.
11.14
Modifying the Duration of a Project
Plan
During
the course of a project, schedule,
cost, and effort slippages
are quite
common.
Therefore, you sometimes need to
modify the project start and
end
dates.
Normally the start date is
modified for short cycle
projects that need an
early
head start. Finish date is
modified when you are
unable to meet the
project
end date
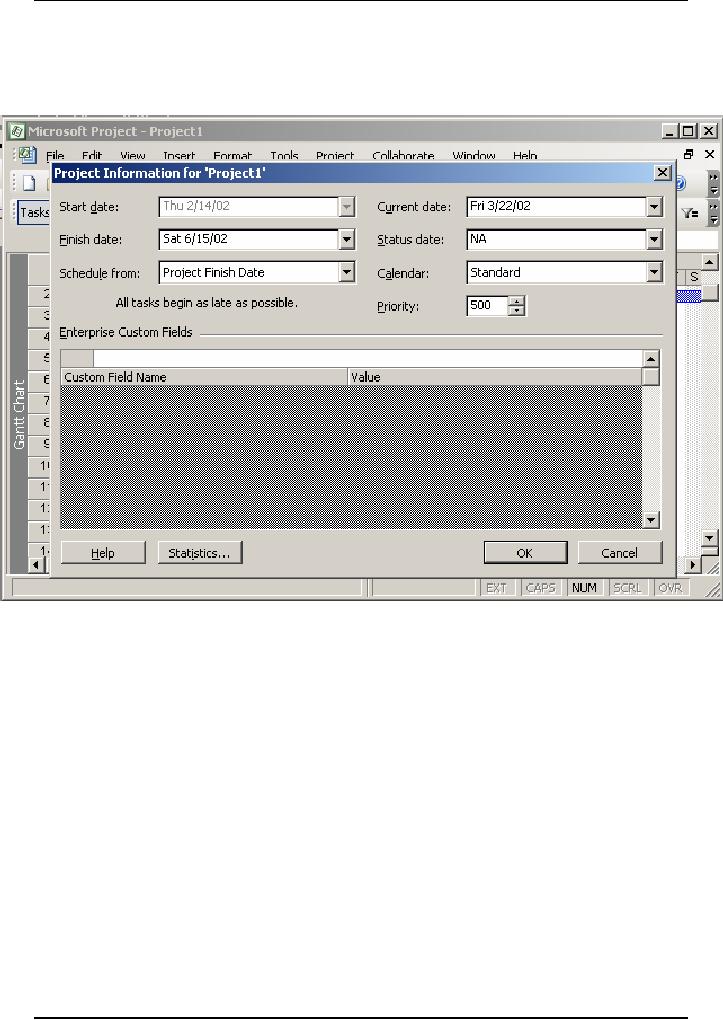
due to slippages. Assume that the
project starts on February 15 and
you
change
its finish date from June 10
to June 15. To do this, perform
the following
steps:
1. Click
the Project
menu
2. On the
Project menu, click the
Project
Information command.
This displays the
Project
Information dialog
box.
3. In the
Project Information dialog
box, click the Schedule
from list
box.
4. Select
the Project
Finish Date option
from the Schedule from
list.
396
Software
Project Management
(CS615)
5. Click
the Finish
date box, and
select June 15 from the calendar of
the month
June.
This step is shown in Figure
11.19.
6. Click
OK.
Figure
11.19: Modifying
the Plan Duration
You have
modified the project finish
date from June 10 to June 15. You can
view the
change in
the Gantt chart view of
the project.
11.15
Displaying Project Information
Using Reports
You
create reports to display
project-related information in a tabular
format,
which is
easily comprehensible. Project
reports provide a picture of
the status of a
project.
The status of a project helps
measure the progress of it.
Reports can be
prepared
for a specific phase or for
all the phases at one
time.
Creating
Standard Reports
Using
Microsoft Project 2000, you
can create two types of standard
reports:
·
Standard resource
report: You create standard resource
reports to display
resource
allocation and the costs
incurred on them
397
Software
Project Management
(CS615)
·
Standard task
report: You create standard task reports
to display information
regarding
tasks and the duration to
complete each task in a
project.
To create
a report on the resources
listed in the Sample-Project.mpp
file, perform
the
fo1lowing steps:
5.
Display the Resource Sheet
view of Microsoft
Project
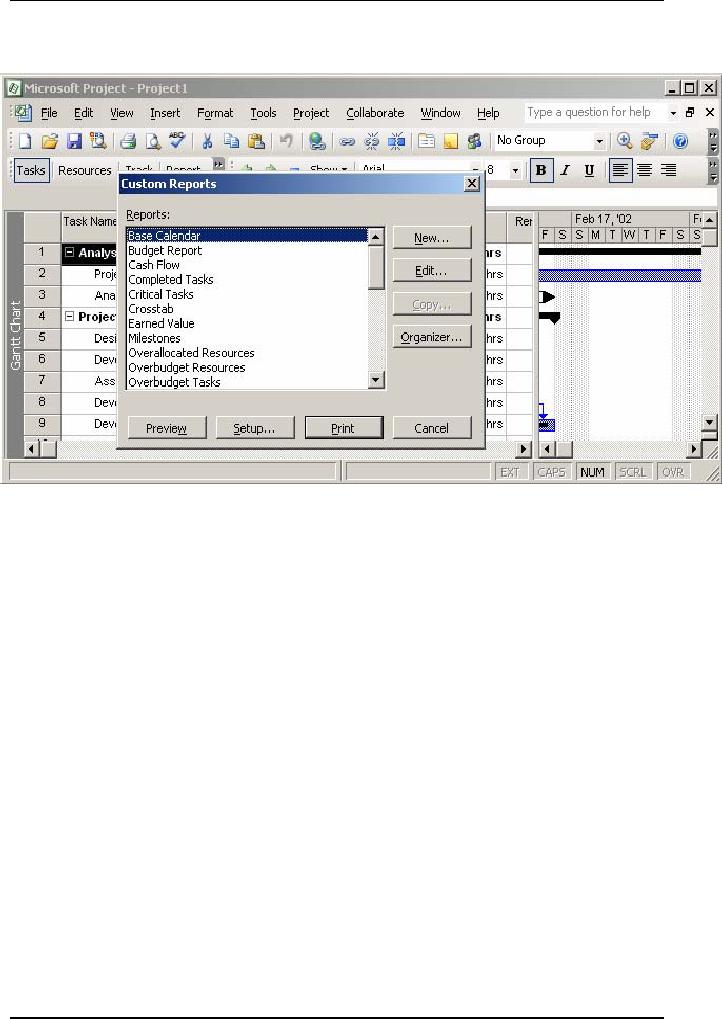
6. Click
the View menu.
7. Click
the Reports command.
This
command displays the Reports
dialog box. This contains
the various
report
formats.
8. Select
the Custom icon to create a
new resource
Figure
11.20 displays the Custom
icon.
Figure
11.20: Displaying
the Custom Icon in the Reports Dialog
Box
5. Click
the Select button.
This
displays the Custom Report
dialog box.
6. Click
the New button.
This
way, you create a new
type of a resource report that is
not part of the list
of
reports
displayed. The Define New
Report dialog box is
displayed as shown in
Fig
11.21.
398
Software
Project Management
(CS615)
Figure119.21:
Defining
New Reports
7. In the
Report type box, select the
Resource option.
You do
this to create a report
displaying the various
resources used in a
project.
8. Click
OK to confirm your
selection.
The
Resource Report dialog box is
displayed as shown in Figure
11.22. In this
dialog
box, you specify the name of
the report. In the same
dialog box, you
can sort
the information to be displayed in
the report.
399
Software
Project Management
(CS615)
Figure
11.22: Resource
Report Dialog Box
9. Click
OK
to
confirm your
specifications.
After
the Resource Report dialog
box is closed, the Custom
Reports dialog
box is
displayed.
10.
Click the Preview
button to
view the report.
The
report is shown in Figure
11.23. To be able to view the
report, you
configure
a printer to the computer
that has Microsoft
Project.
Figure
11.23: Report
on the Resources Listed in the
Project1.mpp File
Similarly,
you can also view a report on tasks. To
view the report on tasks,
repeat
the
procedure for
creating
a report on resources in the
Gantt chart view of
Microsoft
Project.
Modifying
and Printing a Standard
Report
You might
need to modify a report to
display more information or to
display the
existing
information in a different format. To
modify the ways in which a
task is
displayed,
you Use the Task report
dialog box.
400
Software
Project Management
(CS615)
You can
modify an existing standard task or a resource
report by clicking the
Edit
button on
the Custom Reports dialog
box. This displays the
relevant reports
dialog
box.
For
example, to modify an existing
report to display only
summary tasks and add
gridlines
to each task for the XYZ
Inc. project, perform the
following steps:
1. Click
the Definition tab in the
Task Report dialog box.
The Task Report
dialog
box is
displayed in Figure
11.24.
Figure11.24:
Modifying
Reports
2. Click
the Show summary tasks
check box.
This
check box is used to display
only the summary tasks in a
project. For
example,
in the current project file,
selecting this check box
would display only
the
broad-level tasks, Analysis,
Design, Development,
Testing, and
Implementation
and not the subtasks below
each one of them.
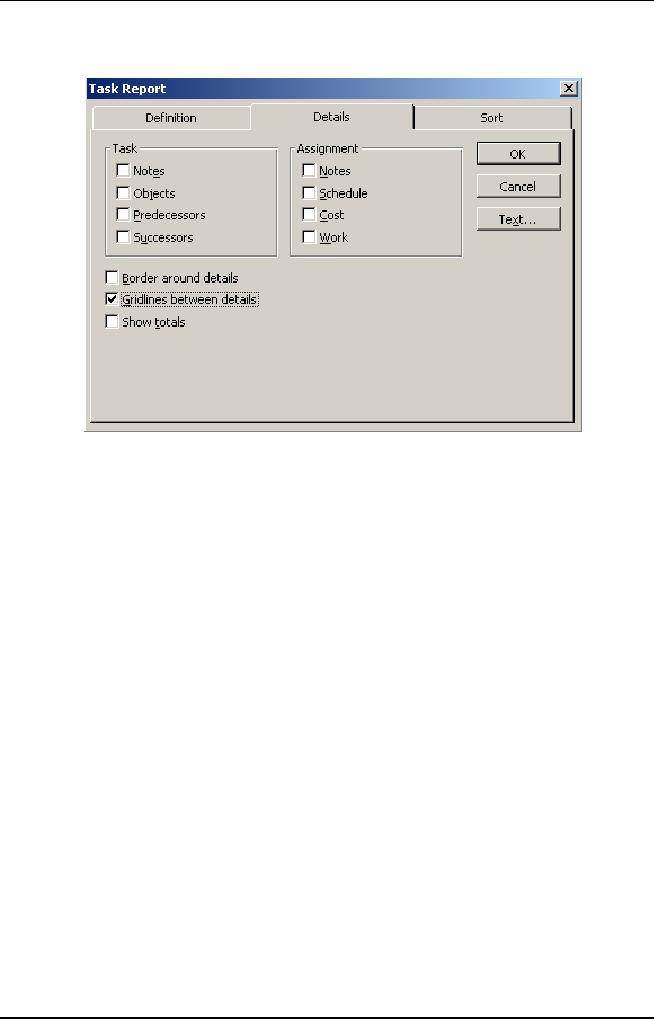
3. Click
the Details tab.
4. On the
Details page, select the
Gridlines between details
check box.
The
Gridlines between details
check box is shown selected
in Figure 25.
401
Software
Project Management
(CS615)
Figure
9.25: Selecting
Gridlines between details
Check Box.
5. Click
OK to close the Task Report
dialog box.
In Task
Report dialog box, you can
display specific fields in
the Definition tab.
In
addition,
you call also use the
Details tab to display a summary of
tasks in
gridlines
and resources.
You can also
sort a report on different
fields displayed on a
report.
Printing
a Standard Report
Printing
a standard report is really simple. In
the Define New Report
dialog box,
you
click the Print button to
print a report.
Figure
1126 displays the Define New
Report dialog box. Clicking
the Print button
in the
Custom Reports dialog box,
displays the Print dialog
box.
402
Software
Project Management
(CS615)
Figure
11.26: Printing
a Report
403

Software
Project Management
(CS615)
Finally,
you can see the
Sample-Project.mpp file that
you are creating for
XYZ
Inc.
complete with all the
components that you have
added.
12
Commissioning
& Migration
12.1
Software
Implementation
After
the software product is
developed, the challenge
lies in seeing the
system
work
successfully at the user-end.
Product implementation is the
crucial activity
of
actually handing over the
product to the users. The
product moves from
the
theoretical
environment of the development team to
the practical environment
of
the
user. Implementation begins with
the preparatory activities of
planning,
training
the user staff, and testing
the system. After the
preparatory activities
are
complete,
the new system is installed
and configured at the user
end.
Implementation
marks the end of product
development. After this, the
product is
handed
over to the maintenance
team.
Implementation
Prerequisites
The
purpose of implementation is to organize and
implement the new or
updated
system.
Most of the time,
implementation is a contract-based activity.
The
contract
provides details of the
implementation activity.
Implementation
procedure
includes details such as the
scope, method, and duration
of
implementation.
There are some prerequisites of
implementation. They
are
finalizing
the number of licenses, procedures for
error logging, scheduling
system
changeover,
and procedure for maintaining
data backups. However, the
primary
task is to
organize a team to monitor
implementation.
An
implementation coordination committee is
set up to monitor
implementation
committee.
Other committee members include
line managers of other
departments
and members of
the development team.
IThe
committee performs various
activities. It identifies various
requirements of
implementation
process, such as arranging
for software licenses, project
software,
and other
standby facilities. The
committee looks into the
implications of the
system
environment, staff allocation
for implementation tasks, and
internal
communication.
The committee also devises
alternative methods
facilitating
system
changeover.
Key
Implementation Plans
The
various activities performed
during implementation are
preparing an
implementation
plan, a raining plan, an
acceptance plan, and a system
support
plan.
a.
Implementation Plan
404
Software
Project Management
(CS615)
The
first task of implementation is the
creation of the implementation
plan.
The
implementation plan contains
details of the methods of
system transfer
and the
timescale for implementation.
Details of hardware and
software
needed
for implementation are also
mentioned in the plan. The
plan contains
details
of date, location, and timescale
for implementation. The plan
also
mentions
the prerequisites of implementation, such
as the existing
network
environment
and the availability of related
software. You can look at an
implementation
plan in Table 12.1.
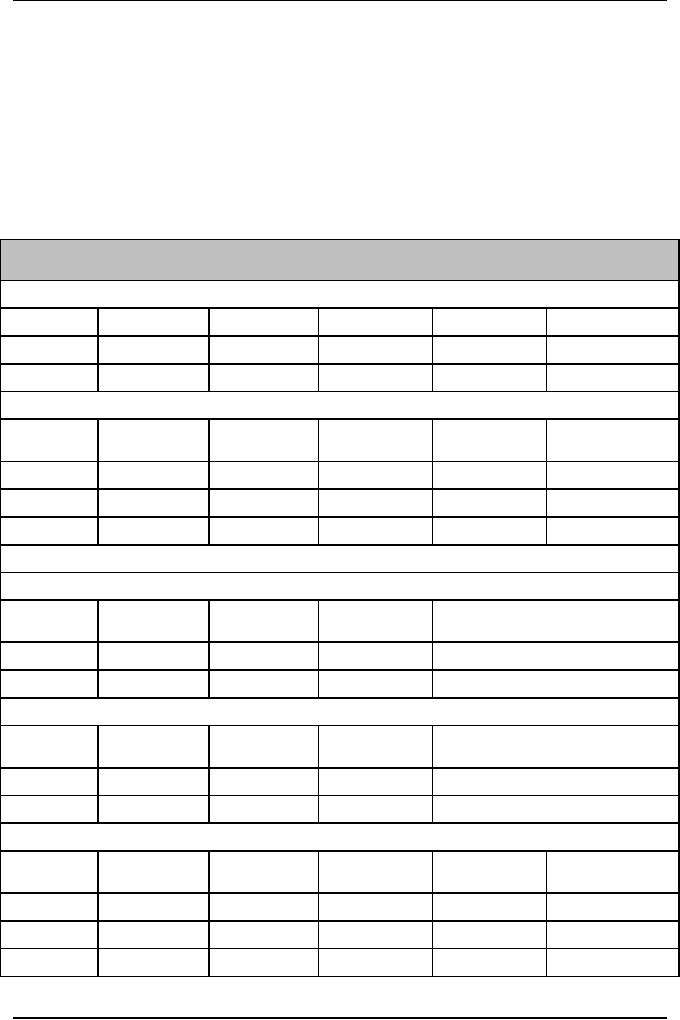
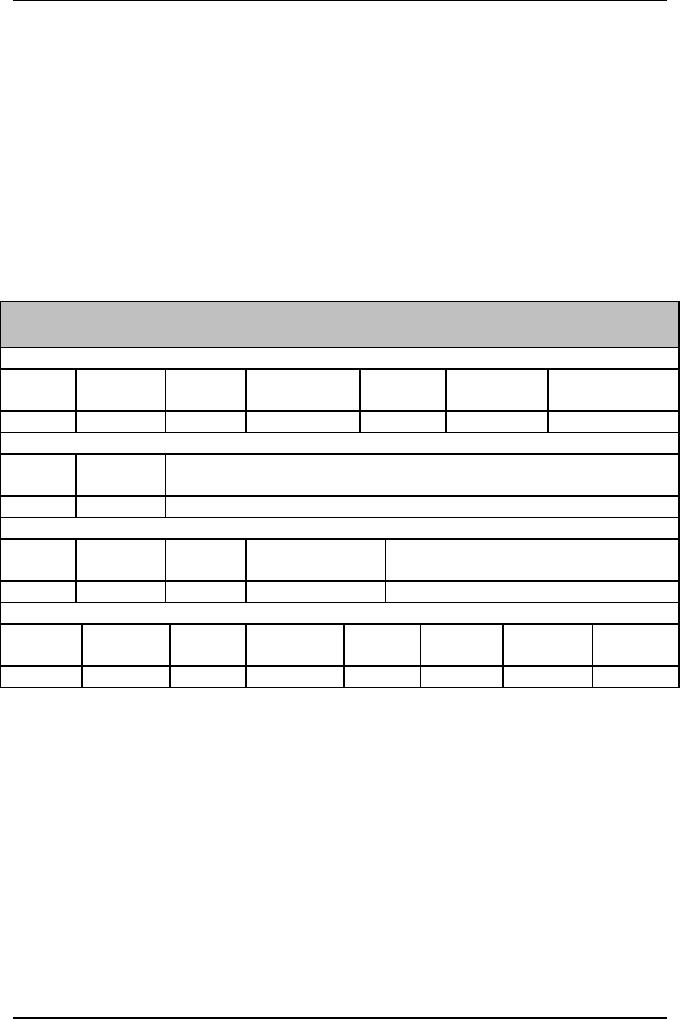
Table
12.1: Implementation
Plan
Implementation
Plan
1)
Implementation Schedule
Serial
No.
Location
Start
Date
End
Date
Days
Resources
2) Resource
List
Resource
Contact
Pager
or
Key
Resource
Serial
No.
E-mail
ID
Name
Name
Mobile
No.
(Y/N)
3)
Software Components for
Installation
3.1)
Server
Software
Space
Serial
No.
Version
Location
Name
Required
3.2)
Client
Software
Space
Serial
No.
Version
Location
Name
Required
4) Data
Migration
Data to
be
Location
of
Data
Mode
of
Serial
No.
Batch or
Script
Migrated
Server
Migration
Migration
405
Software
Project Management
(CS615)
In the
implementation plan, Implementation
Schedule section records
.details
such as
location and duration of implementation.
The Resource List
section
has a
list of the resources and
their contact numbers. The
plan has details of
the
server and clients in the
Components of Installation section.
Finally, the
plan also
contains data migration
details.
b.
Training Plan
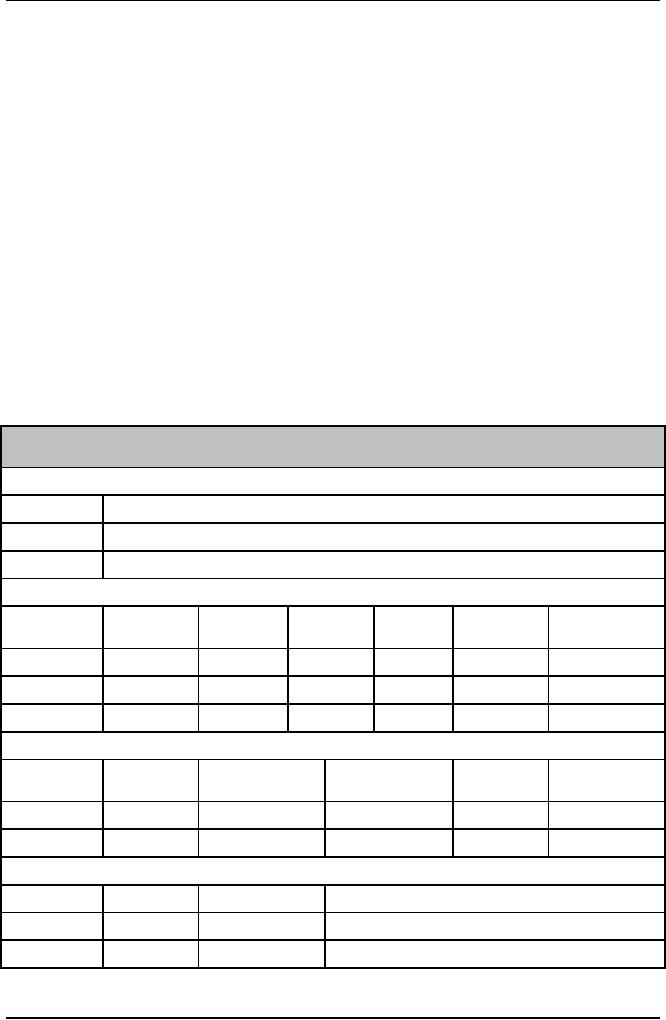
Preparing
a training plan is one of the
tasks of implementation. The
training
plan
contains details of the
participants to be trained. It also
mentions the
focus
area arid .the audience for
die training session. Training
schedule
containing
the training venue, training
name, start date and end
date is a part
of the
training plan. The plan
conveys budgetary details and
the roles and
responsibilities
of participants as well as the
faculty. A training plan
is
displayed
in Table 12.2. The plan
has details of the focus
areas of training,
courses
identified for training, and
training schedules. Roles and
responsibilities
of trainer are also included in
the training plan.
Table
12.2: Training
Plan
Training
Plan
1) Focus Areas
for Training
Serial
No.
Focus
Area
2)
Training Courses
Course
Number
of
Serial
No.
Duration
Category
Faculty
Details
Title
participants
3)
Training Schedule
Course
Serial
No.
Code
Start
Date
End
Date
Venue
Title
4) Roles
and Responsibilities
Member
Role
Back-up
Responsibilities
406
Software
Project Management
(CS615)
c.
Acceptance Plan
The
purpose of an acceptance plan is to
determine the details of
acceptance
testing.
The plan contains details
such as the order of testing
of functions,
location,
date, and duration of testing.
Details of participating members,
coordinators,
and users are also mentioned in
the plan. The acceptance
plan
lists
the procedure for bug
fixing, version control, and
verification and
validation
details. Procedure for the
creation of acceptance test cases
and
setting
up software and hardware environment is
also mentioned in the
plan.
The
acceptance plan in Table
12.3 contains details of the
acceptance schedule,
acceptance
criteria, list of resources, and a bug
report form.
Table12.
3:
Acceptance
Plan
Acceptance
Plan
1)
Schedule
Serial
From
Resource
Module
To
Date
Days
Documentation
No.
Date
Name
2)
Acceptance Criteria
Serial
Item
Acceptance
Criterion
No.
Name
3) Resource
List
Serial
Resource
E-mail
Telephone/Pager
Key
Resource (Y/N)
No.
Name
4) Bug
Reporting Procedure
Serial
Reported
Report
Closure
Assigned
Module
Bug
Fixed
On
No.
by
Date
Date
To
d.
System Support
Plan
The
implementation team prepares the
system support plan either
during or
before
product installation. The
system support plan contains
details of how
the
system will be supported after it is
implemented. Typically, the
support
plan
has a warranty clause. The
warranty clause usually lasts for a
year. The
warranty
covers details of people in the
support activities, details
of
agreement,
the response time, and
support details.
Implementation
Activities
After
the prerequisites are in place,
implementation activities begin in
right
earnest.
Now, all the plans
created for implementation
are put into
practice.
Implementation
activities include acceptance
testing, user and operator
training,
407

Software
Project Management
(CS615)
data
migration, installation and
configuration, product sign-off,
product wind-up,
post
mortem, and product
delivery.
i.
User
Acceptance Testing
You must
have heard the proverb, "the
proof of the pudding lies in
the eating.
This
applies for software product
also. The success of the
software product
depends
on how the user responds to
the product. One of the
important
implementation
activities is user acceptance. This aims
at ensuring that the
system is
working according to the user
requirements. UAT is done to ensure
that
the desired product design matches
the actual product
design.
UAT is
the final testing performed
by the end user after using
the product over
a limited
period me. As part of the
implementation process, the
project
manager
prepares the User Acceptance
Test plan. The UAT plan is
the last
stage of
the testing process where
the user tests the product.
The user tests the
product
and identifies whether it is acceptable
or not.
Ideally,
UAT is conducted in the same
environment as the one in which
the
product
is designed. UAT plan consists of the
activities to be conducted,
functions
to be tested, the time, and environment
in which software will be
tested.
Often test cases are attached
with the plan. The user
validates the
software
based on the test
cases.
The
executable product is installed in
the test environment and configured
for
use.
Then the user executes the test
supplied. r the user tests
the software
product,
the implementation team takes
care of the bugs or items
identified by
the
user. The bug fixing and
closing of issues continue
iteratively until all
problems
are solved. The software
product is then ready for
use. The user
representative
uses a signoff on the prescribed
format to indicate
satisfaction
with
the product. This marks end
of the development activity.
The final bug-
free
version is delivered to the
user.
ii.
Training
To
familiarize the users with
the new system, you
need to train them.
Apart
from
the users, there are the
operators who also need to be trained to
handle
the
system. Training for both
the users and operators has
separate goals.
Training
sessions aim at providing
the participants with
specific skills
required
in handling the new system.
Training aids used are
documents, icons,
on1ine
helps, and demonstrations or classroom
sessions. The user
training
focuses on
major m functions and the
users' need to gain access
to them. Some
of the
activities that a user might
need to perform are
simulating activities,
analyzing
data, drawing graphs, and searching
for information. The user
is
trained
on navigation skills, information
searching skills, and
security
functions.
The users are trained on
the differences between the
old and new
activities
to familiarize them with the
differences.
408

Software
Project Management
(CS615)
The
operator training focuses on the
support functions of the
system. The
support
functions include granting user
access, granting file
access, recovering
damaged
files, installing new devices and
software, and making backups.
Therefore,
the operators' training focuses on two
function areas. First,
the
operators
learn to run the system, and
second they learn to support
the users.
Another
important approach to training is
documentation. Documentation can
be in the
form of user manuals and guides. The
use of documentation in
training
will depend on the target audience.
Therefore, you need to ensure
that
your
development team does not
neglect training and documentation.
This
should be
planned and tracked from the
project start as soon as
the
requirements
analysis is complete. You also need to
ensure that training and
documentation
for users and operators is updated
periodically.
iii.
Data
Migration
At times,
the user might want to
transfer data from the
old system to the
new
system
during implementation. The
implementation team migrates data
from
the
old system to the new
system. This task can be automated by
using scripts
and
tools. Data migration is an important
activity. As a project manager,
you
need to
ensure that all data is
successfully migrated. At times,
data migration
involves
a large amount of data from
heterogeneous sources. This entails
lot
of work,
which might be beyond the
handling capacity of the
implementation
team.
Typically, in such situations,
data migration activity is
subcontracted to
an
external agency. If the data
is in the form of documents,
data entry
operators
could also be hired. Although
the activity is subcontracted, as
a
project
manager, you need to plan and
monitor its progress
continuously.
iv.
Installation
and Configuration
To make
the system available to end users,
the implementation team needs
to
install
and configure the system.
This involves making the
system run and
prepare
it for actual work. The
implementation team does this by
deploying
the
system on user machines. During
installation, the files,
components, and
executables
are copied to the user
machine.
Configuration
is the act of making necessary
changes in the system
parameters
that are specific for
target users. This activity is
performed along
with
installation. Installation and
configuration activity can be automated
by
using
many tools. You can perform
installation and configuration at
multiple
locations
by using tools. These tools
create installable disks that can be
used
to
install and configure. This
enhances the productivity of
the implementation
team to a great
extent.
At times,
the project manager might
need to outsource the
installation activity.
Then
great care needs to be taken to ensure
that correct versions are
installed.
At times,
Web-based automatic installation
facilities are used to
simplify the
process
further. At times, the
implementation team might need to
install the
409

Software
Project Management
(CS615)
system at
multiple locations simultaneously.
The team prepares separate
plans
for
each location. The
implementation team also configures the
installed
system.
v.
Product
Sign-Off
At the
end of acceptance testing, the
user-representative gives the
sign-off in
the
form of an acceptance letter.
This marks the formal end of
the
implementation
phase. This means that
all issues raised during
the acceptance
testing
are solved and closed. As a project
manager, you need to ensure
that
the
contractual obligations with
the user are fulfilled. You
need to verify that
the
client accepts all documents
and deliverables as mentioned in the
contract.
You also ensure
that the sign-off is
according to defined guidelines and is
in
the
form of an acceptance
letter.
vi.
Project
Wind-Up
Project
wind-up marks the formal
closure of the development
phase. This
activity
begins after obtaining a sign-off
from the user. The
key activities
performed
during project wind-up are
analyzing what went wrong
and what
could
have been better. Major
learning from the project is
summarized at the
end of
the project. Certain
completion criteria are
formalized at the
project
start.
These criteria prevent the
project from dragging on
endlessly. Certain
activities
are performed to ensure that
the project ends on
time.
·
Monitoring
deliverables
·
Monitoring
progress
·
Controlling
change requests
·
Monitoring
work yet to be done
Usually a
senior project manager supervises the
project-wind up activities.
During
project wind-up, you need to
gather feedback both internally as
well as
from
the client. The various
wind-up activities performed
during project end
include
obtaining client feedback of the
project. You also need to update
and
close the
project plan. Another
activity is updating project-related
statistics at
the end
for resource estimation. You can
determine the level of
success of the
project
based on the quality of the
delivered system and the
level of
satisfaction
of all concerned.
During
project wind up, the
project manager also plans for
the allocation of
the
project staff. The
deliverables list is checked to ensure
that all
requirements
are met. The project manager
also verifies the
financial
completion
of the project. A contract is also
drawn to deal with the
problems
later
for a defined period under a
warranty. The project is
evaluated for
adherence
to schedule, budget, technical goals, and
client and project team
satisfaction.
410

Software
Project Management
(CS615)
Another
important project-end activity is
data collection. Data
accumulated
during
the project is collected and
organized after completion.
This data helps
in resource
estimation and quality assurance of
future projects. The
data
collected
regarding the actual cost per
task, cost overrun and under-run
per
task,
unplanned tasks, and planned task that
were not required are
estimated.
Data
about software change requests and
bug statistics is also
noted.
The
performance of the project team is also
evaluated at the end of the
project.
The team
members are evaluated in terms of
their ability to
accomplish
project
tasks. The time taken, the
quality achieved, and the
adherence to cost
and
schedule is also noted. The team members
are also evaluated based
on
their
innovative approach to accomplishing a
task. The ability of the
team
member to
work as a team, communicate, and support
each other is also
judged.
The team members are also asked to
evaluate themselves in terms
of
their
strengths and weaknesses.
vii.
Post
Mortem
The post
mortem activities involve
collecting valuable information at
the end
of the
project. The knowledge gained
from the project is
documented for use
by other
projects. Similarly, the
recommendations for enhancements are
also
documented.
You also need to submit project-
related items, hard copies,
and
files to
the project library.
Usually, post mortem activities
are conducted
among
the team members. The team members
exchange feedback about
each
other
regarding interpersonal communication and
work processes within
the
team.
Finally,
the project manager prepares a
project closedown report.
This report
contains
suggestions on what should be done to
improve software quality
in
the
next project. This report
contains details of what the
team has failed to
deliver
and the lessons learned from
the project. This report
will help detect
and
eliminate long-term problems.
The project closedown report
contains the
following
details:
·
Description
of the project
·
Success
assessment
·
Schedule,
budget, and technical
details
·
Problems
while implementing
solutions
·
Data
updates regarding cost
estimation
viii.
Product
Delivery
Product
delivery marks the last
leg of implementation. In this
phase, the
packaged
software, documentation, and other
items mentioned in the
contract
are
passed on to the maintenance team. As a
project manager, you need
to
ensure
the smooth transfer of
knowledge from the
development team to the
maintenance
team. The maintenance activities
are discussed in detail in
the
next
section.
411

Software
Project Management
(CS615)
12.2
Software
Maintenance
According
to surveys, changeability is one of the
most important attributes
of
complex,
multifunction software systems. This
calls for continuous
adjustments
of the
software to suit the
changing environment. While
changes are inevitable,
it
is not
always possible to create products
foreseeing the changes. Therefore,
the
product
needs to be changed according to the
changing scenario. You might
need
to upgrade
the software product based
on new system requirements or
remove
redundant
functionality. The need for
a change brings software maintenance
into
the
picture. Maintenance activities can
either be in-house or outsourced.. In
the
case of
in-house maintenance, the
development team performs the
maintenance
activities.
On the other hand, an
independent maintenance team
performs
outsourced
maintenance activities.
Software
maintenance deals with the
sustenance of a piece of software
after it is
released.
Maintenance activity is needed
when errors are detected
after the
software
product is released. Changing
requirements of the software
product also
require
maintenance activity to cater to the
changes.
Maintenance
activity assumes greater importance
for a project manager. This
is
because
managing software maintenance is
more challenging than
managing
software
development. Consider an example. You
are maintaining a
banking
operation.
A small Program change is introduced as
part of the
maintenance
activity.
Suppose this change results in an
incorrect interest calculation. You
can
well
imagine the kind of
confusion this error will create,
not to mention the loss
of
client
faith and goodwill in the
bank. Therefore, as a project manager,
you need to
be extra
cautious while managing a
maintenance project.
Types
of Maintenance Activities
Maintenance
is an important phase in SDLC:
The need for maintenance
activities
has
increased with the increase
in software packages. Maintenance
activities
include
correction and prevention of defects, enhancements to
incorporate
changing
needs, and porting of applications and
adaptability. The
changing
hardware
and software scenarios have
increased the demand for
software
maintenance.
Today, in the entire SDLC of
a software application,
the
maintenance
effort is about 80 percent and
the development effort is
only 20
percent.
There
are four types of
maintenance activities:
·
Corrective
·
Adaptive
·
Perfective
·
Preventive
412

Software
Project Management
(CS615)
Corrective
maintenance is about
fixing bugs. This takes
approximately 17
percent
of the maintenance time.
During corrective maintenance,
the existing code
is used
to correct the fault that
causes the code to deviate
from its documented
requirements.
Here, the focus is on fixing
defects.
During
adaptive maintenance, the
existing code is changed to adapt
the new
features
and functionality. These new features
are usually part of a new
release of
a code.
This change normally takes 18
percent of the maintenance
time.
Perfective
maintenance improves the
maintainability of the code.
During this
activity,
the code is restructured to make it
easily understood and to
remove
ambiguities.
The enhancement of code occupies 60
percent of the
maintenance
time.
Preventive
maintenance is
undertaken to protect the
code against failure.
Here,
the
focus is on adhering to coding
standards and reduce the chances of
code
failure.
Preventive maintenance .activity
takes around 5 percent of
the
maintenance
time.
In the
above list of maintenance activities,
you can see that out of
total
maintenance
effort, only 20 percent is spent on
corrective maintenance and 80
percent
on the rest. This refutes
the popular belief that
maintenance activities is
all
about
fixing mistakes.
Maintenance
Activities
To
perform maintenance activities,
the maintenance team needs to
acquire the
business
and technical knowledge of the
client systems. The maintenance
process
is
usually divided into three
phases.
· Initiation
Phase
· Preparation
Phase
· Execution
Phase
Initiation
Phase
The
initiation phase starts with
the commencement of maintenance
activities. It is
primarily
a knowledge acquisition phase.
During this phase, the
maintenance team
takes
over the system from
the development team. The
maintenance team
familiarizes
itself with the ways and
functioning of the system.
This is essentially
a phase
of knowledge transfer from
the development team to the
maintenance
team.
The major activities of the
initiation phase are baseline
assessment and
operating
procedures. During baseline assessment,
the interfacing and
communication
methods between the
development and maintenance teams
are
defined.
The user-coordinator from
the user side and the
information technology
help
from the maintenance team
are identified. During this
phase, the plan
for
acquiring
the systems knowledge is also
finalized.
During
the operating procedures activities,
the maintenance team understands
the
application
and the functionality involved in
the maintenance task.
The
413

Software
Project Management
(CS615)
maintenance
team reviews the current
operating procedures of the system.
The
team also
obtains details about the
environment set up,
deployment of software,
the
resource allocation process, and priority
settings. Other' activities
such as root
cause
analysis, work assignment to the
development teams, and updating
of
documentation
procedures is also done. The maintenance
team refers to the
problem
management procedures, on-call or
escalation procedures; and
operational
process for handling:
faults. It also makes decisions based on
the
severity
of the faults, application
criticality, and infrastructure
issues.
The
maintenance team finalizes procedures for
transferring support work
from the
development
team. The maintenance team members are
initiated to hands-on
exposure
of the systems. The maintenance team
finalizes the quality systems
and
standards
and guidelines to be followed.
Preparation
Phase
The
preparation phase begins after
the initiation phase. During
this phase, the
maintenance
team sets up the administrative and
support procedures needed
for
maintenance
activities. In this phase,
the environment is set up and
hardware,
software,
and network are made ready
for operation. All the procedures
decided
and
finalized during the
initiation phase are put
into practice in this
phase.
According
to the documentation procedures finalized
in the initiation phase,
the
latest
documentation is kept in the
library. During this phase,
bug reporting,
problem
solving, and other support
methodologies are established. The
security
measures
are also put in place and practiced
during this phase.
Execution
Phase
The
execution phase follows the
preparation phase. In this
phase, the
maintenance
team starts
executing the maintenance
activities after the
preparation in the
earlier
phase.
During this phase, the
maintenance team is in close touch with
the
development
team for a small period of
time. Such communication
is
recommended to ensure
better coordination.
Maintenance
Curve
Maintenance
activity begins after product
implementation. The effort spent
on
maintenance
varies over a period of
time. Normally, maintenance
effort is very
high
immediately after implementation.
The system faces numerous
changes
during
this time. The changes
could be in the form of
bugs, changes in
network
environment,
or problems caused by user mishandling.
During this time, the
effort
spent on
maintenance activities is very
high. With time, the
system stabilizes and
maintenance
activities also slowdown. During
this period, the users
are more or
less
satisfied with the system.
The system also runs
smoothly without
requiring
any
major changes. Therefore, maintenance
activity is at its lowest
during this
phase.
414
Software
Project Management
(CS615)
However,
over a period of time,
business processes change and the
system also
415
oooc3o 3owoo3o3o12oo3o00proooo83o3o12oooo12oo3o00ooe79looET3oTimeoctB622yra3oTw[Tcr7Tcl--17.475-1.1Tw[oD0.9ecution<crnh3oT©3-3o12du.rzm-1.1Tw[oD0.thew1dbo00proooo22yra3oSaT©3s
iv

Software
Project Management
(CS615)
consists of
the head of IT, the project
coordinator, and team members. The
maintenance
project 1anager is the
single point contact between
the user
representative
and the maintenance team. The
project manager categorizes the
type of
maintenance activity to be performed
based on specifications. The
project
manager
ensures proper communication
between all the entities
1volved in
maintenance
activity. To ensure that the
maintenance process runs
smoothly, there
is a
thorough checking of all
deliverables. Maintenance activity is
the most
critical
because the system is
running and already in place.
Therefore, the
project
manager
needs to ensure that no error
arises during the
maintenance process.
The
common approach followed in the
maintenance process is as follows.
After
the user
makes a request for change, the
maintenance team performs an
impact
analysis.
Then the team plans for
the system release. The
system goes through
design changes,
coding, and testing. Finally,
the system is released.
The
maintenance
activities undertaken
are corrective maintenance,
adaptive
maintenance,
perfective maintenance, and preventive
maintenance.
Corrective
Maintenance Process
The
corrective maintenance process begins
with the user representative
reporting
bugs to
the project coordinator by
using the problem report
form. The project
coordinator
analyzes the problem and
assigns the problem to one of
the team
members
for corrective action. If
the bug fixing leads to
any changes in the
system,
the change is carried out
based on the change request process.
The team
member
requests the SCM team to
check out the item to be
modified. Then the
bugs are
fixed and tested in the test
environment. After this, the
user acceptance is
carried
out for the successful
completion of the corrective
maintenance process.
Finally,
the SCM team releases the
modified item. All related
documents are
modified
to reflect the changes and
the project coordinator
closes the problem
report.
Adaptive
Maintenance Process
In the
adaptive maintenance process,
changes are made to the
system to
accommodate
changes in its external
environment. Adaptive
maintenance
includes
work related to enhancing
software functionality. During
this process,
certain
system changes, additions, insertions,
deletions, and modifications
are
included
to meet the evolving needs of
the user and the environment. At
times, the
original
environment of the software
product might change. For
example, there
might be
changes in operating system,
business rules, and external
product
characteristics.
Adaptive maintenance refers to
modifications that adapt to
these
changes.
The project coordinator
plans the changes to be
made. The detail
plan
and the
quality goals are defined
for the changes. The team is
formed based on the
quantum
of work. The change request procedure is
followed to carry out
the
changes.
Finally, the changes are
deployed based on a deployment
strategy.
Perfective
Maintenance Process
416

Software
Project Management
(CS615)
Perfective
maintenance refers to enhancements that
make the product
better,
faster,
smaller, better documented,
better structured with more
functions and
reports.
It includes all efforts to
improve the quality of
software. Perfective
maintenance
extends the software beyond
its original functional
requirements.
During
perfective maintenance, the user or
the system personnel
initiates the
changes
to the system. The initiator
raises the change request to the
project
coordinator.
The changes could be a
result of enhancements of new
functionality
in the
existing system.
After
tracking-the changes, an impact analysis
is done and a detail plan is made
to
carry
out the changes. Based on
the amount of
changes, a
dedicated member or a
team
works on the changes. The
testing is done in the testing
environment- and
changes
are implemented in the
system based on the
deployment strategy.
Preventive
Maintenance Process
Preventive
maintenance activities make changes to
software programs so that
they
can be
more easily corrected,
adapted, and enhanced. During the
preventive
maintenance
process, the project
coordinator identifies the
potential risks.
Recommendations
are made to the management
for approval of the
maintenance
actions.
The project coordinator
prepares the project detail
plan for carrying
out
the
changes. The preventive maintenance team
is formed based on the
quantum of
work.
The team implements the change
based on the request procedure.
Finally,
deployment
happens based on the
deployment strategy.
The
maintenance process begins when
the user initiates a request for a
change.
The
process ends when the
system changes are tested
and the change is released
for
operation. In between, there
are many activities that
are coordinated and
planned
using change management.
Reengineering
Reengineering
is a process of abstraction of a new
system from an old
system.
Reengineering
is the modification and evolution of
software product to meet
the
constantly
changing business requirements.
Failure to reengineer can prevent
an
organization
from remaining competitive and
persistent. This is because
every
system
faces the risk of being
phased out sooner than they
were earlier.
Therefore,
you
need to develop systems that
support multiple platforms and
are open to
modifications
and changes. Here, the role of
reengineering comes into
play.
Reengineering
comprises reverse engineering and forward
engineering.
Reverse
Engineering
Reverse
engineering is a process of recovering
the design of the running
system
from
the source code. Reverse engineering
involves analyzing a software
system
to
achieve two objectives.
First, reverse engineering helps to
identify the system
components
and their Interactions. Second, it helps
make representations of the
system on
a different, higher level of
abstraction.
417

Software
Project Management
(CS615)
Suppose,
you want to retrieve the
design or a product whose design document
is
not
available. You can recover the design by
working backwards on the
product
from
the source code to the design
requirements. At times, you
might need to
reengineer
programs developed many years
back. The specifications of
such
programs
are either unclear or was
not developed at all. In
such a situation, you
use
reverse engineering to analyze the
program at a higher level of
abstraction.
Therefore,
you perform reverse engineering to
add a significant functionality
to
the
old program. You can also use it to make
the system cost-effective and
to
adopt new
technologies.
Certain
prerequisites are necessary for reverse
engineering. The existing
system
should be
in a running condition. The
latest source code should be
available.
During
reverse engineering, the reverse
engineering team gathers
information
about
the source code and the design and
specifications documents. They
also
obtain
information about the
knowledge and experience of the
developer. Then
the team
studies the existing code and
the existing documents. Then
they create a
draft
document from the existing
code. The team discusses
with the users and
modifies
the draft document based on
the discussions.
To
perform requirement reengineering,
the team first prepares a
prototype. After
this, it
provides the demo of the
prototype to the users. Then
the system
requirement
specification document is modified
based on the discussions.
The
team
obtains approval from the
users on the
requirements.
During
design reengineering, the team studies
the existing data model and
the
new
requirements. Then they map
the requirements with the
existing data model
and
conduct gap analysis. After
this, they modify the
data model based on the
gap
analysis.
The team studies the behavior of
the existing programs and
prepares
program
specifications based on the
behavior and the existing
code. Then the
unwanted
functionality is removed from
the program specifications.
The program
is then
modified based on the new
requirements.
During
construction reengineering, the team
comments on the unwanted
code
from
the programs. Then they
add remarks in the filtered
code, and modify the
programs
based on the new
functionality. Finally, the team
tests the
reengineering
process.
Testing involves preparing
the unit level test cases,
the test code, and
fixing
the defects. Then the code
for integration testing is
released. The various
testing
methodologies followed are
conducting integration testing,
functional
testing,
independent testing, user acceptance
testing, and releasing the
code for
deployment.
Reverse
engineering helps understand
the processing of the system,
understand
data, and
eliminate dead code, bad
coupling, and no documentation. It
also
reduces
the maintenance efforts. The
tools used for reverse
engineering are Rigi
and
Refine Language Tools,
static analyzer, and test
editor.
418
Software
Project Management
(CS615)
Forward
Engineering
Forward
engineering is the process of
building a new program from
the
requirements
and design specifications of an old
program. During
forward
engineering,
old design information is recovered
from existing software and
is
used to
reconstitute the existing
system. In the process, the
quality of the
existing
system is
enhanced and new functions are
added. Therefore, forward
engineering
moves
from a high-level abstraction and design
to a low-level implementation.
Forward
engineering is used to improve
the overall performance of
the system.
Figure
12.2 displays the
reengineering process.
Abstraction
Forward
Engineer
Reverse
Engineer
Existing
System
Proposed
System
Figure
12.2: Reengineering
Process
Maintenance:
Best Practices
In
addition to the maintenance
process, there are some
maintenance best practices. A
maintenance
process is successful if the
testing and production environment
are the same.
Version
control is strictly implemented
using version control tools,
such as VSS and
PVCS. You
need to check that the
deployment strategy is clearly
defined and tested and
the
documentation is kept
up-to-date.
The
members of the maintenance team management
should be rotated in
different
business
areas to enhance efficiency. It is very
essential to identify backups of the
key
personnel.
There should be a balance between
the new development and
problem fixing.
Ensure
proper training, and use the
latest technology. Knowledge
sharing sessions also
help in
improving communication within
the team. There should be an
online help
facility
for the maintenance team, and
helpdesk tools should be
available to track
the
problems.
Periodic causal analysis of the
nature of problems and corrective
action need to
be
conducted. To ensure successful
maintenance process, you
need to conduct
periodic
quality
reviews and monitor the
quality goals of the team.
419
Table of Contents:
- Introduction & Fundamentals
- Goals of Project management
- Project Dimensions, Software Development Lifecycle
- Cost Management, Project vs. Program Management, Project Success
- Project Managements nine Knowledge Areas
- Team leader, Project Organization, Organizational structure
- Project Execution Fundamentals Tracking
- Organizational Issues and Project Management
- Managing Processes: Project Plan, Managing Quality, Project Execution, Project Initiation
- Project Execution: Product Implementation, Project Closedown
- Problems in Software Projects, Process- related Problems
- Product-related Problems, Technology-related problems
- Requirements Management, Requirements analysis
- Requirements Elicitation for Software
- The Software Requirements Specification
- Attributes of Software Design, Key Features of Design
- Software Configuration Management Vs Software Maintenance
- Quality Assurance Management, Quality Factors
- Software Quality Assurance Activities
- Software Process, PM Process Groups, Links, PM Phase interactions
- Initiating Process: Inputs, Outputs, Tools and Techniques
- Planning Process Tasks, Executing Process Tasks, Controlling Process Tasks
- Project Planning Objectives, Primary Planning Steps
- Tools and Techniques for SDP, Outputs from SDP, SDP Execution
- PLANNING: Elements of SDP
- Life cycle Models: Spiral Model, Statement of Requirement, Data Item Descriptions
- Organizational Systems
- ORGANIZATIONAL PLANNING, Organizational Management Tools
- Estimation - Concepts
- Decomposition Techniques, Estimation Tools
- Estimation Tools
- Work Breakdown Structure
- WBS- A Mandatory Management Tool
- Characteristics of a High-Quality WBS
- Work Breakdown Structure (WBS)
- WBS- Major Steps, WBS Implementation, high level WBS tasks
- Schedule: Scheduling Fundamentals
- Scheduling Tools: GANTT CHARTS, PERT, CPM
- Risk and Change Management: Risk Management Concepts
- Risk & Change Management Concepts
- Risk Management Process
- Quality Concept, Producing quality software, Quality Control
- Managing Tasks in Microsoft Project 2000
- Commissioning & Migration