 |
JAVA: Creating a Simple Web Application in Tomcat |
| << Java Servlets |
| JAVA: Servlets Lifecycle >> |

Web
Design & Development CS506
VU
Lesson
27
Creating
a Simple
Web
Application in Tomcat
In
this handout, we'll discuss
the standard tomcat directory structure, a
pre-requisite for building
any web
application.
Different nuts and bolts of Servlets
will also be discussed. In the
later part of this
handout,
we'll
also learn how to make a
simple web application using
servlet.
Standard
Directory Structure of a J2EE
Web Application
A web
application is defined as a hierarchy of
directories and files in a standard
layout. Such hierarchies
can
be used in two forms
Unpack
o Where
each directory & file exists in the
file system separately
o Used
mostly during
development
Pack
Known
as Web Archive (WAR)
file
o
Mostly
used to deploy web
applications
o
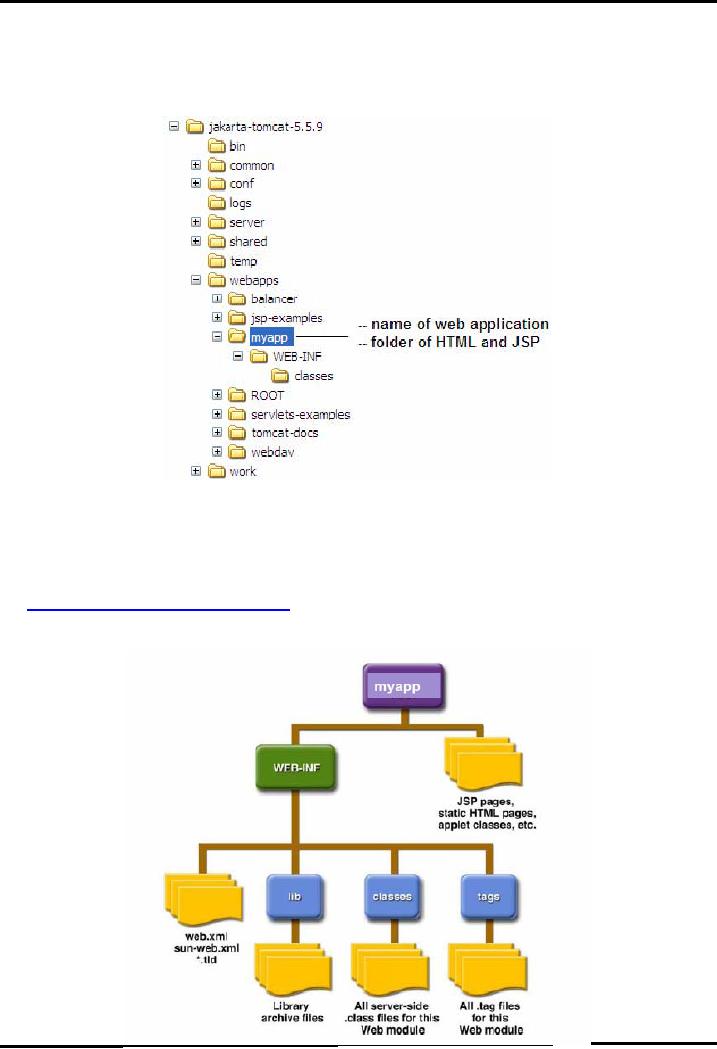
The
webapps folder is the top-level Tomcat
directory that contains all the
web applications deployed on
the
server.
Each application is deployed in a
separate folder often
referred as "context".
To
make a new application e.g
myapp in tomcat you need a
specific folder
hierarchy.
-Create
a folder named myapp in C:\jakarta-tomcat-5.5.9\webapps
folder. This name will
also appear
in the
URL for your application.
For example
http://localhost:8080/myapp/index.html
-All
JSP and html files will be
kept in main application
folder
(C:\jakartatomcat-5.5.9\webapps\myapp)
-Create
another folder inside myapp
folder and change its
name to WEB-INF. Remember
WEB-INF is
case
sensitive and it is not WEB_INF
-Configuration
files such as
web.xml
will
go
in
WEB-INF
folder
(C:\jakarta-tomcat-
5.5.9\webapps\myapp\WEB-INF)
-Create
another folder inside WEB-INF
folder and change its
name to classes. Remember
classes name
is
also case sensitive.
198
Web
Design & Development CS506
VU
-Servlets and
Java Beans will go in
classes folder
(C:\jakarta-tomcat5.5.9\webapps\myapp\WEB-
INF\classes)
That's
the minimum directory structure required
in order to get started. This is
also shown in the figure
below:
-To
test application hierarchy,
make a simple html file e.g.
index.html file. Write some
basic HTML code
into
it and save it in main application
directory i.e.
C:\jakarta-tomcat-5.5.9\webapps\myapp\
-Restart
the server and access it by
using the URL
http://localhost:8080/myapp/index.html
-A more
detailed view of the Tomcat standard
directory structure is given
below.
199

Web
Design & Development CS506
VU
-Here
you can see some
other folders like lib&
tags under the
WEB-INF.
-The
lib folder is required if
you want to use some achieve
files (.jar). For example an
API in jar format
that
can help generating .pdf
files.
-Similarly
tags folder is helpful for
building custom tags or for
using .tagfiles.
Note:
Restart
Tomcat every time you
create a new directory structure, a
servlet or a java bean so
that it
can
recognize it. For JSP and
html files you don't have to
restart the server.
Writing
Servlets
Servlet
Types
-Servlet
related classes are included
in two main packages
javax.servletand
javax.servlet.http.
-Every
servlet must implement the
javax.servlet.Servlet interface, it contains the
servlet's life cycle
methods
etc. (Life cycle methods
will be discussed in next
handout)
-In
order to write your own
servlet, you can subclass
from GernericServlet or
HttpServlet
GenericServlet
class
Available
in javax.servlet package
Implements
javax.servlet.Servlet
Extend
your class from this
class if you are interested in
writing protocol independent
servlets
HttpServlet
class
Available
in javax.servlet.http package
Extends
from GenericServletclass
Adds
functionality for writing
HTTP specific servlets as
compared to GernericServlet
Extend
your class from HttpServlet,
if you want to write HTTP
based servlets
Servlet
Class Hierarchy
The
Servlet class hierarchy is
given below. Like all
java classes GenericServletalso
inherits from Object
class.
Apart from GenericServlet and
HttpServlet classes, ServletRequest,
HttpServletRequest,
ServeltResponse
and HttpServletResponse are also
helpful in writing a
servlet.
As
you can guess ServletRequest &
ServletResponse are used in
conjunction with GenericServlet.
These
classes
are used for processing
protocol independent requests and
generating protocol
independent
responses
respectively.
javax.servlet.http
200
Web
Design & Development CS506
VU
Types
of HTTP requests
HTTP
supports different types of request to be
sent over to server. Each
request has some specific
purpose.
The
most important ones are
get
&
post.
Given below a brief overview
of each request type is
given. You
can
refer to RFC of HTTP for
further details.
-GET:
Requests
a page from the server. This is the
normal request used when
browsing web pages.
-POST:
This
request is used to pass
information to the server. Its
most common use is with HTML
forms.
-PUT:
Used to
put a new web page on a
server.
-DELETE:
Used to delete a
web page from the
server.
-OPTIONS:
Intended
for use with the web server,
listing the supported options.
-TRACE:
Used to
trace servers
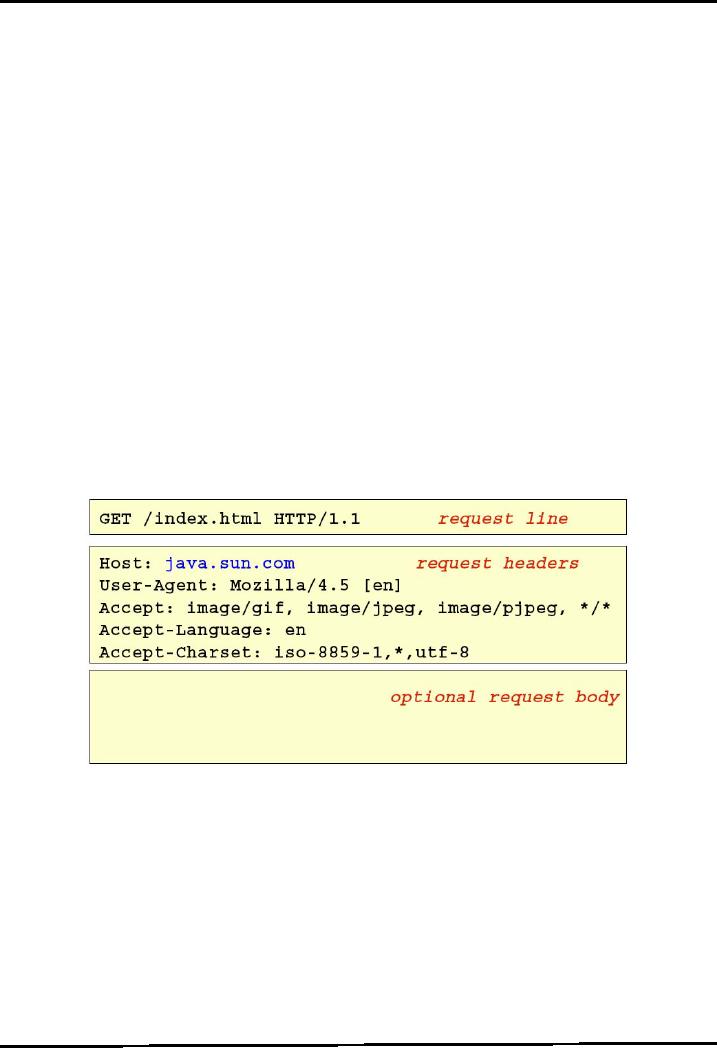
GET
& POST, HTTP request
types
Some
details on GET and POST HTTP
request types are given
below.
. GET
-Attribute-Value
pair is attached with
requested URL after
`?'.
-For
example if attribute is
`name' and value is
`ali' then the
request will be
http://www.gmail.com/register?name=ali
-For
HTTP based servlet, override
doGet() methods of HttpServlet
class to handle these type
of
requests.
. POST
-Attribute-Value
pair attached within the
request body. For your
reference HTTP request diagram
is
given
below again:
-Override
doPost() method of HttpServlet class to
handle POST type
requests.
Steps
for making a Hello World
Servlet
To get
started we will make a customary
"HelloWorldServlet". Let's see
what are the steps involved
in
writing
a servlet that will produce
"Hello World"
1.
Create a directory structure for
your application (i.e.
helloapp). This is a one
time process for
any
application
2.
Create a HelloWorldServlet source
file by extending this class
from HttpServlet and
overriding
your
desired method. For example
doGet() or doPost().
3.
Compile it (If get error of not
having required packages,
check your class
path)
4.
Place the class file of
HelloWorldServlet in the classes folder
of your web application
(i.e. myapp).
Note:
If you
are using packages then
create a complete structure under classes
folder
201

Web
Design & Development CS506
VU
5.
Create a deployment descriptor
(web.xml) and put it inside
WEB-INF folder
6.
Restart your server if
already running
7.
Access it using Web browser
Example
Code: HelloWorldServlet.java
//File
HelloWorldServlet.java
//
importing required
packages
import
java.io.*;
import
javax.servlet.*;
import
javax.servlet.http.*;
//
extending class from
HttpServelt
public
class HelloWorldServlet
extends HttpServlet
{
/*
overriding doGet() method because
writing a URL in the browserby
default generate request
of
GET
type
As
you can see,
HttpServletRequest andHttpServletResponse are
passed to this
method.
Theseobjects will help in
processing of HTTP request
andgenerating
response
for HTTP
This
method can throw ServletException or
IOException, so wemention these
exception
types
after method signature
*/
public
void doGet(HttpServletRequest
request,HttpServletResponse
response)
throws
ServletException, IOException
{
/*
getting output stream i.e
PrintWriter from responseobject by
calling getWriter
method
on it
As
mentioned, for generating
response, we will
useHttpServletResponse
object*/
PrintWriter
out = response.getWriter();
/*
printing Hello World in the
browser using PrintWriter
object.
You can also write HTML
like
out.println("<h1>
Hello World </h1>")
*/
out.println("Hello
World! ");
} // end
doGet()
} // end
HelloWorldServlet
Example
Code: web.xml
eXtensible
Markup Language (xml) contains
custom defined tags which
convey information about
the
content.
To learn more about XML visit
http://ww.w3schools.com.
Inside
web.xml, the <web-app>
is the
root tag representing the web
application. All other tags
come inside
of
it.
<?xml
version="1.0"
encoding="ISO-8859-1"?>
<web-app>
<servlet>
<servlet-name> HelloWorldServlet
</servlet-name>
<servlet-class>
HelloWorldServlet
</servlet-class>
</servlet>
<servlet-mapping><servlet-name>
HelloWorldServlet
</servlet-
name><url-pattern>
/myfirstservlet
</url-
pattern></servlet-mapping>
</web-app>
The
<servlet>
tag
represents one's servlet
name and its class. To
specify the name of servlet,
<servlet-
name>
tag is
used. Similarly to specify the
class name of servlet (it is
the same name you used
for making
a
servlet), <servlet-class>tag is
used.
202
Web
Design & Development CS506
VU
Note: It is
important to note here that
you can specify any
name for a servlet inside
<servlet-name>
tag.
This
name is used for referring
to servlet in later part of
web.xml. You can think of it
as your id assigned to
you
by your university while you
have actually different name
(like <servlet-class>).
Next
we will define the servlet
mapping. By defining servlet
mapping we are specifying
URL to access a
servlet.
<servlet-mapping>
tag is
used for this
purpose.
Inside
<servlet-mapping>
tag,
first you will write the
name of the servlet for
which you want to
specify
the
URL mapping using <servlet-name>
tag and
then you will define the
URL pattern using <url-
pattern>
tag.
Notice the forward slash (/ ) is
used before specifying the
url. You can specify
any name of
URL.
The forward slash indicates the
root of your
application.
<url-pattern>
/myfirstservlet
</url-pattern>
Now
you can access
HelloWorldServelt (if it is placed in
myapp application) by giving the
following url in
the
browser
http://localhost:8080/myapp/myfirstservlet
Note:
Save
this web.xml file by placing
double quotes("web.xml") around it as
you did to save .java
files.
Compiling
and Invoking
Servlets
-Compile
HelloWorldServlet.java using javac
command.
-Put
HelloWorldServlet.class
in C:\jakarta-tomcat5.5.9/webapps/myapp/WEB-INF/classes
folder
-Put
web.xml file in
C:\jakarta-tomcat5.5.9/webapps/myapp/WEB-INF
folder
-Invoke
your servlet by writing
following URL in web browser.
Don't forget to restart your
tomcat
server
if already running
http://localhost:8080/myapp/myfirstservlet
Note:
By
using IDEs like netBeans�
4.1, you don't have to write
web.xml by yourself or even to
worry
about
creating directory structure and to copy
files in appropriate locations.
However manually
undergoing
this process will strengthen
your concepts and will help
you to understand the
underlying
mechanics☺.
References:
Entire
material for this handout is
taken from the book JAVA A
Lab Course by Umair
Javed.
This
material
is available just for the
use of VU students of the course Web
Design and Development and not
for
any
other commercial purpose without the
consent of author.
203
Table of Contents:
- JAVA FEATURES
- Java Virtual Machine & Runtime Environment
- Learning Basics of JAVA
- JAVA: Object Oriented Programming
- JAVA: Inheritance
- JAVA: Collections
- JAVA: Intro to Exceptions
- JAVA: Streams
- JAVA: Modification of Address Book Code
- JAVA: Graphical User Interfaces
- JAVA: Event Handling
- JAVA: More Examples of Handling Events
- JAVA: Problem in Last Code Example
- Java Database Connectivity
- JAVA: More on JDBC
- JAVA: Result Set
- JAVA: Meta Data
- Java Graphics
- JAVA: How to Animate
- JAVA Applets
- JAVA: Socket Programming
- JAVA: Serialization
- JAVA: Multithreading 1
- JAVA: Multithreading 2
- JAVA Web Application Development
- Java Servlets
- JAVA: Creating a Simple Web Application in Tomcat
- JAVA: Servlets Lifecycle
- JAVA: More on Servlets
- JAVA: Dispatching Requests
- JAVA: Session Tracking 1
- JAVA: Session Tracking 2
- JAVA: AddressBook Case Study Using Sevlets
- Java Server Pages 1
- JavaServer Pages 2
- Java Server Pages 3
- JAVA: JSP Action Elements and Scope
- JAVA: JSP Custom Tags
- JAVA: MVC + Case Study
- JAVA: MVC Model 2 Architecture
- JAVA: Layers and Tiers
- JAVA: Expression Language
- JAVA: JavaServer Pages Standard Tag Library (JSTL)
- JAVA: Client Side Validation & JavaServer Faces (JSF)
- JAVA: JavaServer Faces