 |
Lab Data Set: Multi -Campus University |
| << Data Transfer Service (DTS) |
| Extracting Data Using Wizard >> |

Lab Lec:
3
Extracting
Data Using Wizard
Steps
towards single source of
truth
�
Identify
source systems
�
Figure out the
issues associated with each
source system
�
Extract
data
�
Transform
data
�
Load
data
�
Quality
checks
Data
warehouse is a single source of truth. We
have to put all departmental
data from desperate
sources at
one place in some standard
form. The task is not
trivial. Desperate sources of
data have
a lot of
inherent issues. High level
steps given in the slide
gives just an overview of the
task. First
of all we have
to identify the source
systems. It is quite possible that
each department uses
different
database systems or same organization at
different geographical locations uses
different
database
management systems. To put data
into a single source after
extracting from such
diverse
sources
requires powerful tools
especially designed to fulfill
the purpose. We will use
Microsoft
SQL Server
which is a user friendly
graphical tool and makes
such a complex task doable
by
some
practice.
After
identification of source systems, it is
necessary to study the
issues that must be cons
idered
before putting
all the data together.
Microsoft SQL Server provides a powerful
support to perform
Extract,
Transform and Load (ETL)
data from source systems to
Destination system. Finally
certain
steps are performed to check
and improve quality of d
ata.
In this lab
exercise we will perform all
the above steps in a detailed
manner through
powerful
support of
Microsoft SQL Server.
Example:
Student Record System:
Diversity
�
Identify
source systems at different
campuses
�
Source
systems are as
follows
� Lahore
campus uses simple Text
Files
� Karachi
campus uses MS-Excel
workbooks
� Islamabad
campus uses MS-Access
DB
� Peshawar
campus uses simple Text
Files
The
task starts from analysis of
source systems at different
campuses. Data for Lahore
and
Peshawar
campus is kept in simple
text files, for Karachi Ms-Excel
books are used and
for
Islamabad
MS-Access is used to keep
data. Further more table
structures, date
formats,
conventions for
gender M/F or 1/0, etc.
are different from campus to
campus.
First we will
load the data for
each campus in MS-SQL Server as it is, in
different databases
then
before putting
all the pieces together
all these issues will be
addressed.
389

Example:
Student Record System:
Issues
�
Figure out
the issues related with
each source syste m
�
Issues
include
� Standards
and formats of stored
data
�
Number of tables
in different source
systems
�
Type of
columns, their number and
ordering in different tables to be
combined
Here we need to
figure out the issues in
source systems. As source
data is distributed
over
different
campuses therefore the issues
like difference in date
formats, conventions of storing
gender
(M/F,0/1,1/0), etc are obvious.
Microsoft SQL Server has a good
support to resolve these
issues.
Extracting University
Data
1. Lets start
our practical by loading data
for the university
2. We have data
from four different
campuses
3. Initially we
will develop four different
databases, one for each
campus, and load
corresponding
data
4. Then we
will transform and
standardized each
database
5. Finally we
will combine all the
four databases to single
source of truth (DWH)
6. At each
step we will run queries to
collect demographics
For
loading data for the
university, it is required to load the
data for four campuses,
separately
and as it
is, into the MS-SQL Server.
Once all data is loaded to
SQL Server then the
tasks of
transformation
and standardization would be
started. First we will transform
the database of each
of the
campuses individually. Then we
will standardize the
databases of four
campuses
sepa
rately. Finally, the data
from four different campuses
will be put together.
Extracting
Data Using
Wizards
�
Import
and Export Data Wizard provides
the easiest method of
loading data.
�
The
wizard creates package which
is a collection of tasks
�
Tasks
can be as follows:
� Establish
connection through source / destination
systems
� Creates
similar table in SQL Server
� Extracts
data from text
files
� Apply
very limited basic
transformations if required
� Loads
data into SQL Server
table
After
addressing the issues w
decide to select a suitable
tool in SQL Server to resolve
these
e
issues. At
this stage we are not
performing transformations rather we
are just copying data
from
source to
destination. For this
purpose the easiest method
is the use of wizard. Wizard
would
create
package for us including all
required tasks as:
�
Establishes
connection through source / destination
systems
390

�
Creates similar
table in SQL Server
�
Extracts
data from text
files
�
Applies very
limited basic transformations, if
required
�
Loads
data into SQL Server
table
Extracting
Data for Lahore
Campus
�
First of
all load data for
the Lahore campus
1.
Connect to
source Text files
2.
Connect to
Destination SQL Server
3.
Create
new database
`Lahore_Campus'
4.
Create
two tables Student &
Registration
5.
Load
data from th text files
containing student information into
Student table
e
6.
Load
data from the text
files containing registration records
into Registration
table
�
Import/Export
Wizard is sufficient to perform all
above mentioned tasks
easily
Loading
data for Lahore campus
includes following
tasks:
1. Connect
to source Text
files
Since
there are many text
files for Lahore campus, we
need to load those text
files separately.
First of all,
select the file that is to
be loaded first.
2. Connect
to Destination SQL
Server
In this
case our source system is a
text file. For transformation
and standardization we will
load
all
data as it is from source
file to the SQL server and
then through powerful tools of
SQL Server,
we will
perform these intended
task.
3. Create
new database
`Lahore_Campus'
To load data
for four campuses we will
develop four separate
databases. So, to load data
for
Lahore
campus we will create a new
data base named
`Lahore_Campus'.
4. Create
two tables Student &
Registration
All
files containing student information will
be loaded in one table
Student and all other
files
containing
registration information will be
loaded in other table
Registration. After this
step we
will
have two populated tables
only.
5. Load
data from the text files
containing student informati on
into Student
table.
6. Load
data from the text
files containing registration
records into Registration
table
Import/Export
Wizard is sufficient to perform all above
mentioned tasks easily. So we
will use
the
wizard as it can provide us good
functionality in this
scenario.
391
Seven
Steps to Extract Data Using
Wizard
1. Launch the
Wizard
2. Choose a
Data Source
3. Choose a
Database
� Specification
of file format incase of Text
files
4. Specify
the Destination
5. Choose
Destination Database
� Selection
of existing database or creation of a new
database
6. Select a
table
� Selection
of existing table or creation of a new
table
7. Finalizing
and Scheduling the
package
The
slide states seven simple
steps to create a package
for data loading through
wizard. Lets
discuss
each o f the steps in
detail.
Step1:
Launch the wizard(1)
�
Two
methods to launch the
wizard
� Start >
Programs > Microsoft SQL Server >
Import & Export Data
� Start >
Programs > Microsoft SQL Server >
Enterprise Manager
1) On console
root drop Data Transformation
Service node
2) Tools >
Data Transformation Service >
Import/Export data
These
are two different methods to
launch the wizard. We can
use either.
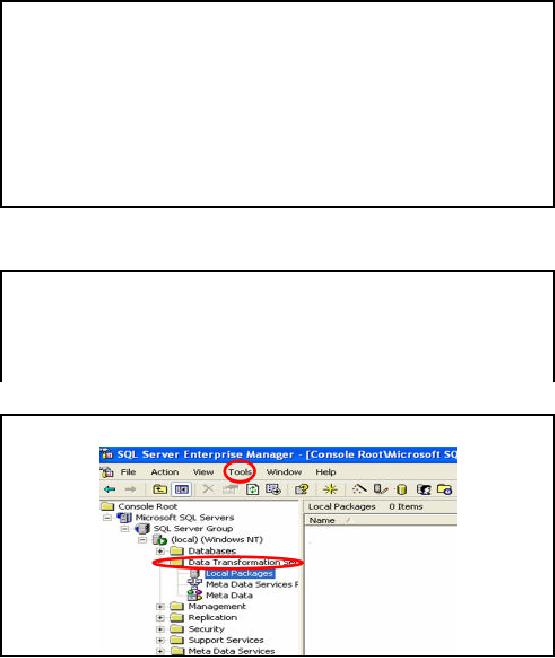
Step1:
Launch the wizard(2)
The
slide shows the main screen
of SQL Server enterprise ma nager. In
the left pane we have
Console root. We
can see Data Transformation
services highlighted. Expand
the node mentioning
Data
Transformation Services and
then press Tools in the
menu bar. This will
lead you to launch
the
wizard to load data.
392
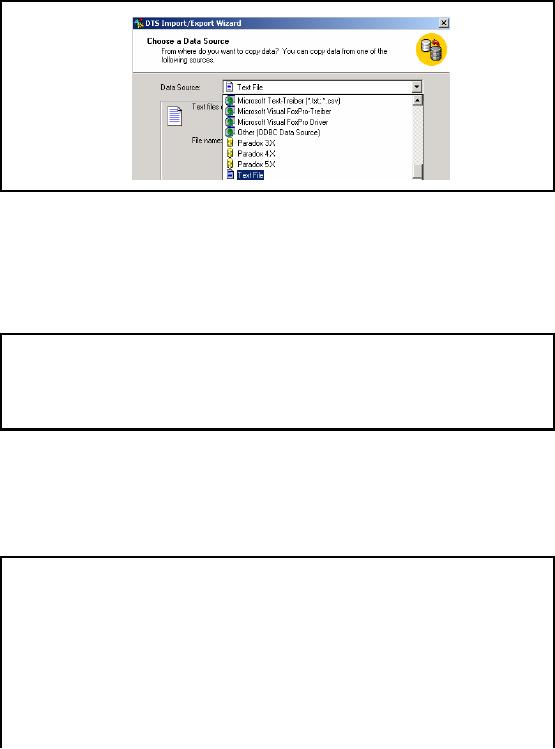
Step2:
Choose a Data
Source(1)
After launching
the wizard, first of all we
will be welcomed by the wizard through a
welcome
screen
having a button `NEXT'. On pressing
`NEXT' we will see the above
window. This
window is
basically allows to perform step 2 of
creating a package through wizard. In
this
window we
can see a drop down
menu `Data Source'. This menu
shows all possible
connections
that
are available through SQL Server.
Connection will be selected
according to sou rce
system.
In our
case, source system is a simple
text file. Therefore select
the last option text
file from this
drop
down menu.
Step2:
Choose a Data
Source(2)
�
Data
source for Lahore is a Text
file
�
After specifying
data source, Browse first
file to be loaded from Lahore
data
�
"Lhr_Student_94.txt", is a
text file that contains
students data of Lahore
campus
�
First of
all browse this file to
load
After
selecting text file as a
source system, we will see a
new option on the lower
part of same
window. The
option is to browse the text
file considered as a source
system. To load data
for
Lahore
campus first of all select
the file `Lhr_Student_94.txt'. Browse option
allows us to have
an Open
File dialog box, which
will let us to locate file through
navigatio n. We will locate
the
directory in
which our source data is
placed, select the file
`Lhr_Student -94' from Lahore
folder.
Then
press next to move to step 3
of wizard.
Step3:
Specify File
Format(1)
�
After
specifying file, Wizard asks
for file format
like
� Columns
are fixed length fields or delimited by
some character
�
First
row contains header
information (column/field) names or
directly data
�
What
are the text
qualifiers
�
What is
the file storage
format
�
How
many rows, if required,
should be skipped from
start
393
Third
step in creation of package
through wizard is to specify the
format of the file to be
loaded.
In this
new screen we are supposed
to provide following information to
the SQL Server:
�
Whether
the source file has
fixed length columns or delimited length
columns.
�
Does
the first row contain
column name?
�
Do we have
text qualifiers in our
source text file? If yes
then select the specified
from drop
down
list menu.
�
What is
the file storage
format?
�
Do we want to
skip rows from start of
file? If yes, then how
many rows are supposed to
be
skipped?
�
The
answers to all above stated
questions are provided
through graphical user interface
objects
like check box, radio
buttons and drop down list
menus.
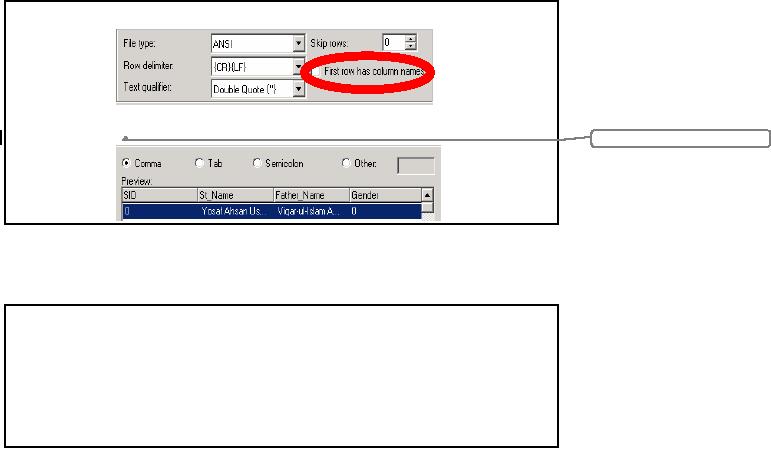
Step3:
Specify File
Format(2)
Formatted:
Font: 7
pt
Here we can
see the screen to input
answers of the questions
asked on previous slide.
Each and
every
object is self explanatory. First of all
you will see the above
screen and then on
pressing
next we
need to specify the column
delimiter that is used in
our text file.
Step4:
Specify the
Destination(1)
�
As many
options for destinations are
available as were for the
source (in step 2)
�
By selecting
Text files as destination,
data extracted from text
file would be stored
in
another
text file
�
Incase of
given scenario we want to load data in
SQL Server, which is a default
option
for
destination
Step 4 in
creation of a package through wizard is
to specify the destination
database. This needs
to establish a
connection with destination
system first. For this
purpose select the
correct
connection
from the drop down
menu `Destination'
which
contains all possible
connection
options as were
available for source in step
2.
394
In case we
select Text file as a
destination then the data
extracted from one text
file will be loaded
in another
text file. As we have planned to load
data in SQL Server, therefore
select SQL server
connection,
which is by default
selected.
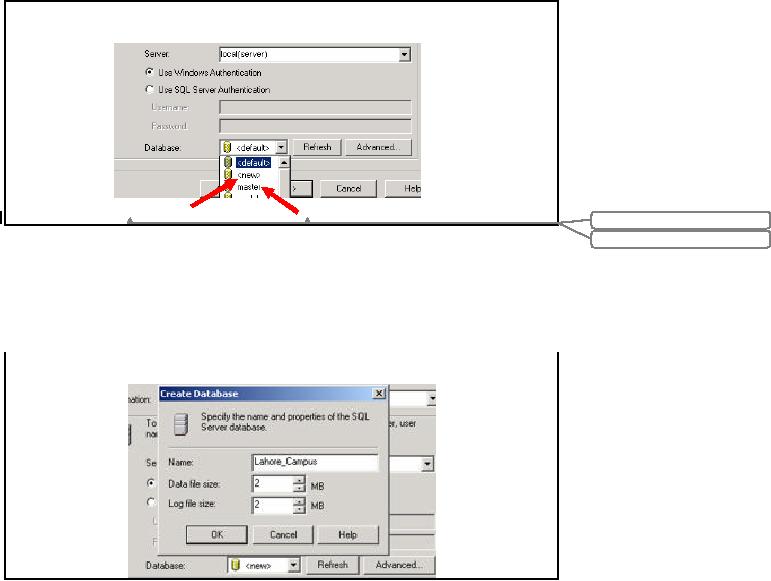
Step4:
Specify the
Destination
Choose
Database
Formatted:
Font: 7
pt
Formatted:
Font: 7
pt
On selecting
SQL Server as destination we can
see options appea red on the
same window. From
here we
are just required to select
the destination database in
destination system. This can
be done
through a
drop down list menu titled
as Database. This drop down
list menu is showing
all
databases
available to this user in
SQL server. <new>
option
allows us to create a new
database.
We will
select new as we want to create
separate database initially
for each campus.
Step5a:
Creating a New
Database
On selecting
<new>
option we
can see this Create
database pop up dialog box.
This dialog box is
asking
for the name of database
and the space needed
for that database. Write
name as
`Lahore_Campus'
and then press OK.
Then press NEXT
395
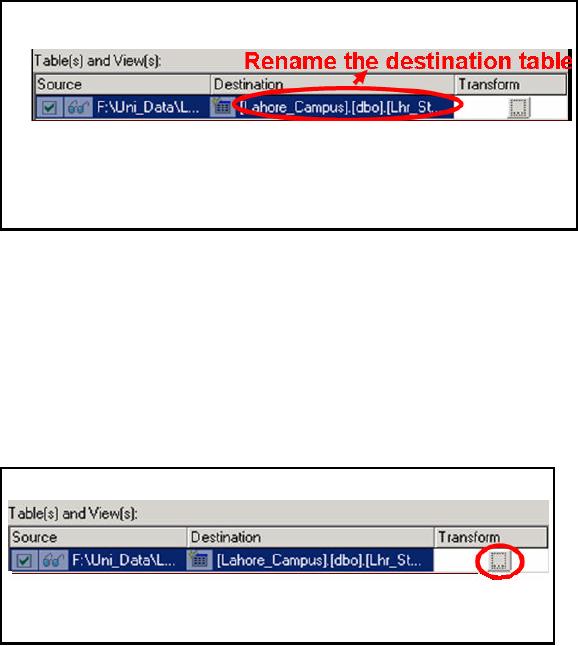
Step6:
Creating a New
Table
�
Source
contains the name of input
file
�
Destination is a
new table with same
structure as that of source
text file
�
By default, name
of destination table is same as
that of text file i.e.
"Lhr_Student_94",
Rename it as
"Students"
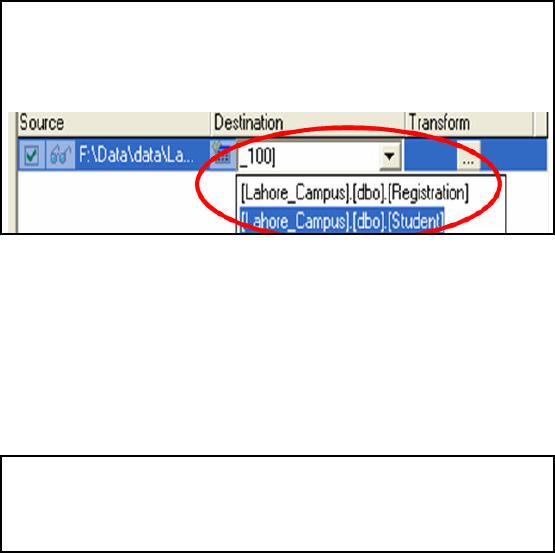
After
select ing the destination
database from existing
databases or new database, we
press next.
This time we
will see the above
window on the screen. This
window contains 3 columns
source,
destination
and transform. Source contains
the name of input file.
Destination shows the name
of
the
destination table in destination
database which was selected
in previous step. The
wizard
checks
the names of all available
tables in destination database.
Select the table for
loading whose
name is
exactly the same as of
source table/ view/ text
file. If none of the table
has matching
name
then wizard generates code
to create new table with
exactly the same name
and same
number of
columns as that of source
table/view/text file. Wizard generates
table with all
columns
having
same data type i.e.
VARCHAR(255)
In this
case our destination
database is empty, as it has not
yet physically created.
Therefore,
wizard
selects the name for
new table `Lhr_Student_94' as it is
the name of source text
file. To
rename
this text file we can double
click the destination highlighted
row. As shown in the
figure.
Step6:
Creating a New Table:
Transform
�
Name
and order of columns in new table
can be seen through
"Transform"
�
Names,
data types and order of
columns in new table can b changed
through
e
"Transform"
Transform
column is
used to apply transformations that
are available through wizard
like
changing the
data types of the columns,
order of the columns and so
on. If we click the
transform
button, we can
see the mapping between
source and destination
columns.
396
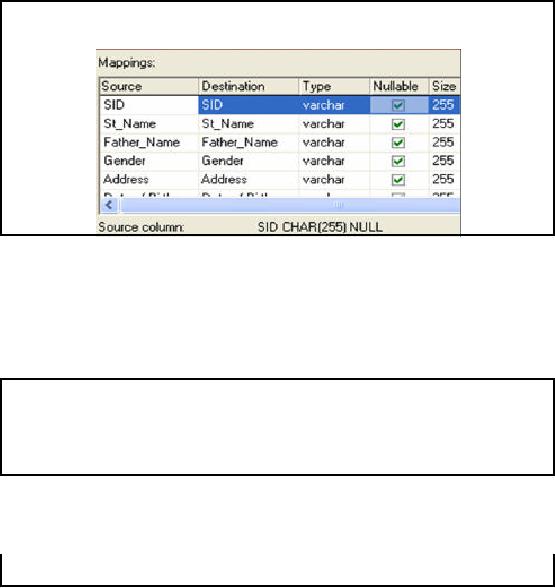
Step6:
Creating a New
Table
Column
Mappings
On clicking
transform we can view the
dialog box showing mapping between source
and
destination
columns. The third column is
showing data type of
destination column. By default
all
types
are selected as varchar of
size 255. By default Nullable
option is
checked that means
the
corresponding
columns can contain null
values as well. A pointer variable
varchar to hold
character array
of length 255 requires a lot of
memory to be consumed especially when we
are
dealing with a
huge input data. So we
should change the type
according to required lengths,
for
example,
for Gender one character is
enough as gender may be M/F
or 0/1.
Step7:
Scheduling the Pac
kage(1)
�
In the
preceding six steps, a
package has developed including
tasks of establishing
connections,
extraction and loading of
data
�
Whenever the
package would run all
the tasks would be
executed
After
finalizing the mapping we can
press next for f inalizing
the package. On saving the
package
all
steps would be written in a
script file. Whenever the
script would be run all
steps would be
executed
and tasks would be
performed.
Step7:
Scheduling the
Package(2)
397
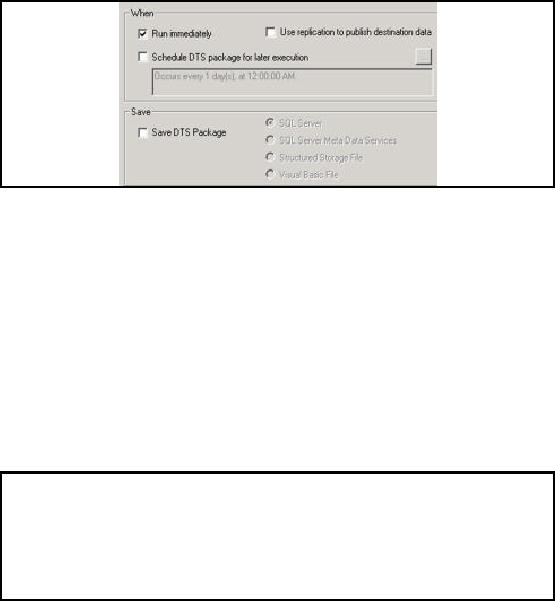
The above dialog
box provides following options:
1. Run the
package immediately
2. Schedule
DTS package to run
periodically
3. Use of
replication to publish destination data ( we
are not concerned with this
option currently)
4. Save
package
For
saving package we need to
select the destination location
that can be one of
following:
a. SQL
Server
b. SQL Server
Meta Data Services
c. Structured
storage file
d. Visual Basic
file
Now, we
have successfully completed
the package and it is ready
to run. It can be executed
manually or
automatically by scheduled option.
Execution
of a package
1.
Connection
with source (Text file) is
established
2.
Connection with
destination (MS-SQL Server) is
established
3.
New
Database at destination is
created
4.
New
table is created
5.
Data is
extracted from source
6.
Data is
loaded to destination
When
this package will be
executed either automatically due to
scheduled option enabled
or
manually
following tasks will be
performed:
� Connection
with source (Text file) is
established
� Connection
with destination (Ms-SQL Server) is
established
� New
Database at destination is
created
� New
table is created
� Data is
extracted from source
� Data is
loaded to destination
Execution
can be completed successfully or it
may be stopped and roll
backed due to some
error.
In case of
successful completion of execution all
the transactions will be
committed to the
398
database
otherwise, if some error
occurs, execution will be
terminated abnormally and
all
transactions
will be rolled back. In
second case when we will
access the database we will
find it
in the
state that was before the
execution of package.
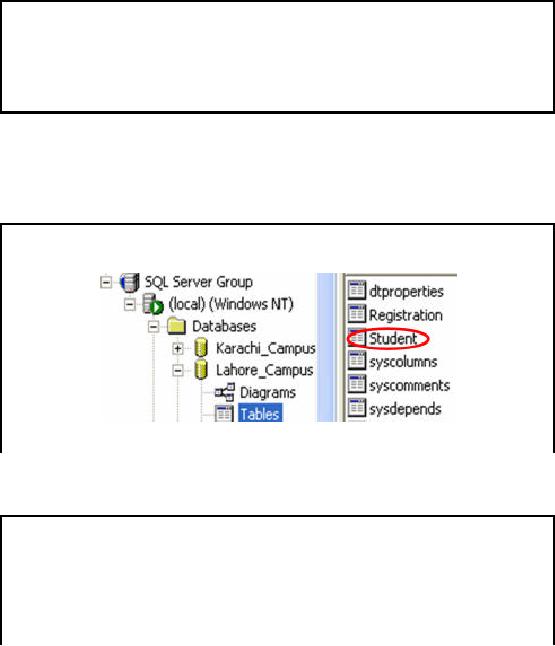
Verification
of Results(1)
�
Results
can be verified by view
resultant table and its
rows
�
New
Database "Lahore_Campus" can be accessed
through SQL Server Enterprise
Manager
�
Expand
the tree on the left
pane
�
Local >
Databases > Lahore_Campus >
Student
After
successful completion of the package we
can verify the results by
viewing the
destination
table
and its rows. To access
new database `Lahore_Campus", we will
use SQL Server
Enterprise
Manager. In SQL
Server Enterprise Manager we will
expand the console tree in
the left pane
and
drop
the databases, there we can
find `Lahore_Campus'. Double click
the node tables and
locate
Student
table in right pane
window.
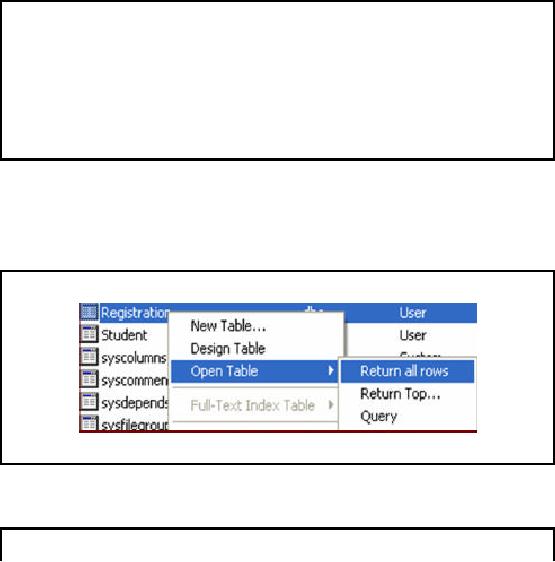
Verification
of Results(2)
Right click
"Student"
Open
Table > Return all
rows
Right click
student table and select
option `Return all
rows' in
sub menu open Table. This
will
show you
all the rows loaded in the
destination table.
Adding
More Records to Table
�
The
Loaded file contains the
data for batch 1994
only
�
Data
for remaining ten batches is
stored in ten separate text
files
�
In SQL Server we
will be having only one
student table for all
batches in a campus, so
data
for remaining table is required to be
added in same table
By this
step destination table
contains the data for
one batch only, as the
source file was for
the
1994 only.
Data for remaining ten
batches is stored in separate
text files. We are required
to add
the data
for remaining batches in the
same table. Following slides
guide you for loading data in
the
same table.
399
Adding
More Records to
Table
�
Repeat
first five steps as it was
done while loading previous
table
�
In step
six, Drop down destination
menu and select the
table in which you want to
append
the
records
To load data in
the same table, we are
required to repeat first five
steps as it was done
before.
1. Launch the
Wizard
2. Choose a
Data Source
3. Choose a
Database
Specification
of file format incase of
Text files
1. Specify
the Destination
2. Choose
Destination Database
Selection
of existing database
"Lahore_Campus"
The
difference comes in 6th step
when we select destination
table. To choose destination
table
drop
the menu in Destination
column and locate the
name of required table that is
"Student". That
is all we
are required to add records in
the same table.
Load
All BS &MS Student Records For
Lahore
�
Repeat
the same procedure for
remaining nine files for the
batches 1996 to 2004
�
Then load
"Course Registration Details" data in a
new table "Registration"
�
We have eleven
files for Registration data,
one for each
batch
�
Load
all files in table,
"Registration"
400
We are required
to repeat the same procedure
for remaining nine files for
the batches 1996 to
2004.
After loading all text files
containing student data of Lahore campus,
load "Course
Registration
Details" data in a new table
"Registration". We can find eleven files
for registration
data,
one for each batch.
Load all course registration
details files in table,
"Registration"
Loading
"Course Registration"
Records
�
Load "Course
Registration" records, in the same
way
�
We have 11 BS +
4 MS text files for Registration
data, one for each
batch
�
Load
all files in table, "Registr
tion"
a
�
Registration
records already contain a
column indicating degree (BS/MS)
Similarly load
all text files that
contains course registration details
records. We have 11 text
files
for BS
registration detail records and 4 text
files for MS registration detail records.
Create new
table
registration and load all files in
new table. After loading
all course registration records
for
BS and MS we
can see that each record
would still be identified
uniquely as registration table
contains a
column indicating t he degree of a
student either BS or
MS.
Verification:
"Course Registration"
Records
�
Right click
Registration table through enterprise
manager, to get the above
menu
In the
same way as we did for
Student table we may verify
the results of package
targeting
Registration
records load.
Verification:
"Course Registration"
Records
401
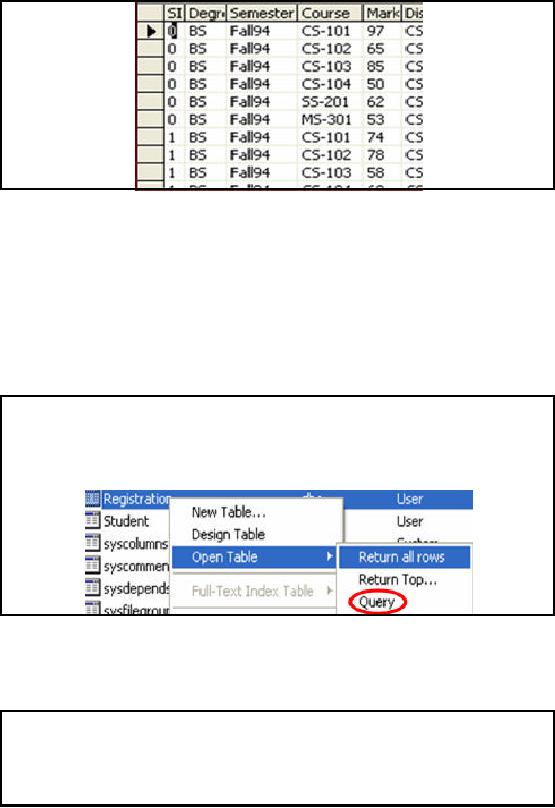
The above
slide shows the output of query "
Return
all rows" from
Registration
table.
Demographics
�
Finally
all the data for Lahore
Campus has been
loaded
�
Now we
can collect demographics on
this data through
queries
By this time we
have two tables in SQL
Server, Students & Registration that
contain all students
and registration
records for Lahore Campus
respectively. Before starting
transformation and
quality check of
data, it is required to collect
demographics so that we can
chalk out the way
of
transformation.
Total
students & BS Students
�
Total
Number of Students
Select
COUNT(*) AS Expr1
From
Student
�
5,200
402

�
Total BS
students
SELECT
COUNT(*) AS Expr1
FROM
Student
WHERE ([Last
Degree] IN ('F.Sc.', 'FSc', 'A
level', 'A -Level', 'HSSC'))
� 4,400
Total
number of students
This is
the simplest query that
counts the total number of students
registered in Islamabad
campus.
For each campus
individually, this query provides
correct results but for
consolidated
data
for all campuses this
type of query will count
those students twice who
admitted in one
campus
and then transferred to
another campuses as their names
would be present in
the
databases of
both campuses. While running
queries for consolidated
data we must take care
of
such
issues.
Total BS
students
Repeating
IDs for BS and MS students
make such queries
complicated which involves
the
separation of BS
and MS students. To count total number of
BS students we must separate
them
from MS
students. In Student
table we do not
have any such direct
information that can filter
BS
students
from total students. To meet
such requirements we devised a methodology
of
considering
degree information. No doubt this is not
a perfect way of filtering as the
quality of
result
can suffer a lot due to
the presence of outliers. However, in
real life when we have to
deal
with
legacy systems we need to
face hundreds of such
complicated issues due to
bad designs and
limitations of
legacy systems. In such
scenarios we need to devise solutions
intelligently through
indirect
ways.
SIDs
vs. Students
�
Total
unique SIDs
SELECT
COUNT(DISTINCT SID) AS
Expr1
FROM
Student
�
4,400
�
SIDs
are exactly equal to the BS
students
Total
unique SIDs
In this query we
counted the distinct student
IDs from student table.
The answer is exactly
equal
to the total
number of BS students because the
student IDs are unique among
BS students only
and
same IDs are repeating
for BS students.
Unique
identification of each
student
Unique
identification of each student is
possible through combination of degree only. In
one
campus
there can be only one
such student who has
SID=1 and he is enrolled in BS
degree
program.
Similarly there can be only
one student is possible who
has again SID=1 and is
enrolled
for MS
degree program. Each SID can
be repeated at most twice, one time
for BS student and
other
time for MS student.
Repeating
Student IDs for BS and
MS
403

�
Students
IDs are repeating for MS
students
�
After
loading records of MS students in
the same table with BS
students, student ID is no
more useful to
identify each record
uniquely
�
Now we
need some more information to be
used with IDs to identify
each record
uniquely
After
loading all files for BS
and MS, you will find an
interesting problem. As the university
was
managing the
records of BS and MS separately,
Student ID was used as Primary
key to identify
students
uniquely. Student ID is just an
auto-increment sort of number
which starts from zero
for
both BS and MS
students. In warehouse environment when
we have combined both BS and
MS
students,
Student ID no more uniquely identifies
each student in
warehouse.
Solution of
Repeating IDs
�
Problem of
repeating IDs can be resolved through
the use of `Last Degree'
column with
ID
�
SID +
[Last Degree] -> unique
record
�
1) SID =
`100', [Last Degree] =
`F.Sc.' 2) SID = `100',
[Last Degree] =
`M.Sc.'
�
1) is a BS
student & 2) is an MS student
� What
can be outliers here?
As ID is no more useful we
need to add some additional
information with ID to identify
each
student
uniquely. If we look at table structure
of student table, we can
find a column Last
degree
that
can be used to distinguish BS students
from that of MS students.
But there is also a
little
chance of
outliers like the students
who are doing MS in computer
science after MS in
physics
etc.
These outliers, if exists,
will be handled
separately.
Solution of
Repeating IDs (Cont.)
�
Outlier
can be a BS student who has
already sixteen years education
background (say) in
Mathematics
and he is again registered
for BS computer
science
�
Such a
student can have [last
degree] = `M.Sc.'
At this time we
will use information like if
student ID is 1 and last
degree is `F.Sc.' he is an
undergraduate
student, and if student ID is 1
and last degree is BS then
he is a graduate student
who is
enrolled in MS.
Male
Students
�
Total
Number of Male
Students
SELECT
COUNT(*) AS Expr1
FROM
Student
WHERE
(Gender = '0')
�
3,466
404

To find out
the total number of male students we
counted all records where
gender = `0'. This
gives
3,466. We can not say any
thing about the quality of
this result. The quality
can be
discussed after
data profiling but not at
this stage. There may be a
lot of errors in data, we
may
have
some other male students
for whom gender is missing
here. We may have some
records with
noise
like '01' or '10' which out
of domain of the column. But all
such issues can be
identified
first in
data profiling only not
before that.
Female BS
students in Telecom
�
Total
Number of Female students in BS
Telecom
SELECT
COUNT(DISTINCT r.SID) AS
Expr1
FROM
Registration r INNER
JOIN
Student s ON
r.SID = s.SID AND
s.[Last Degree]
IN ('F.Sc.', 'FSc',
'HSSC', 'A
-Level', 'A level')
AND
r.Discipline =
'TC' AND s.Gender =
'1`
�
365
This query
requires access of both student and
registration table. Gender of student can
be found
from
student table where as Discipline
can be found from registration
table only. To find
the
answer of
such a query we need to have inner
join of both tables.
Extracting
Data for Karachi
Campus
�
Now
load data for Karachi
Campus
1.
Connect to
source MS-Excel
2.
Connect to
Destination SQL Server
3.
Create
new database `Karachi_Campus'
4.
Create
two tables Student &
Registration
5.
Load
data from the Excel
worksheet containing student information
into Student table
6.
Load
data from the Excel
worksheets containing reg istration
records into
Registration
table
�
Import/Export
Wizard is sufficient to perform all
above mentioned tasks
easily
By this
time we have loaded data and
collected demographics for Lahore
campus only. Now we
are required to
load data fro Karachi ca mpus.
For Karachi campus we need to load
data from
Excel files.
Main steps of loading are as
follows:
1. Connect to
source MS-Excel
2. Connect to
Destination SQL Server
3. Create
new database `Karachi_Campus'
4. Create
two tables Student &
Registration
5. Load
data from the Excel
worksheet containing student information
into Student table
6. Load
data from the Excel
worksheets containing registration
records into
Registration
table
405
Again
Import/Export Wizard is sufficient to
perform all above mentioned
tasks easily
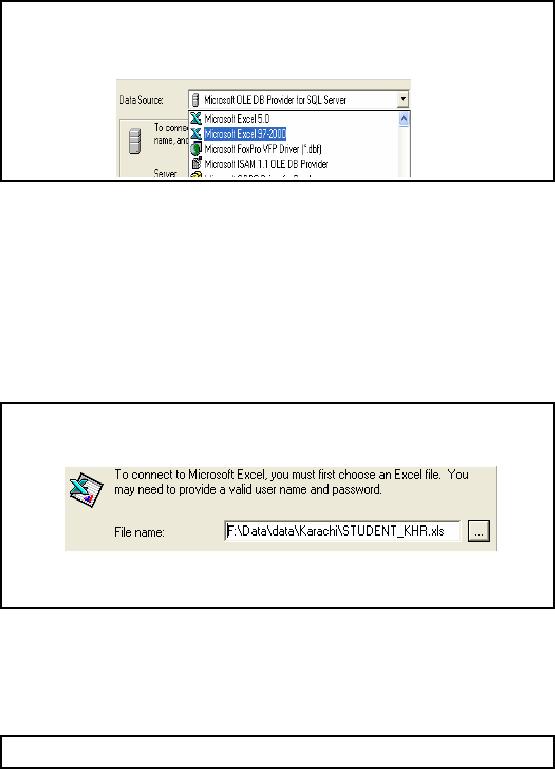
Student
data for Karachi
�
Step1:
Launch the wizard
�
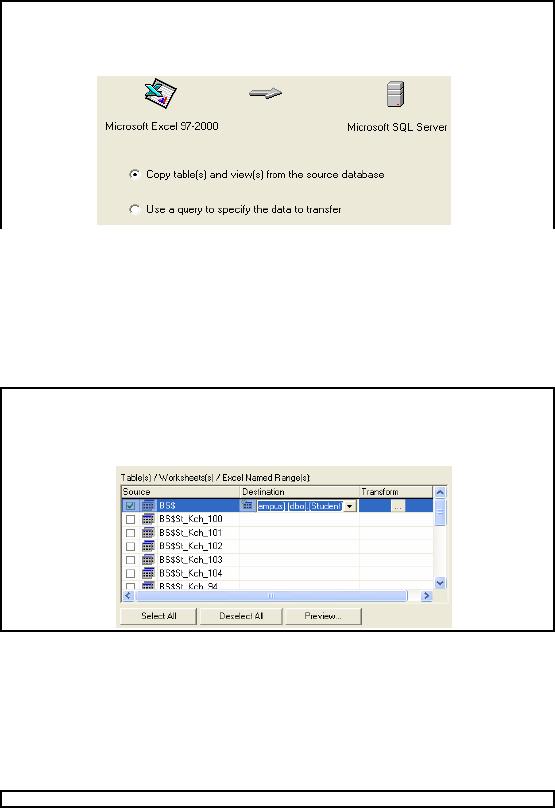
Step2a :
Choose a data source
Step 1 is
same as it was for the
text files. In step two we
need to select Microsoft
Excel 97-2000
as data
source.
Student
Data for Karachi (Cont.)
�
Step2b: Browse
Student Excel-Worksheet
�
STUDENT.xls
for all BS/MS student
records
�
Reg_BS_KHR.xls
for BS Registration
records
�
Reg_MS_KHR.xls
for MS Registration
records
After selection
of MS-Excel data source, we
are required to locate the
data file that
contains
extension
".xls". To load student data we
need to locate STUDENT.xls
data file as it
contains
data
for both BS and MS
students.
When we
will load registration data we will
require to load Reg_BS_KHR.xls file for BS
students
registration
details and Reg_MS_KHR.xls for MS
students registration
records.
Student
Data for Karachi (Cont.)
406
�
Step 3:
Specify
Destination
�
Step 4:
Choose/Create
Database
� Karachi_Campus
�
Step 5 a:
Table/View or
query
In step3 we
select Microsoft SQL Server
as destination and in step4 we
create new database
Karachi_Campus
in the same way that we
adopted for
Lahore_Campus.
As some
particular sort of queries can be
run in MS Excel therefore wizard
asks us whether we
want to extract
data from source through query or we want
to c opy complete table/view. As
we
do not want to
filter data through query
therefore we will select the
other option that is
copy
complete
table/view.
Student
Data for Karachi (Cont.)
�
Step
5b:
�
Choose BS to
copy complete worksheet of BS
students
In this
screen we can see a lot of
worksheets, where as in our Student_KHR.xls
file there are
only
two
worksheets, one for BS and
one for MS. You
can see in the dialog box
that the name of
worksheet BS is
followed by `$'. To load complete
worksheet BS select the
first option `BS$'.
Following
options show logical
divisions with in a worksheet.
Like in this case we can
see an
option
`BS$St_Kch_94', it means that by
selecting this option only
those students will be
copied
who belong to
the batch 1994. Similarly, by selecting
the option `BS$St_Kch_100' only
students
of batch 2000
will be copied but if we select
the option BS$ then
all students in worksheet
BS
irrespective of
their batch will be
copied.
Student
Data for Karachi (Cont.)
407

�
Step 5b
(Cont.)
:
�
In step 5b you
can see two columns
Source and
Destination
�
If we want to
copy all records from BS
worksheet we need to check
`BS$'
�
If we want to
copy only those records
from BS worksheet that
belongs to year
2000 we
need to choose
BS$St_Kch_100
�
Similarly
BS$St_Kch_101 belongs to records of
year 2001 and so on
In step 5b we
can see two columns
Source and Destination. If we want to
copy all records
from
BS worksheet we
need to check `BS$'. If we want to
copy only those records
from BS worksheet
that belongs to
year 2000 we need to choose
BS$St_Kch_100. Similarly
BS$St_Kch_101
belongs to
records of year 2001 and so
on
Student
Data for Karachi (Cont.)
�
Step 5b
(Cont.)
:
�
For Ms-Excel, it
is a convention to use `$' after
worksheet name like `BS$'
/
`MS$'
�
If there
are any logical divisions of records
within an Excel worksheet, it
is
written after
`$' sign like
`BS$St_Kch_94'
�
In the
given dataset of Karachi BS Excel
worksheet contains data
records for
eleven
years (9404 )and MS
Excel worksheet contains
data records for 4
years
(01-04)
�
Records
with in an Excel worksheet
are logically divided on
annual basis hence
we can
see options like
`BS$ST_Kch_94'
For
MS-Excel, it is a convention to use `$'
after worksheet name like
`BS$' / `MS$'. If there
are
any
logical divisions of records
within an Excel worksheet, it is
written after `$' sign
like
`BS$St_Kch_94'. In
the given dataset of Karachi BS
Excel worksheet contains
data records for
eleven years
(9404 )and MS Excel
worksheet contains data
records for 4 years (01-04).
Records
with in an
Excel worksheet are
logically divided on annual
basis hence we can see
options like
`BS$ST_Kch_94'.
Student
Data for Karachi (Cont.)
�
Step 5b
(Cont.)
:
�
As we want to
copy all records from BS
worksheet and all records
from MS
408
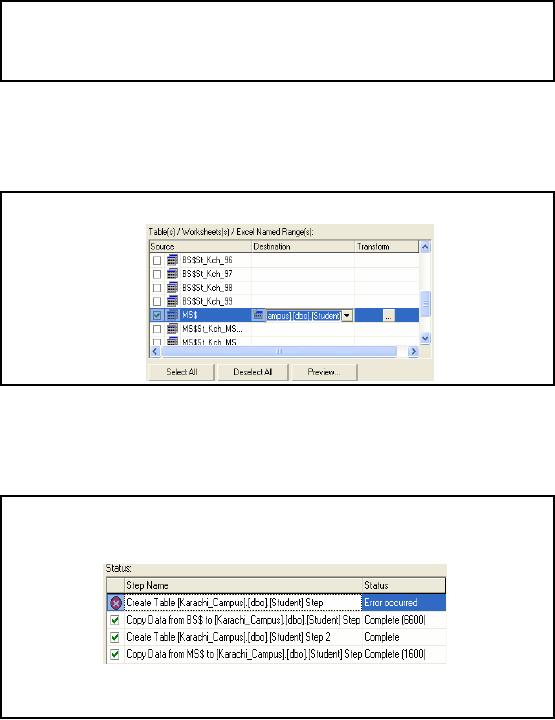
worksheet as
well, therefore, we will choose
two options from sources
BS$ and
MS$
�
As Records
from both worksheets are required to be
copied into a single
table
Student,
therefore, rename destinations against
both sources as "Students"
Loading
data from MS-Excel workbook
provides us facility of loading
data in all worksheet
through single
package. On the same dialog
box, scroll down and find
option MS$ under the
column Source.
By this way you can load other
worksheet MS in the same
table. Locate t he
row
having
check box against MS$ and
rename the destination as `Student'. So
that all data from
both
worksheets load
in the same table
Karachi.
Student
Data for Karachi (Cont.)
So,
finally two options should
be checked under the column Source,
one is BS$ and the
other one
is MS$. Against both options
the table name should be the
same i.e. Student, because
our
destination is
same. We can use third
column transform, by pressing button against
the selected
row.
This option provides us the
same mapping view that we
have seen earlier, while
loading text
file.
Student
Data for Karachi (Cont.)
�
Step
6:
�
Run
the package immediately
�
Status
after package completion is as
follows:
After
this, run the package.
After successful execution we
can see the above
window. We can see
that
there were four steps in
this case:
1) Create
table student
2) Load
data of Karachi BS students
409

3) Create
table Student
4) Load
data of Karachi MS students
As we checked
two options therefore package
will try to create the
two destination tables.
But
both tables
have same names therefore
SQL Server database will not
allow to create two
tables
with
the same name `Student'.
Hence out of four, Task
three will be terminated
with an error
`Student
table already exists'. As no new
destination table is created
for MS student therefore
finally
all records of MS worksheet
will be loaded in the same
table `Student', due to
same
destination
name. Same information can
be seen in above dialog, but these
errors are not
reported
in the
order in which they occur.
Therefore we can see first
task failed where as it is third
in
reality.
Student
Data for Karachi (Cont.)
�
Step 6
(Cont.)
:
�
It can be
seen that a task listed
first in previous figure is
failed
�
Choosing Source
`BS$' and selecting
destination table `Student' means
create
table
student and copy all
records from destination
worksheet to student
table
�
Similarly
Choosing source `MS$' and
selecting destination table
`Student' means
exactly
the same
�
Hence
package tries to create
table student twice, once
for BS and then for
MS
It can be
seen that a task listed
first in previous run
failed. Choosing Source `BS$'
and selecting
destination
table `Student' means create
table student and copy
all records from
destination
worksheet to
student table. Similarly
Choosing source `MS$' and
selecting destination
table
`Student'
means exactly the same.
Hence package tries to
create table student twice,
once for BS
and
then for MS
Student
Data for Karachi (Cont.)
�
Step 6
(Cont.)
:
�
But
second time SQL does not
allow to create the table
with the same
name
�
Therefore a
task to create table again
fails
�
As there
exists only one table
student therefore all data
for BS and MS is
copied
to the
same table
�
Rest of
the three tasks are
successful
� Create
table student
� Copy BS
records worksheet
� Copy MS
records worksheet
But
second time SQL does not
allow to create the table
with the same name.
Therefore a task to
create
table again fails. As there
exists only one table
student therefore all data
for BS and MS is
copied to the
same table. Rest of the
three tasks are
successful:
1. Create
table student,
2. Copy BS
records worksheet &
3. Copy MS
records worksheet
However, their
order of reporting is not the same in
which they actually
occurred.
410

Registration
Data for Karachi
�
Similarly load
Registration data for Karachi
Campus
�
There are
two Excel workbooks for
Registration data of Karachi
� Reg_BS_KHR
� Reg_MS_KHR
�
Reg_BS_KHR
contains six worksheets each
containing registration records of
two
batches
�
Reg_MS_KHR
contains only single
worksheet contianing all records of 4
batches
Now we
are required to load registration detailed records
for Karachi campus. There
are two MS-
Excel workbooks,
one for BS & the other
one for MS. Workbook for BS
contains 6 worksheets,
each
sheet containing records for 2
batches whereas the
worksheet for MS contains
all records in
one
worksheet. We need to load all
worksheets complete.
Registration
Data for Karachi (Cont.)
�
First of all
load all BS records into a
new table `Registration' in
database
`Karachi_Campus'
�
Then
append all Ms records into
the same table
`Registration'
�
All
these tasks can be performed
through wizard in the same
way as previous data
was
loaded
For
loading all BS records in a
new table `Registration' we
can write only one
package. Then we
will
develop another package that
will append all MS records
in Registration table. This
all can
be done in
the similar way as we have
done before.
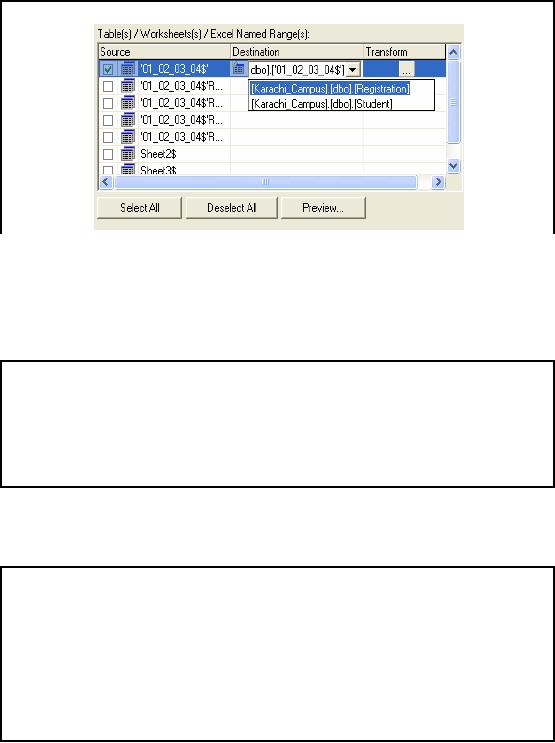
To select
complete worksheet to be copied we
need to check the row
indicating the name of
worksheet
followed by immediate `$'
without any logical division.
Then set destination table
as
registration.
All registration records either for BS or
for MS should be loaded in
the same
registration
table.
Registration
Data for Karachi (Cont.)
The
above slide shows that we
are selecting only those
options that are showing
name of
worksheet
followed by `$; sign. Against both
options we are setting
destination as `Registration'.
411
Registration
Data for Karachi (Cont.)
�
As the
source is again an Excel
book t herefore we have sources
with same convention
i.e.
Worksheet
name followed by `$' and
logical division of work
sheet
�
Check
only those sources that
corresponds to full worksheet
like '94 -95$', such
sources
always
miss the name of logical
division after `$'
sign
As the
source is again an Excel book therefore
we have sources with same
convention i.e.
Worksheet
name followed by `$' and
logical division of work
sheet. Check only those
sources
that
correspond to full worksheet
like '94-95$', such sources
always miss the name of
logical
division
after `$' sign.
Checking each of
the check boxes, results in
two tasks in the final
package. One is to create a
new
table,
always, with the name
specified in destination with
the same structure as
specified by the
source
table. As we have set same
name for destination table
that is Registration, therefore
only
one
task of new table creation
will succeed rest of all
Create Table task will
fail and data will
be
loaded in
the same table
Registration.
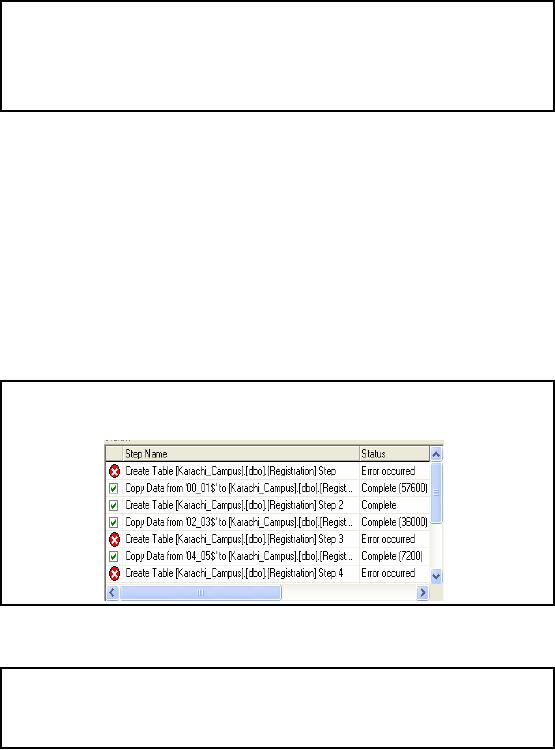
Registration
Data for Karachi (Cont.)
�
Status of
completion is as follows
This time it
can be easily identified
that only those tasks
are failed that attempted to
create a new
table
Registration. Rest of all
tasks of copy data copied
data into same destination
table.
Registration
Data for Karachi (Cont.)
�
All
tasks intended to create a
new table with the
same name `Registration' are
failed
�
All
the records are appended to
already created single table
`Registration'
�
Similarly
append the Records for MS
students in the same
Registration table
412
All
tasks intended to create a
new table with the
same name `Registration' are
failed. All the
records
are appended to the already
created single table `Registration'.
Similarly append the
Records
for MSstudents in the same
Registration table
Registration
Data for Karachi (Cont.)
Similarly load
MS data from the workbook
Reg_MS_KHR.
Again
set Registration table
as
destination
table and perform remaining
steps as it is. As Registration
table already e xists,
again
create
table task would fail
and data will be loaded in
the same Registration table,
appending new
records.
Demographics
(1)
�
Finally
all the data for Karachi
Campus has been
loaded
�
Now we
can collect demographics on
this data through
queries
�
First we
try the same queries
that we used for Lahore
Campus
Finally
all the data for Karachi
campus has been loaded.
For collection of demographics, first
of
all we
try the same queries
that we used for Lahore
campus. As the table names
are same i.e.
Student
and Registration, therefore, those
queries should work here
also.
Demographics
(2)
�
Total
Number of Students
Select
COUNT(*) AS Expr1
From
Student
�
8,200
�
Total BS
students
SELECT
COUNT(*) AS
Expr1
FROM
Student
WHERE
([Last Degree]
IN ('F.Sc.', 'FSc', 'A level', 'A
-Level', 'HSSC'))
413

�
Error, [Last
Degree] invalid
column
Total
Number of Students
Select
COUNT(*) AS Expr1 From Student;
This query
returns 8,200, which is
correct. This is exactly the
same query that we have
already
run
for Lahore campus. Due to
the standardization of table
names we get this
benefit.
Total BS
students
SELECT
COUNT(*) AS Expr1
FROM
Student
WHERE ([Last
Degree] IN ('F.Sc.', 'FSc', 'A
level', 'A -Level', 'HSSC'))
This query
returns Error,
[Last Degree] invalid
column. Because in
Karachi campus
student
table,
there is no column name as [Last Degree], but
same information is stored in
qualification
column.
Demographics
(3)
�
At Karachi
campus, correct column is `Qualification'
instead of [Last Degree],
similarly
names of
others columns are also
different from those of Lahore,
therefore, same queries
are not
applicable here
�
Correct Query to
count BS students is
SELECT
COUNT(*) AS Expr1
FROM
Student
WHERE
(Qualification IN ('F.Sc.', 'FSc',
'A level', 'A -Level', 'HSSC'))
�
6,600
This is
one of the characteristic of non
standardized and heterogeneous
data that same
information is
stored under different column name.
Therefore, we need to standardize
all column
names
and data-types so that data
from different databases can
be put together. Now, to
extract
same
information for Karachi campus we
need to correct the above query
as
SELECT
COUNT(*) AS Expr1
FROM
Student
WHERE
(Qualification IN ('F.Sc.', 'FSc', 'A level',
'A-Level', 'HSSC'))
Now
there is no problem and query
gives correct results
(6,600) for Karachi campus.
There may
be some outliers
but that can not be identified at
this stage.
414

Demographics
(4)
�
To find total
number of male students we use
same query that we used for
Lahore except
Column name
`Gender' which is `M/F'
here, so query is
SELECT
COUNT(*) AS Expr1
FROM
Student
WHERE
([M/F] = '0')
�
0, Incorrect
answer
�
Answer to the
query is zero i.e. no male
student in Karachi campus which is
definitely
incorrect
Now we
try to find the number of
male students at Karachi campus. We
submit the same
SQL
query that we
run for Lahore campus.
The answer turns out to be
zero. There must be some
thing
incorrect in
this query otherwise it can not be zero.
To identify the error we
look at the data
and
can
easily point out that the
error is due to the
inconsistent gender storage
conventions. At Lahore
campus, 1 is a
convention to store female
and 0 is a convention to store
male whereas at Karachi
campus M
for male and F for female is
used. To put all data in
single source we need
to
standardize
the data storage
conventions.
Demographics
(5)
�
If we look in
the data for Karachi campus
we can find out the
reason for the error
in
above
query
�
For Karachi
campus convention to store gender
information is M (male) and F
(female)
instead of 0
(male) and 1 (female)
�
Correct
query is
SELECT
COUNT(*) AS Expr1
FROM
Student
WHERE
([M/F] = `M')
�
5,463
Following is
the correct query that can
be used for Karachi campus to
count the total number
of
male
students at Karachi campus.
SELECT
COUNT(*) AS
Expr1
FROM
Student
WHERE
([M/F] =
`M')
The
answers to be 5,463.
Demographics
(6)
�
Total
Number of Female students in BS
Telecom
415

�
We again
need to correct the query
which was written for
Lahore Campus, and
correct
query
is
SELECT
COUNT(DISTINCT r.St_ID) AS
Expr1
FROM
Registration r INNER
JOIN
Student s
ON r.St_ID = s.St_ID
AND
s.Qualification IN ('F.Sc.', 'FSc',
`HSSC',
'A-Level', 'A level') AND
r.Disp = 'TC'
AND
s.[M/F] = 'F'
�
551
Similarly to
get the count of total number of female
students in BS telecom, we need to
correct
the column
names and data storage
conventions. The correct
query is as follows:
SELECT
COUNT(DISTINCT r.St_ID) AS
Expr1
FROM
Registration r INNER
JOIN
Student s
ON r.St_ID = s.St_ID
AND
s.Qualification IN ('F.Sc.', 'FSc',`HSSC',
'A-Level', 'A level')
AND
r.Disp =
'TC'
AND
s.[M/F] = 'F'
Answer is
551
Slide 1
416
Table of Contents:
- Need of Data Warehousing
- Why a DWH, Warehousing
- The Basic Concept of Data Warehousing
- Classical SDLC and DWH SDLC, CLDS, Online Transaction Processing
- Types of Data Warehouses: Financial, Telecommunication, Insurance, Human Resource
- Normalization: Anomalies, 1NF, 2NF, INSERT, UPDATE, DELETE
- De-Normalization: Balance between Normalization and De-Normalization
- DeNormalization Techniques: Splitting Tables, Horizontal splitting, Vertical Splitting, Pre-Joining Tables, Adding Redundant Columns, Derived Attributes
- Issues of De-Normalization: Storage, Performance, Maintenance, Ease-of-use
- Online Analytical Processing OLAP: DWH and OLAP, OLTP
- OLAP Implementations: MOLAP, ROLAP, HOLAP, DOLAP
- ROLAP: Relational Database, ROLAP cube, Issues
- Dimensional Modeling DM: ER modeling, The Paradox, ER vs. DM,
- Process of Dimensional Modeling: Four Step: Choose Business Process, Grain, Facts, Dimensions
- Issues of Dimensional Modeling: Additive vs Non-Additive facts, Classification of Aggregation Functions
- Extract Transform Load ETL: ETL Cycle, Processing, Data Extraction, Data Transformation
- Issues of ETL: Diversity in source systems and platforms
- Issues of ETL: legacy data, Web scrapping, data quality, ETL vs ELT
- ETL Detail: Data Cleansing: data scrubbing, Dirty Data, Lexical Errors, Irregularities, Integrity Constraint Violation, Duplication
- Data Duplication Elimination and BSN Method: Record linkage, Merge, purge, Entity reconciliation, List washing and data cleansing
- Introduction to Data Quality Management: Intrinsic, Realistic, Orr’s Laws of Data Quality, TQM
- DQM: Quantifying Data Quality: Free-of-error, Completeness, Consistency, Ratios
- Total DQM: TDQM in a DWH, Data Quality Management Process
- Need for Speed: Parallelism: Scalability, Terminology, Parallelization OLTP Vs DSS
- Need for Speed: Hardware Techniques: Data Parallelism Concept
- Conventional Indexing Techniques: Concept, Goals, Dense Index, Sparse Index
- Special Indexing Techniques: Inverted, Bit map, Cluster, Join indexes
- Join Techniques: Nested loop, Sort Merge, Hash based join
- Data mining (DM): Knowledge Discovery in Databases KDD
- Data Mining: CLASSIFICATION, ESTIMATION, PREDICTION, CLUSTERING,
- Data Structures, types of Data Mining, Min-Max Distance, One-way, K-Means Clustering
- DWH Lifecycle: Data-Driven, Goal-Driven, User-Driven Methodologies
- DWH Implementation: Goal Driven Approach
- DWH Implementation: Goal Driven Approach
- DWH Life Cycle: Pitfalls, Mistakes, Tips
- Course Project
- Contents of Project Reports
- Case Study: Agri-Data Warehouse
- Web Warehousing: Drawbacks of traditional web sear ches, web search, Web traffic record: Log files
- Web Warehousing: Issues, Time-contiguous Log Entries, Transient Cookies, SSL, session ID Ping-pong, Persistent Cookies
- Data Transfer Service (DTS)
- Lab Data Set: Multi -Campus University
- Extracting Data Using Wizard
- Data Profiling