 |
BASICS OF HTML 1 |
| << NETWORKING DEVICES |
| BASICS OF HTML 2 >> |
E-COMMERCE
IT430
VU
Lesson
05
BASICS
OF HTML
john@hotmail.com
is the
example of an email address. In
order to deliver an email at this
address, the part
`hotmail.com'
would first be translated
into the IP address of hotmail
email server through DNS. A
message
sent
to John can then be stored in
his account lying in the
hotmail email server. There
are three protocols
commonly
used for emails. Simple
Mail Transfer Protocol (SMTP) is
used for sending email
messages
between
servers. In other words it is
used for message uploads.
Post Office Protocol 3
(POP3) or Internet
Message
Access Protocol (IMAP) can
be used to retrieve messages. They should
also be configured
with
SMTP.
POP is used to download
email to the client machine
from the server side and the
message is
deleted
from the email server after download. On
the other hand, in case of IMAP the
message is not
deleted
in the email server and thus
can be reopened from another
location/machine.
Hypertext
markup language
Web
documents are defined by the
Hypertext Markup Language
(HTML). It is a language of tags. A
tag is a
special
letter or key word enclosed
in angular brackets. Most
tags have their corresponding
closing tags
represented
by the same special letter or
key word enclosed in angular
brackets but preceded by a
slash (/).
Depending
upon which tag is used the
enclosed content can then
have a specific effect, style or
format.
HTML is
case independent. It has a fixed
no. of tags and attributes.
Attributes are those
specific
words/letters
prescribed for certain tags
having certain possible values.
The browser has the capability
of
reading/interpreting
each tag and its attributes
used in a code and can
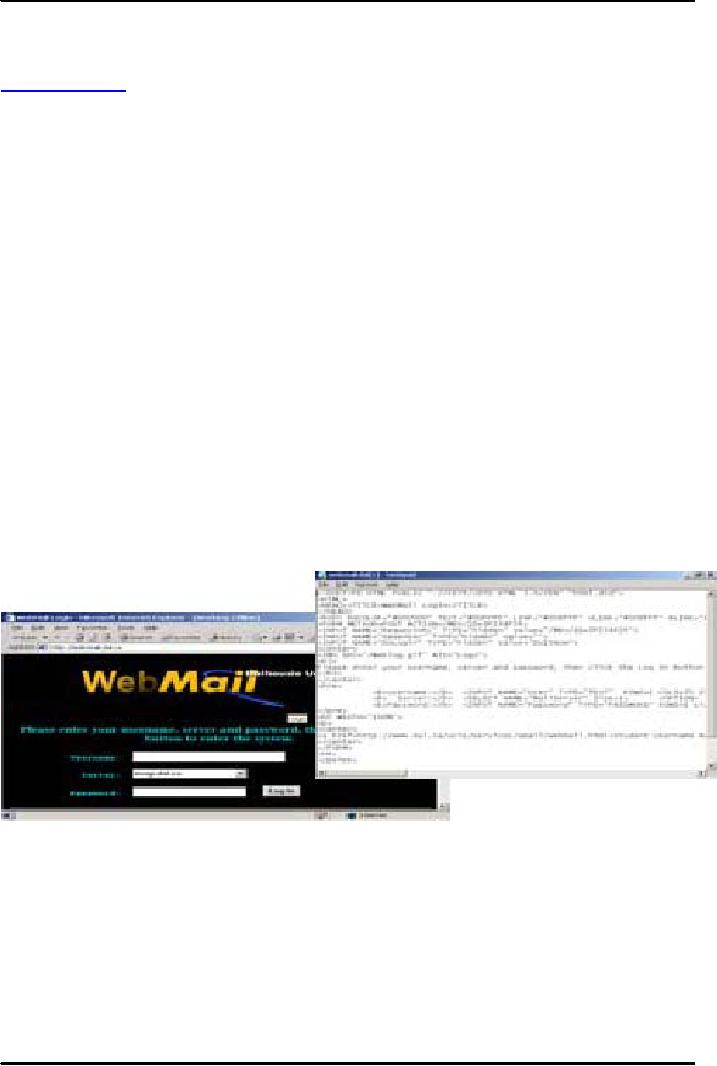
show the result accordingly. One
can
see the
source code of an HTML page
using the option View Source
as
shown in Fig. 1 below:
Looking
at the Code
Under
the View menu
Select
Source
Fig.
1
An HTML document
starts with <HTML> tag
which has its closing
tag. The entire text work
(including
tables,
images, lists, buttons etc.)
is contained within a pair of
<body> tag.A <Head>
tag can also be
used
before the
body tag to provide title
and other informationabout the
web page. Here is the
example of a
simple
HTML document:
<HTML>
<HEAD>
<TITLE>
My first page</TITLE>
18
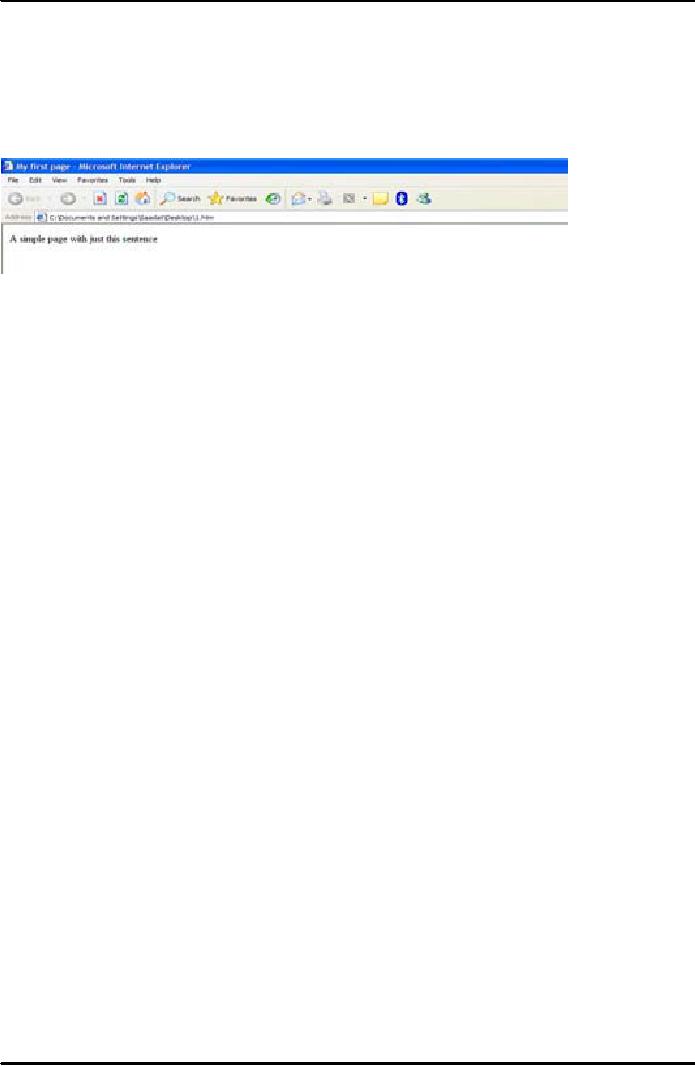
E-COMMERCE
IT430
VU
</HEAD>
<BODY>
A
simple page with just this
sentence
</BODY>
</HTML>
Result
is shown in Fig. 2 below.
Fig.
2
Text
formatting
-Paragraph
tag <p> can be used
for text formatting e.g,
<p Align="Center">Education provides a
better
understanding
of life</p> the enclosed sentence
would accordingly be displayed in the
center of the screen
due to
attribute align and its
value `center'. One can also
use Left or Right as values
for the attribute
`align'.
<br>
tag is used to provide a
line break.
-<center>Education
provides a better understanding of life
</center> would align the
enclosed
text in the center.
-<b>
and </b> are used for
bold text.
-<i>
and </i> are used for
italic text.
-<u>
and </u> are used of
underlined text.
-<big>
and </big> for bigger
font size.
-<small>
and </small> for
smaller font size.
Font
tag
Font
tag defines various font
properties. `Size', `face' and `color'
are its attributes. Attributescan be
used
simultaneously
in a tag as you can see below:
<font size=5 color=red
face=Arial>internet and e-
commerce</font>
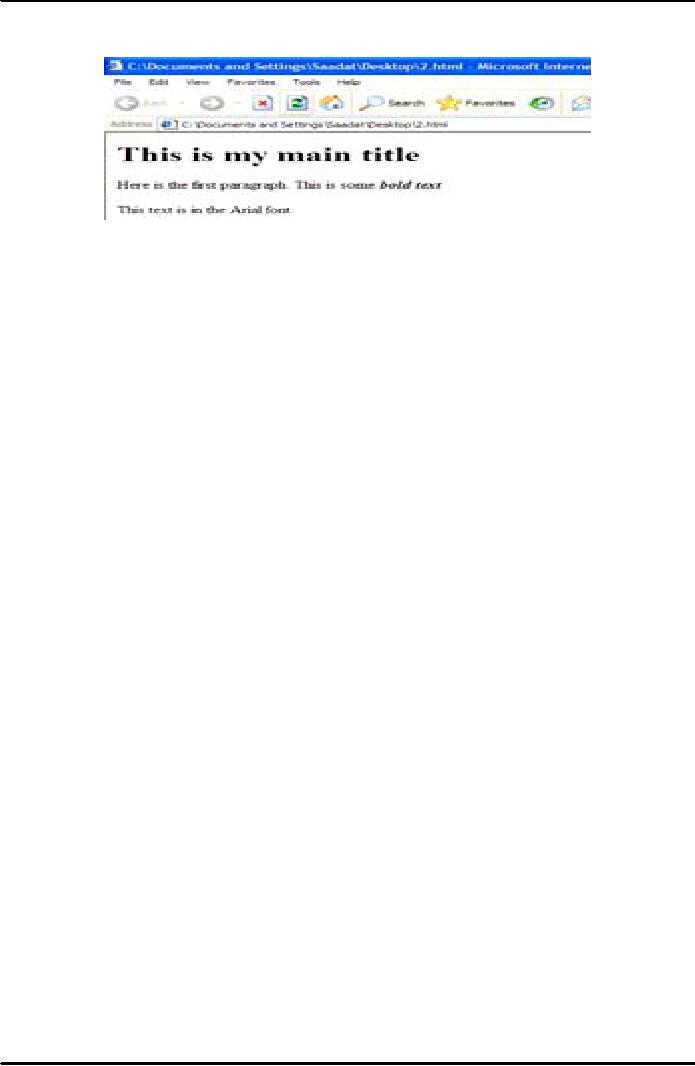
Example
code
<HTML>
<HEAD></HEAD>
<BODY>
<H1>This
is my main title</H1>
<p>Here
is the first paragraph. This is
some <b><i>bold
text</i></b></p>
<p><font
face="Arial">This text is in the Arial
font.</font>
</BODY>
</HTML>
19
E-COMMERCE
IT430
VU
Result
is shown in Fig. 3 below.
Fig.
3
Heading
in HTML
Six
different levels of headings
can be created in HTML.
Their syntax is given below:
<H1>
Level 1 largest text
</H1>
<H2>
Level 2 </H2>
<H3>
Level 3 </H3>
<H4>
Level 4 </H4>
<H5>
Level 5 </H5>
<H6>
Level 6 smallest text
</H6>
Creating
basic HTML
For
creating/viewing a web page
take the following
steps:
1
Open a
text editor like Notepad or
WordPad
2
Type
away
3
Save
as a "text" file and call it
filename.html
4
Start
up a browser
5
Open
up your file
6
File
menu -> Open
7
Browse
to find your file
8
Click
open and OK
9
To
make changes go back to the
text editor
10
Make
your changes and
SAVE
11
Go
back to the browser
12
Reload
use `Refresh' icon or
`Refresh' button in the View
menu or F5
List
in HTML
<UL>
and </UL> are used to
create unordered list. <OL> and </OL>
are used to create the ordered
list.
Use
<LI> and </LI> tags in
between as shown below:
<HTML><Body>
<UL>
<LI>Item1</LI>
<LI>Item2</LI>
<LI>Item3</LI>
</UL><P>
<OL>
<LI>Item1</LI>
<LI>Item2</LI>
<LI>Item3</LI>
</OL>
20
E-COMMERCE
IT430
VU
<P>
<hr
width=50% size=5 Align=
center
noshade></Body></HTML>
Result
is shown in Fig. 4 below.
Fig.
4
Note
that <hr> tag is used
to create a horizontal line.
Width, size, align and
noshade are its
attributes.
<hr>
and <br> tags do not
have corresponding closing tag.
You can also use
square, disc or circle type
of
bullets,e.g,
<UL Type="Square">Square</UL>. In case of
ordered list the default list is in the
format
1,2,3....You
can also use lowercase
letters (a,b..) uppercase
letters (A,B..) small Roman
numerals (i,ii..) and
large
Roman
numerals
(I,II..)
in
the
ordered
list
e.g;
<OL
Type="a"><LI>First></LI><LI>second</LI></OL>
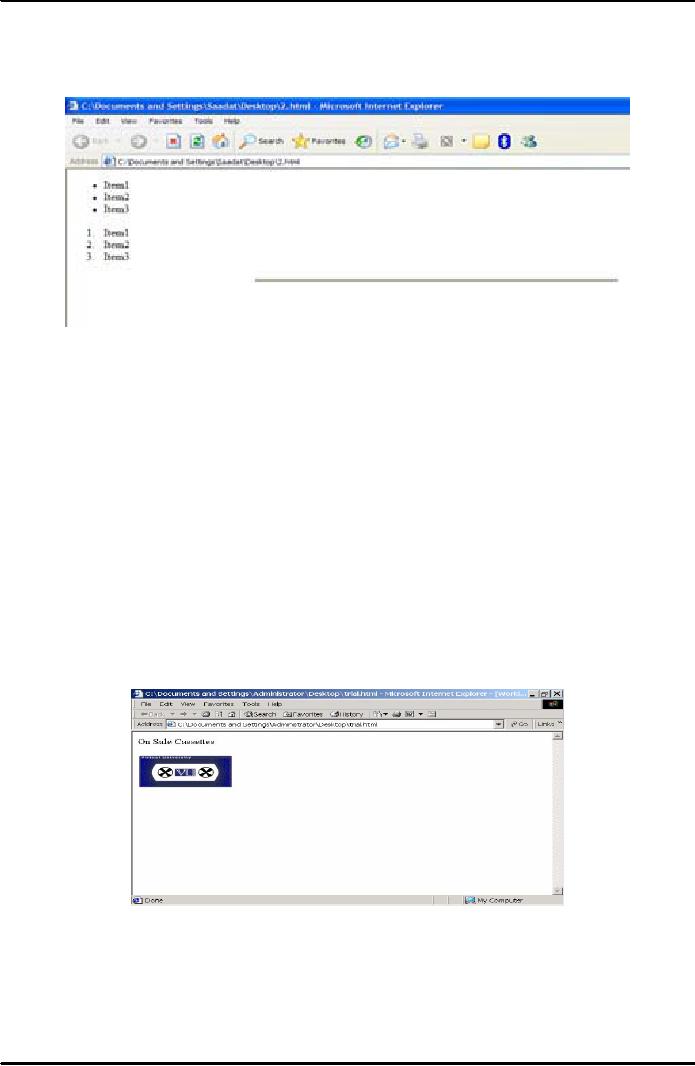
Applying
images in HTML
To apply an
image in html, use
<img> tag. Also, use
attribute `src' and keep the
name of the image file as
its
value.
Browser would display the
image corresponding to the place where
you have used the image
tag in
your
code. See the following example
code:
<HTML>
<BODY> <HI>On Sale
Cassettes</H1> <Img Src="cassette.gif">
</Body></HTML>
Result
is shown in Fig. 5 below.
Fig.
5
Commonly
used formats of image files are
.gif, .jpg etc. Common attributes of
image tag are shown
below,
for
example: <Img Src="cassette.gif"
width="80%" height="50%"
Align="Middle"> Width and
height
attributes
specify size of the image
and align attribute specifies the
positionof the image on the
page.
21

E-COMMERCE
IT430
VU
Downloading
graphics
To
download an image from the
web, do the following:
1.
Right click on the image.
2.
Choose `Save Picture' or `Save
Picture As'. You can
rename the image but you
cannot change its
type.
3.
Select a place to save
your image. It is usually
easiest to reference images if
you save them in the
same
folder
as your HTML document.
4.
Make a reference to the image in
your html document using the
<img> tag. Note that
you can also
create
your own images using a
graphics package.
22
Table of Contents:
- E-COMMERCE
- WHAT IS A NETWORK
- HOW MANY CLASS A, B, C NETWORKS AND HOSTS ARE POSSIBLE
- NETWORKING DEVICES
- BASICS OF HTML 1
- BASICS OF HTML 2
- TEXT BOXES, CHECK BOXES, RADIO BUTTONS
- FRAMES AND IMAGES IN HTML
- TAG ATTRIBUTES, SOUNDS FILES, ANIMATIONS
- STYLE SHEETS 1
- STYLE SHEETS 2
- SOME USEFUL STYLE SHEETS PROPERTIES
- JAVA SCRIPTING 1
- JAVA SCRIPTING 2
- JAVA SCRIPTING 3
- JAVA SCRIPTING AND XML
- CLIENT AND SERVER SIDE PROCESSING OF DATA
- APPLETS, CGI SCRIPTS
- MAINTAINING STATE IN A STATELESS SYSTEM
- INTEGRATION WITH ERP SYSTEMS
- FIREWALLS
- CRYPTOGRAPHY
- HASH FUNCTION AND MESSAGE DIGEST
- SYMMETRIC KEY ALGORITHMS
- VIRTUAL PIN PAYMENT SYSTEM
- E-CASH PAYMENT SYSTEM 1
- E-CASH PAYMENT SYSTEM 2
- SECURE SOCKET LAYER (SSL)
- E-BUSINESS: DISADVANTAGES OF E-BUSINESS
- E-BUSINESS REVENUE MODELS
- E-MAIL MARKETING
- CUSTOMER RELATIONSHIP MANAGEMENT (CRM)
- META INFORMATION
- DATA MINING
- CONFIDENCE AND SUPPORT
- ELECTRONIC DATA INTERCHANGE (EDI)
- PERSONAL FINANCE ONLINE
- SUPPLY CHAIN
- PORTER’S MODEL OF COMPETITIVE RIVALRY
- BARRIERS TO INTERNATIONAL E-COMMERCE
- ELECTRONIC TRANSACTIONS ORDINANCE, 2002 - 1
- ELECTRONIC TRANSACTIONS ORDINANCE, 2002 - 2
- ELECTRONIC TRANSACTIONS ORDINANCE, 2002 - 3
- GLOBAL LEGAL ISSUES OF E-COMMERCE - 1
- GLOBAL LEGAL ISSUES OF E-COMMERCE - 2