 |
JAVA: JavaServer Pages Standard Tag Library (JSTL) |
| << JAVA: Expression Language |
| JAVA: Client Side Validation & JavaServer Faces (JSF) >> |

Web
Design & Development CS506
VU
Lesson
43
JavaServer
Pages Standard Tag Library
(JSTL)
Introduction
The
JSP Standard Tag Library
(JSTL) is a collection of custom tag
libraries that implement
general-
purpose
functionality common to Web applications,
including iteration and
conditionalization, data
management
formatting, manipulation of XML, and
database access. Like JSP,
JSTL is also a
specification
not
an implementation. The development
theme of JSTL is "scriptlet
free JSP".
These
tag libraries provide a wide range of
custom action functionality
that most JSP authors have
found
themselves
in need of in the past. Having a
defined specification for
how the functionality is
implemented
means
that a page author can
learn these custom actions
once and then use and reuse
them on all future
products on
all application containers that support
the specification. Using the JSTL
will not only
make
your
JSPs more readable and maintainable, but
will allow you to
concentrate on good design
and
implementation
practices in your
pages.
JSTL
& EL
JSTL
includes supports for Expression
Language thus EL can be used
to specify dynamic attribute
values
for
JSTL actions without using
full-blown programming language. Prior to
JSP 2.0, EL can only be
used in
attributes
of JSTL tags but EL now
becomes a standard part of
JSP 2.0. This allows the
use of EL anywhere
in the
document.
Functional
Overview
As
mentioned, JSTL encapsulates common
functionality that a typical
JSP author would encounter.
This
set
of common functionality has come
about through the input of
the various members of the expert
group.
Since
this expert group has a
good cross-section of JSP authors and
users, the actions provided in the
JSTL
should
suit a wide audience. While the
JSTL is commonly referred to as a
single tag library, it is
actually
composed
of four separate tag
libraries:
Core
-
contains tags for conditions,
control flow and to access
variables etc.
XML
manipulation - contains tags for XML
parsing and processing
SQL -
contains tags for accessing and
working with
database.
Internationalization
and formatting - contains tags to support
locale messages, text,
numbers and
date
formation
Twin
Tag Libraries
JSTL
comes in two flavors to support
various skill set
personal
Expression
Language (EL) version
-
Dynamic attribute values of JSTL
tags are specified using
JSTL expression language (i.e.
${expression})
- The
EL based JSTL tag libraries
along with URIs and
preferred prefixes
are
given below
in
tabular
format
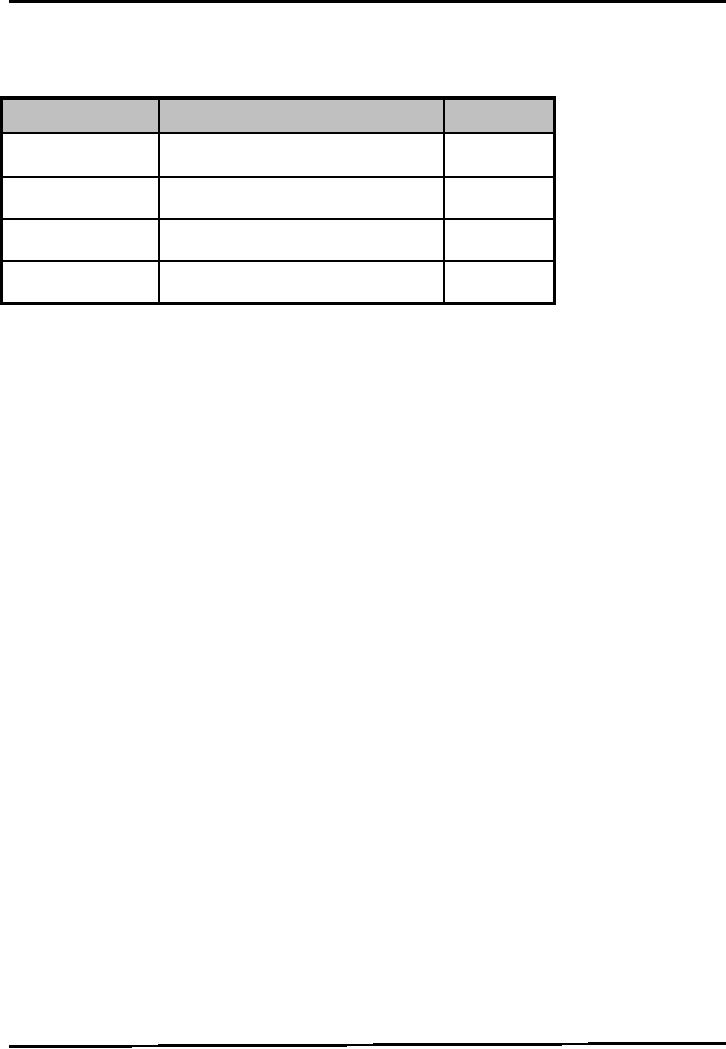
Library
URI
Prefix
Core
http://java.sun.com/jsp/jstl/core
c
SQL
http://java.sun.com/jsp/jstl/sql
sql
Internationalization/
http://java.sun.com/jsp/jstl/fmt
fmt
Format
XML
http://java.sun.com/jsp/jstl/xml
x
343
Web
Design & Development CS506
VU
Request
Time (RT) version
-
Dynamic attribute values of JSTL
tags are specified using
JSP expression
(i.e.
<%= expression %>)
- The
RT based JSTL tag libraries
along with URIs and
preferred prefixes are given
below in tabular
format
Library
URI
Prefix
Core
http://java.sun.com/jsp/jstl/core_rt
c_rt
SQL
http://java.sun.com/jsp/jstl/sql_rt
sql_rt
Internationalization/
http://java.sun.com/jsp/jstl/fmt_rt
fmt_rt
Format
XML
http://java.sun.com/jsp/jstl/xml_rt
x_rt
Using
JSTL
As we
discussed earlier, JSTL
includes four standard tag
libraries. As is true with
any JSP custom tag
library,
a taglib directive must be
included in any page that
you want to be able to use
this library's tags.
For
example, to use EL based
core tag library, the taglib
directive appears as:
<%@taglib
prefix="c" uri=http://java.sun.com/jsp/jstl/core
%>
And
to use RT based core tag
library, the taglib directive
appears as:
<%@taglib
prefix="c_rt" uri=http://java.sun.com/jsp/jstl/core_rt
%>
Working
with Core Actions
(tags)
The
set of tags that are
available in the Core tag library come
into play for probably
most anything you
will
be
doing in your JSPs such
as:
Manipulation
of scoped variables
Output
Conditional
logic
loops
URL
manipulation
and
Handling errors.
Let's
walk through some important
core actions:
c:set
Provides
a tag based mechanism for
creating and setting scope
based variables. Its syntax
is as follows:
<c:set
var="name" scope = "scope"
value = "expression" />
Where the
var attribute specifies the name of the
scoped variable, the scope
attribute indicates which
scope
(page |
request | session | application) the
variable resides in, and the
value attribute specifies the value to
be
bound
to the variable. If the specified
variable already exists, it will
simply be assigned the indicated
value.
If
not, a new scoped variable
is created and initialized to that
value.
The
scope attribute is optional and
default to page.
Three
examples of using c:set are
given below. In the first
example, a page scoped
variable "timezone" is
set
to a value"Asia / Karachi".
<c:set
var="timezone" value="Asia/Karachi"
/>
In the
second example, a request
scoped variable "email"
email is set to a value
"me@gmail.com"
<c:set
var="email" scope="request" value="me@gmail.com"
/>
In the
third example, a page scoped
variable "email" is set to
value of request parameter
"email" by using
paramimplicit
object. If email parameter is
defined in JSP page
as:
<input
type="text" value = "email"
/>
344

Web
Design & Development CS506
VU
Then
c:set tag would be used
as:
<c:set
var="email"
scope="request" value="param.email" />
Using
c:set with JavaBeans &
Map
c:settag
can also be used to change
the property of a bean or the value
against some key. For this
purpose,
the
syntax of the c:set tag would
look like this:
<c:set
target="bean/map" property="property/key"
value="value" />
If
target is a bean, sets the
value of the property specified.
This process is equivalent
to
<jsp:setProperty
... /> JSP action tag.
If
target is a Map, sets the
value of the key
specified
And
of course, these beans and
maps must be stored in some
scope prior to any attempt is
made to change
their
properties.
For
example, consider the following snippet of
code that stores
PersonInfo's object person
into request
scope
using <jsp:useBean ... /> tag. Then
using c:set tag, person's name
property is set to
"ali".
<jsp:useBean
id="person" class="vu.PersonInfo" scope="request"
/>
<c:set
target="person" property ="name"
value = "ali" />
c:out
A
developer will often want to
simply display the value of an
expression, rather than store it.
This can be
done by
using c:out core tag, the
syntax of which appears
below:
<c:out
value = "expression" default =
"expression" />
This
tag evaluates the expression specified by its
value attribute, and then
prints the result. If the
optional
default
attribute is specified, the c:out
action will print its
(default) value if the value
attribute's expression
evaluates
either to null or an empty
String. This tag is equivalent to
JSP expression i.e. <%=expression
%>.
Consider the
following examples in which the
usage of c:out tag has shown. In the
first example, string
"Hello"
would be displayed
c:out
value = "Hello" />
In the
second example, if request
parameter num evaluates to null or an
empty string then default
value "0"
would
be displayed.
c:out
value = "${param.num}" default = "0"
/>
The
above fragment of code is equivalent to
following scriptlet:
<%
tring
no = request.getParameter("num");
if
(no == null ||
no.equals(""))
{
stem.out.println(0);
}
Else
{
Out.println(no);
}
%>
If we
want to display the property of a
bean like name, we'll
write
<c:out
value=
"${person.name}" default = "Not
Set" />
c:remove
As
its name suggests, the
c:removeaction is used to delete a scoped
variable, and takes two
attributes. The
var
attribute names the variable to be
removed, and the optional scope
attribute indicates the scope
from
which
it should be removed and defaults to
page.
For
example, to remove a variable named
square from page scope,
we'll write:
<c:remove
var = "square" />
And
if variable email is required to be
removed from request scope,
then c:remove tag will look
like:
345

Web
Design & Development CS506
VU
<c:remove
var = "email" scope =
"request" />
c:forEach
In the
context of Web applications, iteration is
primarily used to fetch and
display collections of data,
typically
in the form of a list or sequence of rows
in a table. The primary JSTL
action for
implementing
iterative
content is the c:forEach core tag. This
tag supports two different styles of
iteration:
Iteration
over an integer range (like
Java language's for
statement)
Iteration
over a collection (like Java
language's Iterator and Enumeration
classes).
Iteration
over an Integer range
To
iterate over a range of integers, the
syntax of the c:forEach tag will
look like:
<c:forEach
var="name"
begin="expression" end="expression"
step="expression" >
Body
Content
</c:forEach>
The
begin and end attributes should be
either constant integer values or
expressions evaluating to
integer
values.
They specify the initial
value of the index for the
iteration and the index value at
which iteration
should
cease, respectively. When
iterating over a range of integers using
c:forEach, these two
attributes are
required
and all others are
optional.
The
step attribute specifies the amount to be
added to the index after
each iteration. Thus the index of
the
iteration
starts at the value of the begin
attribute, is incremented by the value of the
step attribute, and halts
iteration
when it exceeds the value of
the endattribute. Note that if the
stepattribute is omitted, the step
size
defaults
to 1.
If the
var attribute is specified,
then a scoped variable with
the indicated name will be
created and assigned
the
current value of the index
for each pass through the
iteration. This scoped
variable has nested
visibility
that
is it can only be accessed
within the body of the
c:forEachtag.
For
example to generate squares
corresponding to range of integer values, the
c:forEachtag will be used
as:
<c:forEach
var="x" begin="0" end="10"
step="2" >
<c:out
value="${x * x}" />
</c:forEach>
By
executing the above code,
following output would appear: 4 16 36 64
100
Iteration
over a Collection
When
iterating over the members of a
collection and arrays etc, one
additional attribute of the c:forEach
tag
is
used: the items attribute. Now the
c:forEach tag will look
similar to this:
<c:forEach
var="name"
items="expression" >
Body
Content
</c:forEach>
When
you use this form of the
c:forEach tag, the items attribute is the
only required attribute. The
value of
the items
attribute should be the collection/array
over whose members the
iteration is to occur, and is
typically
specified using an EL expression. If a
variable name is also
specified using var
attribute, then the
named
variable will be bound to
successive elements of the collection
for each iteration
pass.
For
example, to iterate over a
String array (messages)
using java code, we used to
write in JSP:
<%
for(int
i=0; i<messages.length; i++)
{
String
msg = messages[i];
%>
<%=
msg %>
<%
} // end
for
346

Web
Design & Development CS506
VU
%>
This
can be done using c:forEach tag in
much simpler way as shown
below:
<c:forEach
var="msg" items="${messages}" >
<c:out
value= "${msg}" />
</c:forEach>
Similarly,
to iterate over a persons
ArrayList that contains PersonInfo
objects, we used to write in
JSP:
<%
ArrayList
persons =
(ArrayList)request.getAttribute("pList");
for(int
i=0; i<persons.size(); i++)
{
PersonInfo
p == (PersonInfo)persons.get(i);
String
name = p.getName();
%>
<%=
name %>
<%
} // end
for
%>
Indeed,
the above task can be achieved in much
simpler way using c:forEach
tag as shown below:
<c:forEach
var="p"
items="${persons}" >
<c:out
value= "${p.name}" />
</c:forEach>
The
c:forEach tag processes each element of
this list(persons) in turn, assigning it to a
scoped variable
named
p. Note that typecast is
also not required.
Furthermore,
you can use the begin, end,
and step attributes to restrict
which elements of the collection
are
included
in the iteration.
c:if
Like
ordinary Java's if, used to
conditionally process the body content.
It simply evaluates a single
test
expression and
then processes its body
content only if that expression evaluates to
true. If not, the
tag's
body
content is ignored. The syntax
for writing c:iftag
is:
<c:if
test=
"expression" >
Body
Content
</c:if>
For
example, to display a message "a
equals b" if two strings a & b are
equal, the c:if tag is used
as:
<c:if
test=
"${a == b}" >
<h2>
A equals B </h2>
</c:if>
c:choose
c:choose
the second conditionalization tag, used
in cases in which mutually
exclusively test are
required to
determine
what content should be displayed.
The syntax is shown
below:
<c:choose>
<c:when
test= "expression" >
Body
content
</c:when>
...............
<c:otherwise
>
Body
content
</c:otherwise>
</c:choose>
347
Web
Design & Development CS506
VU
Each
condition to be tested is represented by
a corresponding <c:when> tag, of
which there must be at
least
one.
Only the body content of the first
<c:when> tag whose test evaluates
to true will be processed. If
none
of the
<c:when> tests return
true, then the body content of the
<c:otherwise>tag will be
processed.
Note,
though, that the <c:otherwise> tag
is optional; a <c:choose> tag can
have at most one nested
<c:otherwise>
tag. If all <c:when> tests
are false and no <c:otherwise>
action is present, then
no
<c:choose>
body content will be
processed.
The
example code given below
illustrates the usage of c:choose tag in
which two strings a & b
are
compared
and appropriates messages are
displayed:
<c:choose>
<c:when
test= "a == b" >
<h2>
a equals b</h2>
</c:when>
<c:when
test= "a <= b" >
<h2>
a is less than
b</h2>
</c:when>
<c:otherwise
>
<h2>
Don't know what a equals to
</h2>
</c:otherwise>
</c:choose>
netBeans
4.1 and JSTL
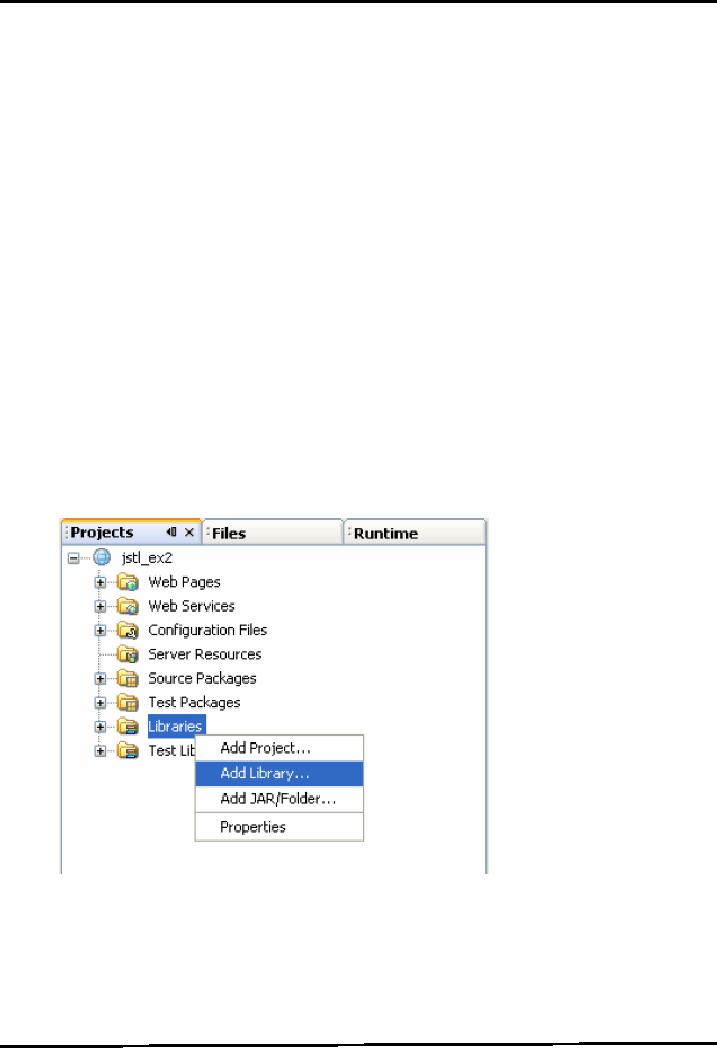
If
you are using netBeans
4.1 IDE then you have to
add JSTL library to your
project manually. To do
so,
right
click on the libraries folder,
you can find it under
project's name and select the
Add Library option.
This
is also shown in the following
figure:
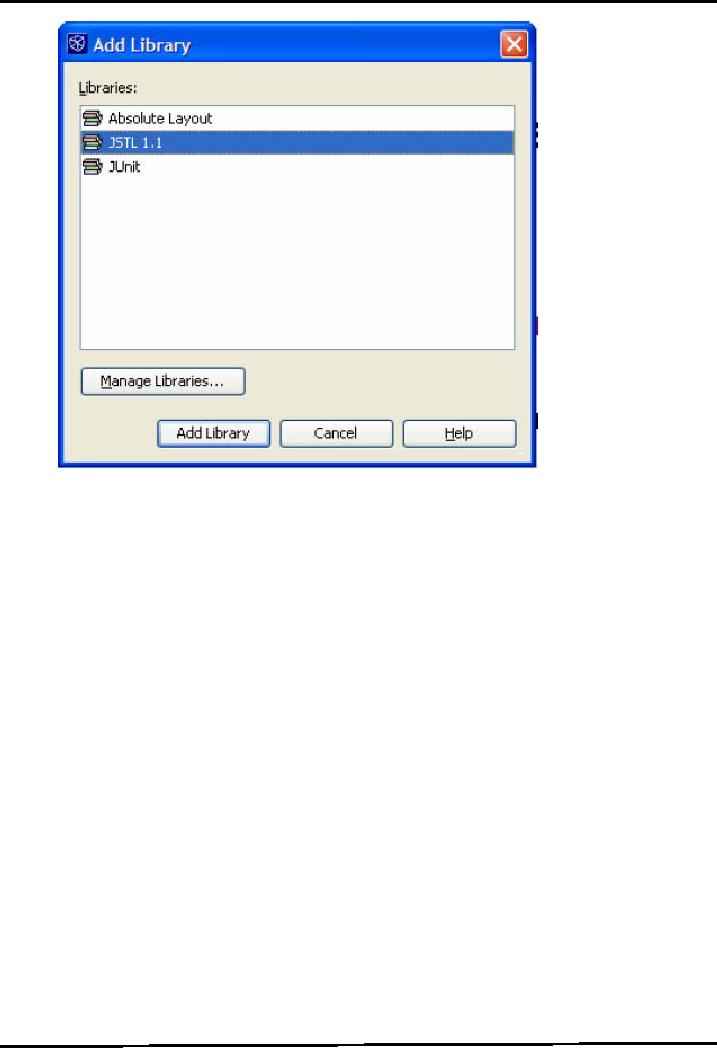
The
Add Library dialog box
opens in front of you.
Select JSTL 1.1 option and
press Add Library
button.
Now
you can refer to any
JSTL library in your
JSPs.
348
Web
Design & Development CS506
VU
Note:
Remember that the JSTL 1.1
library is only added to
current project. You have to
repeat this step
for
each
project in which you want to
incorporate JSTL.
Example
Code: AddressBook using JSTL core
tags
This
is the modified version of AddressBook
that was built using
Expression Language in the last
handout.
Only
showperson.jsp is modified to incorporate
JSTL core tags along
with Expression Language in place
of
scriptlets.
The remaining participants
searchperson.jsp, ControllerServlet,
PersonInfo and PersonDAO
left
unchanged.
Let's look on the code of
each of these components:
PersonInfo.java
The
JavaBean used to represent one
person record.
package
vu;
import
java.io.*;
public
class PersonInfo implements
Serializable{
private
String name;
private
String address;
private
int phoneNum;
// no argument
constructor
public
PersonInfo() {
name
= "";
address
= "";
phoneNum
= 0;
}
//
setters
public
void setName(String
n){
name
= n;
}
public
void setAddress(String a){
address
= a;
349

Web
Design & Development CS506
VU
}
public
void setPhoneNum(int
pNo){
phoneNum
= pNo;
}
//
getters
public
String getName( ){
return
name;
}
public
String getAddress( ){
return
address;
}
public
int getPhoneNum( ){ return
phoneNum;
}
}
350
Table of Contents:
- JAVA FEATURES
- Java Virtual Machine & Runtime Environment
- Learning Basics of JAVA
- JAVA: Object Oriented Programming
- JAVA: Inheritance
- JAVA: Collections
- JAVA: Intro to Exceptions
- JAVA: Streams
- JAVA: Modification of Address Book Code
- JAVA: Graphical User Interfaces
- JAVA: Event Handling
- JAVA: More Examples of Handling Events
- JAVA: Problem in Last Code Example
- Java Database Connectivity
- JAVA: More on JDBC
- JAVA: Result Set
- JAVA: Meta Data
- Java Graphics
- JAVA: How to Animate
- JAVA Applets
- JAVA: Socket Programming
- JAVA: Serialization
- JAVA: Multithreading 1
- JAVA: Multithreading 2
- JAVA Web Application Development
- Java Servlets
- JAVA: Creating a Simple Web Application in Tomcat
- JAVA: Servlets Lifecycle
- JAVA: More on Servlets
- JAVA: Dispatching Requests
- JAVA: Session Tracking 1
- JAVA: Session Tracking 2
- JAVA: AddressBook Case Study Using Sevlets
- Java Server Pages 1
- JavaServer Pages 2
- Java Server Pages 3
- JAVA: JSP Action Elements and Scope
- JAVA: JSP Custom Tags
- JAVA: MVC + Case Study
- JAVA: MVC Model 2 Architecture
- JAVA: Layers and Tiers
- JAVA: Expression Language
- JAVA: JavaServer Pages Standard Tag Library (JSTL)
- JAVA: Client Side Validation & JavaServer Faces (JSF)
- JAVA: JavaServer Faces