 |
Data Profiling |
| << Extracting Data Using Wizard |

Slide 1
Virtual
University of Pakistan
Data
Transformation &
Standardization
Lab
lec: 5
Ahsan
Abdullah
Assoc. Prof.
& Head
Center for
Agro-Informatics Research
www.nu.edu.pk/cairindex.asp
National
University of Computers & Emerging
Sciences, Islamabad
Email:
ahsan101@yahoo.com
Slide 2
Why Correct
Before Transform?
· One is an
obvious reason, other not
so
obvious.
· If SQL
Package encounters an error, it
roll
backs
all transactions.
· Sometimes
the error reporting
is
ambiguous.
After completion
of data profiling for Lahore
campus data, we are required to
correct the records
in the
error table. After
corrections the corresponding
records in the actual table
are required to be
updated.
The methodology to correct the
exception table is dependent on
the following
factors:
Number of
records corrupted
If the number of
corrupted records are very large in
number then we need to update it
through
SQL
Queries or some other automated way,
otherwise, if they are less
in number then they can
be
updated through
inspection or manual
checking.
Type of
corruption or error
If the
dates are missing we must
need to consult golden copy. If
gender is missing we are
not
required to
consult golden copy. In many
cases name can help us in
identifying the gender of
the
person.
437

Slide 3
How to Correct the
Exception Table?
· How to
correct the exception
table?
· It depends
upon the factors
like
Number of
records corrupted
Type of
corruption or error
Educated
guess
Using
golden copy
After completion
of data profiling for Lahore
campus data, we are required to
correct the records
in the
error table. After
corrections the corresponding
records in the actual table
are required to be
updated.
The methodology to correct the
exception table is dependent on
the following
factors:
· Number
of records corrupted
If the number of
corrupted records are very large in
number then we need to update it
through
SQL
Queries or some other automated way,
otherwise, if they are less
in number then they can
be
updated through
inspection or manual
checking.
· Type
of corruption or error
If the
dates are missing we must
need to consult golden copy. If
gender is missing we are
not
required to
consult golden copy. Name
can help us in identifying the
gender of the person.
Slide 4
Exception
Table: Correcting
Gender
· A mechanism
can be formulated to correct
gender
· Use a
standard gender
guide
· Create
another table "Gender guide"
with
columns
Name and Gender
· Copy
distinct first names to
"Gender guide"
· Manually
put the gender of all
names in "Gender
Guide"
· Transform
St_Name in Exception such
that first
name
gets separated and stored in
another
column
· Make a
join of Exception table and
Gender guide
to fill
missing gender
If for
very large number of records gender is
missing, it would become
impossible for us to
manually check
each and every individual's
name and identify the
gender. In such cases we
can
formulate a
mechanism to correct gender. We
can either use a standard
gender guide or create a
new
table Gender_guide. Gender_guide contains
only two columns name
and gender. Populate
438

Gender_guide
table by a query for selecting
all distinct first names
from student table.
Then
manually placing
their gender.
This table
can serve us as guide by telli ng what
can be the gender against
this particular name.
For
example if we have hundred students in
our database with first
name equal to
`Muhammed'.
Then in
our Gender_guide table we will
have just one entry
`Muhammed' and we will
manually
set
the gender as `Male' against
`Muhammed'.
Now to
fill missing genders in
exception table we will just
do a inner join on Error table
and
Gender_guide
table. We will get the
gender against matching
names.
Slide
5
Exception Table: Correct
Gender
Values
· Manually fill
the Gender
The slide
shows an interesting case. We
can update gender easily
against names like Sara
that
clearly identifies
that the student is female.
But there may be certain
names that are common
for
males
and females like Shamim,
Khursheed, etc. In the slide
we can see a name Noor
Haque,
doesn't
conveying the gender. It may
be male and female as well.
So, for such case at
this stage
we can
use `N', but these cases
can only be resolved through
consulting golden copy. This
conversion i.e.
N needs to be reflected in meta
data.
Slide 6
Exception
Table: Correct Gender
Fill Rows
Manually
In For
Lahore campus we have only
187
missing
values so we can fill 187
rows
manually
just by inspection of
names.
· How
about same values (or
more) for other
three
campus?
· Cant
fill hundreds of gender
values by hand!
In this
particular case of Lahore campus we
have only 187 missing values so we
can fill 187
rows manually
just by inspection of
names.
439

Slide 7
Exception
Table: Correction of Date of
Birth
Query
· Correct
inconsistent formats
SELECT
*
FROM
Exception
WHERE
([Date of
Birth] NOT LIKE '%_-Jan-__')
AND
([Date of
Birth] NOT LIKE '%_-Feb-__')
AND
([Date of
Birth] NOT LIKE '%_-Mar-__')
AND
([Date of
Birth] NOT LIKE '%_-Apr-__')
AND
([Date of
Birth] NOT LIKE '%_-May-__')
AND
([Date of
Birth] NOT LIKE '%_-Jun-__')
AND
([Date of
Birth] NOT LIKE '%_-Jul-__')
AND
Now we
need to correct the
inconsistencies in date formats.
First select all dates
with inconsistent
formats.
The following query can do
this for us
SELECT
*
FROM
Exception
WHERE
([Date of
Birth] NOT LIKE '%_-Jan-__')
AND
([Date of
Birth] NOT LIKE '%_-Feb-__')
AND
([Date of
Birth] NOT LIKE '%_-Mar-__')
AND
([Date of
Birth] NOT LIKE '%_-Apr-__')
AND
([Date of
Birth] NOT LIKE '%_-May-__')
AND
([Date of
Birth] NOT LIKE '%_-Jun-__')
AND
([Date of
Birth] NOT LIKE '%_-Jul
-__') AND
([Date of
Birth] NOT LIKE '%_-Aug
-__') AND
([Date of
Birth] NOT LIKE '%_-Sep-__')
AND
([Date of
Birth] NOT LIKE '%_-Oct-__')
AND
([Date of
Birth] NOT LIKE '%_-Nov-__')
AND
([Date of
Birth] NOT LIKE '%_-Dec-__')
AND
([Date of
Birth] <> '')
AND
([Date of
Birth] IS NOT
NULL)
440

Slide 8
Exception
Table: Correction of Date of
Birth
Query
Result
Fix
Manually?
([Date of
Birth] NOT LIKE '%_-Aug-__')
AND
([Date of
Birth] NOT LIKE '%_-Sep-__')
AND
([Date of
Birth] NOT LIKE '%_-Oct-__')
AND
([Date of
Birth] NOT LIKE '%_-Nov-__')
AND
([Date of
Birth] NOT LIKE '%_-Dec-__')
AND
([Date of
Birth] <> '') AND
([Date of
Birth] IS NOT NULL) Manual
Correction
Jul or
Jan
consult
golden
copy
The
slide shows the results of
the above query. We can
see that first incorrect
date is 22-Jal-75.
This
error can not be corrected
until and unless we do not
consult golden copy. Remaining
two
errors
can be corrected without
consulting golden copy.
Slide 9
Exception
Table: Correction of Date of
Birth
Query
Result
Why
1/1/00?
· For
missing values consult
golden copy
· When
golden copy is unavailable
replace
with a
global value 1/1/50
UPDATE
Exception
SET
[Date of
Birth] = '1 -Jan-50'
WHERE
([Date of
Birth] LIKE '')
OR
([Date of
Birth] IS NULL)
There are
some nulls and empty strings
in Date of Birth. We can not
put in values without
consulting golden
copy. So for the time being
we can use a standard value
like 1/1/1900 or
1/1/1950
etc., again a meta data
entry. Later on these values
can be replaced with
original values
after
consulting golden copy.
441

Slide 10
Exception
Table: Updating
Corrections
· Formulate
mechanisms to correct
all
columns in
exception table
· At the
end of this step "Correction
of
exception
table" all records should
become
correct
· Then
take a join of Exception
table and
Student
table to get all correct
data in
student
table
· Finally
Transform the records in
Student
table
and put into another
table
Student_Info
table
Its up to the
designer what met hodology he/she
designs to correct the
exception table. The goal
is
to correct
all records in exception
table up to a certain level.
Hundred percent correction is not
possible to
achieve because of errors in golden copy.
After correction of exception table we
need
to take a
join of exception table and
student table so that all
records of student table can
be
updated
with the values in exception
table. After this exercise
student table should be clean up
to
a variable
level.
After
the cleansing of all records
it is the time to transform records
and put them into
another
table
named as `Student_Info'.
Slide 11
Student_Info
Table
· Student_Info
table
Standard
names and order of the
columns
Standard
data types
· Database for each
campus contains
exactly
same table
`Student_Info'
Same
names of columns
Same
order of columns
Same
data types
· Finally we
will glue Student_Info tables
from
each campus to
get single source
After correcting
student table we need
another table to store all
records after
applying
transformations. To serve t
his purpose we create
another table Student_Info. The
most important
thing
about this table is that it
contains the names and
data types of columns that
are suggested in
data
profiling. For example, data
type for dates columns
(birth date and registration
date) is
DateTime, therefore, in
Student_Info table we set data
types for these columns
dateTime at the
time of
creation. Same is the case
with all other
columns.
Student_Info
table does not contain any
column against row_id as this column
was just added
for
cleansing
purposes. Another important point is that
Student_Info table may contain
more or less
442
columns as
compared to Student table.
Like in Peshawar campus we do not
have the column
Gender
but Student_Info table for
Peshawar campus does contain
it. This column can be filled
by
joining
with the table Gender_guide we
created earlier to find the
missing genders.
Same query of
create table is used to
create table Student_Info in
the databases of each
campus,
so that
exactly the same table
can be creat ed in all
databases, with same names
and same order of
columns.
After transformations and completion of
Student_Info table we will just glue
four tables
(student_Info
table, one from each
campus) to get a single
standardized table. As we know
that
in each
campus order of columns in
student table is different
whereas order of columns
in
Student_Info
table across each campus is
same. Its mean with in a
database, like
Islamabad_Campus,
order of columns in both tables
Student and Student_Info differ. We
need to
apply `copy
column transformation' so that this
different order of columns would
not create any
problem at the
time of loading Student_Info table.
Slide 12
Transformation
· Now we
will apply all
suggested
transformations
and store the
transformed
records in a new table
Student_Info
· Transformations
are applied through
a
package
that would be developed
through
DTS
Designer
While
data profiling we have
suggested certain transformations on each
column. Now it is the
time to apply
all transformations on Student
table and finally put
all transformed records
to
student_info
table. To apply transformations we need
to develop a package though DTS
designer
because
wizard can not provide us
enough functionality to design a
package with complex
transformations.
Slide 13
DTS
Designer
· Open a new package
in DTS Designer
443
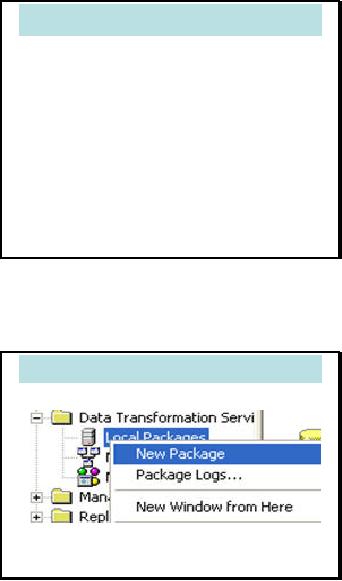
To open a
new package in DTS Designer.
Right click the local packages
and select `New
Package'. As a
result DTS Designer interface
would open.
Slide 14
Establish
Connections
· Drag
SQL Server Connection to
Design Area
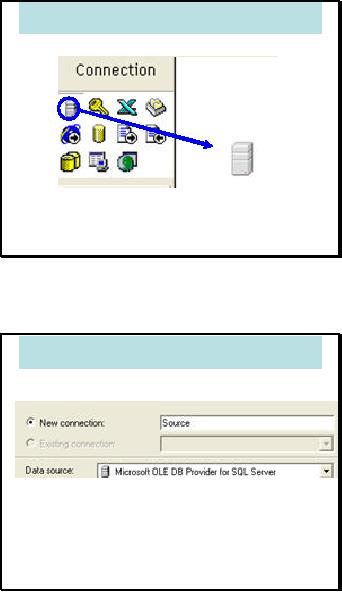
On the
left side a small pane
window shows all the
available connections that
can be established
through SQL
Server. At this stage our
source is Student table in
Lahore_Campus SQL
database.
Therefore, for
source connection we click at the
SQL Server icon and drag it to
the desing area.
Slide 15
Set
Connection properties
· Drag
SQL Server Connection to
Design Area
· Source
and destination database is
same
i.e.
Lahore_Campus
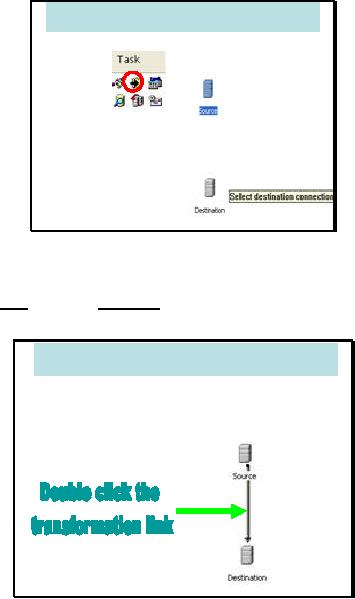
As soon as we
place the connection icon to
the design area another
dialog window opens
and
provides us
the way to set the
properties of theconnection. First of all it
asks us whether we want
to create a
new connection or we want to use
any other connection that
was created before in
the
same
package. If we want to use any
existing connection we can
select existing connection
but
here we want to
create a new connection.
Name the new connection as
Source. Similar to
source
we need to
create another SQL Server
connection for destination
table that is `Student_Info'.
In
properties of
connection we are required to specify
the name of destination
database as well.
444
Slide 16
Transformation
task
· Select
transformation task from
Task
window
· Drag it to
design area, mouse
Cursor will
guide
you through tool
tips
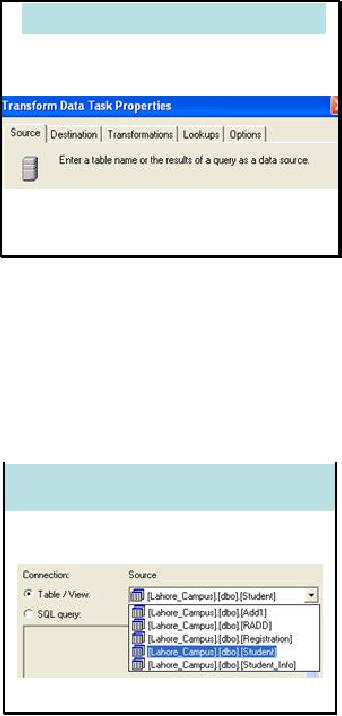
After
creating both source and
destination connections we need to
select the task to be
performed
between
source and destination. All
available task can be found
on the left pane window
`Task' in
form of
icons. The task is transformation
and is represented by the icon we
can see highlighted
in
the
slide. Click the transformation
task icon and drag it to the
design area. First click in
the source
connection
and then click on the
destination connection.
Slide 17
Transformation
link
· On selection of source
and destination for
transformation
task we can see a
transformation
link between source
and
destination
As soon as
destination connection is clicked a
task link appears between
both connections. To set
the
properties and details of
transformations (detail means what
transformation needs to be
applied) we
need to double click the transformation
link.
445
Slide 18
Transformation
Task Properties
· On double click
the transformation
link,
transformation
task property dialog
box
would
open with following 5
tabs
· We will use first 3
tabs only
Double
clicking the transformation link
opens a dialog box with five
tabs.
Source
Source
tab let us define the source
table.
Destination
Destination tab
let us define the destination
table. In this case both
will be the same.
Transformation
Transformation
tab let us define the type
of transformations to be applied between
source
and
destination.
Rest of
the two tabs Lookup
and
Options
will not be
used by us. As all the
task required to be
done
can be completed by these
three tabs.
Slide 19
Transformation
Task Properties:
Source
· First
tab is source, select source
table or
write
query whatsoever is the
requirement
· In this
case source table is
student
The
slide shows the dialog under
source tab. If we want to extract
data from source
database
through some
query then we may specify query by
selecting the radio option
`SQL Query'. On
the
other hand, if we want to copy
all columns of a table or a
view then we may specify it
through
drop
down menu after selecting
the first radio option
Table/View. The drop down
menu shows all
446
tables
and views available in the
database specified while
setting the properties of
the connection.
In this
case source table is
student.
Slide 20
Transformation
Task Properties:
Destination
· Second
tab is destination, select
destination
table
which in this case is
Student_Info
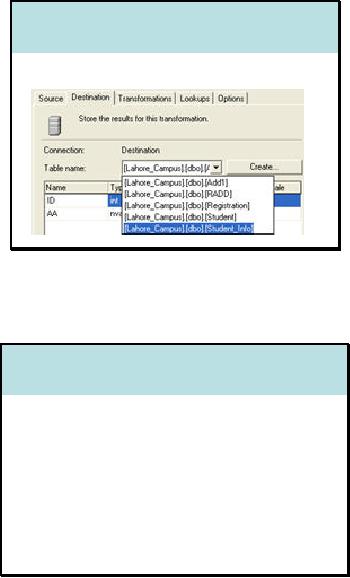
Second
tab is for specifying the
destination table if it exi sts.
Otherwise, if destination table
does
not exist
then we may create it through
Create
button on
the right of drop down
menu. In our
case
destination table Student_Info has
been created earlier, therefore, at this
stage we just need
to select
the Student_Info table from
the drop down
menu.
Slide 21
Transformation Task
Properties:
Transformations
· Press
third tab transformation
· Designer tries to
map source destination
column
automatically
· Drop all mappings if Designer
asks you
through a dialog to
delete all mappings
Now
comes the most important tab
Transformation.
As
soon as transformation tab is
clicked
designer
tries to map the source
and destination table
columns automatically on the
base of
resemblances in
the names. For example, if
we have a column SID in source
and a column SID in
destination
then designer tries to map
these two columns. A dialog box
appears and ask
weather
we want
optimizer mappings remained there or we
want to drop all mappings
and create these
mappings
manually. We prefer to go for later
option and drop all
automatic mappings
because
optimizer does
not transform genders (from 0/1 to M/F)
or names etc.
447
Slide 22
Transformation
Properties:
Transformation
Mappings
· Delete
all mappings
The
slides show the mappings
done by designer itself, delete
all of these
mappings.
Slide 23
Student ID
Transformation
· Delete
all auto mappings
· Select SID
from both source and
destination
and
Click new
To create
new mappings first of all we
need to select the source
column from source list box
and
then
destination column from destination list
box. When both gets
highlighted as shown in the
slide
then press the New
button.
The slide shows highlighted
SID column from both
Source and
destination list
box. In both tables the
first column is SID.
448
Slide 24
Student ID
Transformation: Copy
Col.
· Select
Copy column Transformation
from
the
list appears on pressing
`New' button
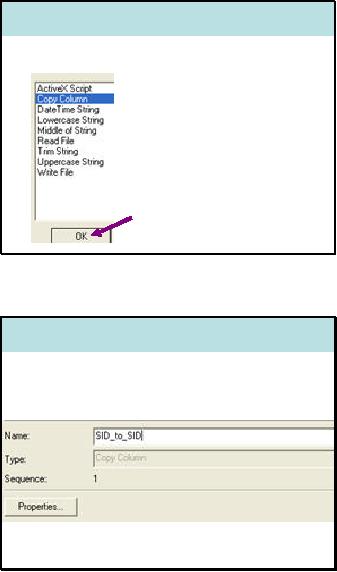
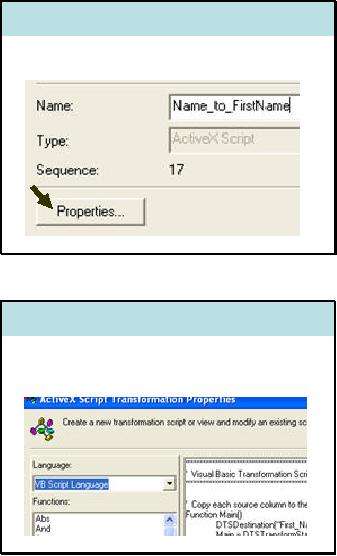
On pressing
the new button, following
list box appears showing all available
forms of
transformations.
Select Copy
Column transformation
and press OK.
Slide 25
Student ID
Transformation: Naming
· Then
name the transformation
like
SID_to_SID
and press OK at the foot
of
dialog
box
After
selecting the type of transformation
needs to be applied we are required to
assign name to
this
transformation like SID_to_SID. For
this transformation we are not required to
set the
properties as it is
the simplest form of transformation
just copy from source to
destination. The
only
difference is the size of variable. At
source it was varchar[250] whereas at
destination it is
varchar[10].
Such transformations are
done automatically by SQL Server, does
not need to
specify in
properties.
449
Slide 26
Student ID
Transformation:
Link
Display
· On each
successful transformation a
link
appears
between source and
destination
participating
columns
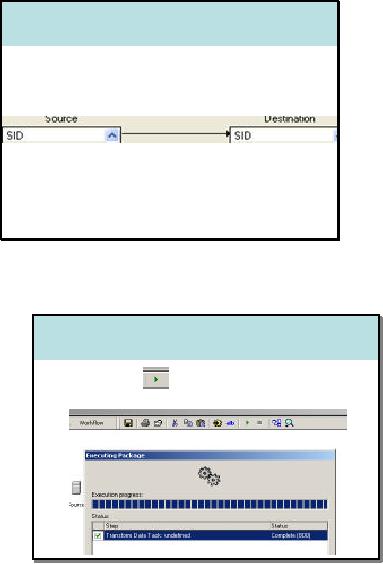
On each
successful transformation a link appears
between source and
destination participating
columns. To
modify the properties of transformation
we are just need to double click
the link and
the
same properties dialog box
would appear.
Slide 27
Sttudentt IID
Transfformattiion::
S uden D
Trans orma on
Executtiion
Execu
on
·· On
pressiing
on ttoollbar
package wiillll be
On press
ng
on oo bar
package w be
executted..
execu
ed
On each
successful transformation a link appears
between source and
destination participating
columns. To
modify the properties of transformation
we are just need to double click
the link and
the
same properties dialog box
would appear. .
450
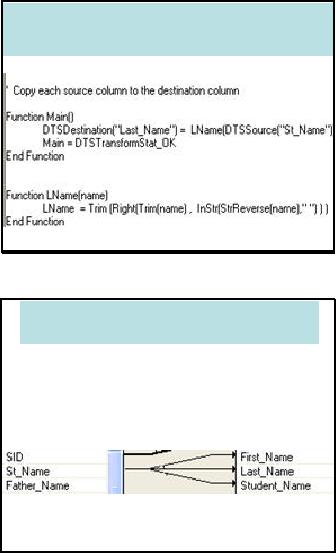
Slide 28
Student
Name Transformation: 1: M
· St_Name is
transformed into three
names
First_Name
Last_Name
Student_Name
(Contains remaining
name)
First_Name
Last_Name
St_name
Student_Name
After
SID we are required to transform St_Name.
It is one to many transformation that is
required
to be specified
through script. In this case
is source column is just one
`St_Name' and the
destination
columns are three `First_Name',
`Last_Name', & `Student_Name'. We are required
to
create
three new transformations,
St_Name to
First_Name
St_Name to
Last_Name
St_Name to
Student_Name
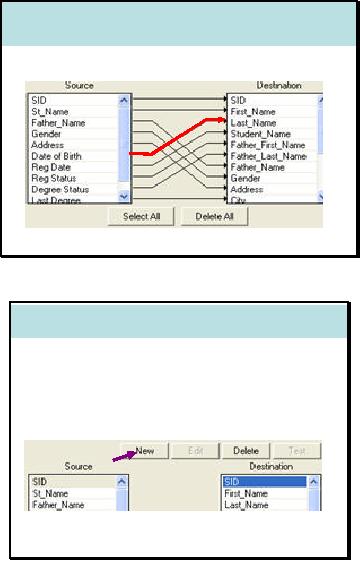
First of all
select St_Name from source
list box and First_Name from
destination list box.
When
both of the
columns get highli ghted
press the new button.
Slide 29
Student
Name Transformation:
Using
Script
· Select
St_Name from source
and
First_Name
from destination click
new
· Select
ActiveX Script
transformation
from
the
menu appeared on
pressing
new
As we are
required to write script to transform
St_Name into First_Name therefore select
Active -
X
Script.
451
Slide 30
Student
Name Transformation:
Naming
· Name
the transformation and
click
properties
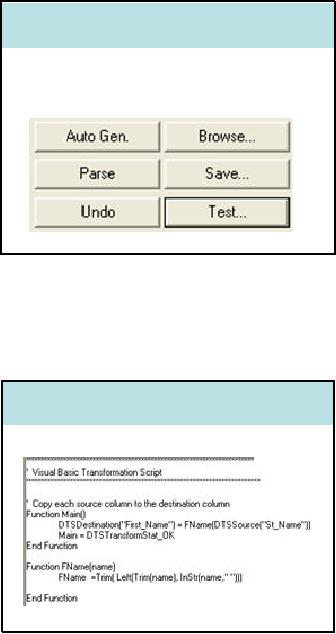
Name
the transformation and press
`Properties'
to
write script.
Slide 31
Name
Transformation: AX properts.
· Such an
interface allows you to
write VB
Script to
transform Student name to
First
name
Slide shows
the interface within the
designer to write and test
scripts that are written
for
transformation. Language
dropdown menu on the extreme
left corner allow us to select
options
available
for scripting the transformation. As we
are using VB scripts therefore
make sure that
VB Script
should be selected in the
dropdown menu.
452
Slide 32
Student
Name Transformation:
Script
Interface
· On Left
Bottom corner of the dialog
window
you can
see the following
menu
· Use
test button to test the
script
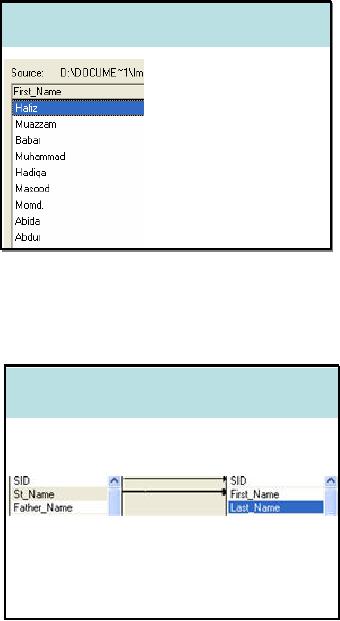
On the
extreme left corner of the scripting
interface dialog we can see
six options as shown in the
slide. We
can save our scripts, we
can browse them later on, we
can parse them for
syntax errors,
we can undo
last move, we can auto
generate simple copy column
script and we can test
our
scripts on
actual column of database
table. To verify the
correctness of the script we can
use Test
option. Test
option runs the script on
the actual column and shows
the first hundred values as an
output.
Slide 33
Student
Name Transformation:
Transformation
Script
· Following
Script allows you to
transform
Student
name to first
name
The
slide shows the script
that has been written to
transform St_Name from source
table to
First_Name of
destination. If you do not know VB Script
you can also use same
script with
correct column
names.
453
Slide 34
Slide
80
Sttudent
Name Transformation:
S udent
Name Trans
Test
·· Outtputt off the
test run
Ou pu o
the
·· Workiing ffine
Work ng ine
The slide
shows the output of the
test run of given script on
Lahore_Campus database. We
can
see
all first names are
separated from the actual
full names. This is the
desired transformation for
First_Name.
Slide 35
Student
Name Transformation:
Last
Name
· Select
St_Name again from
source
and
Last_Name from
destination,
press
new
· Now
write Script to separate
Last
name
from student name
Now we
will separate the last
name from the names of
the students. To create this
type of
transformation we
are required to selectSt_Name
from
source list box and Last_Name
from
the
destination list
box and press New
button.
454
Slide 36
Student
Name Transformation:
Last
Name-Script
· Student
name to last name
transformation
The
slide shows VB Script for
separating last name from
full name of the
student.
Slide 37
Student
Name Transformation:
1:M
Visulaization
· Transformation
looks like as
follows
After
creating all of the
transformations
St_Name to
First_Name
St_Name to
Last_Name
St_Name to
Student_Name
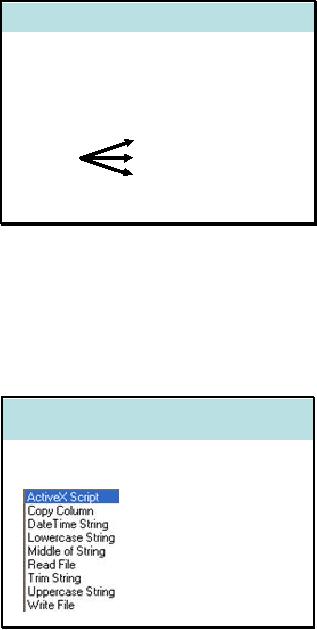
Link
for one to many
transformations looks like the
one shown in the
slide.
455
Slide 38
Father's
Name Transformation
· Apply
similar transformations to
Father_Name
Father_First_Name
Father_Last_Name
Father_Name
(stores rest of the
name)
We need to apply
similar one to many transformation to
father name column.
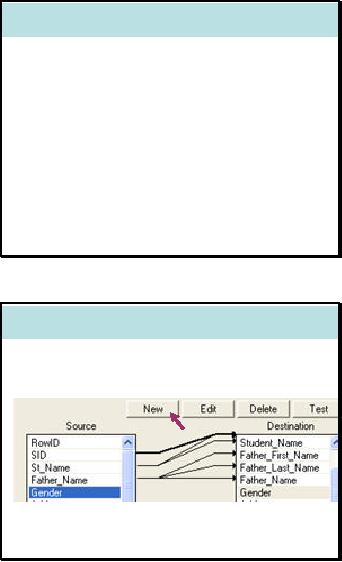
Slide 39
Gender
Transformation
· Select Gender
from both source and
destination columns
and press new
Now we
need to create another transformation
for standardizing the conventions to
store gender
that is
M
for
male and F for
female. Select Gender from
both source and destination
and press
`New'.
456
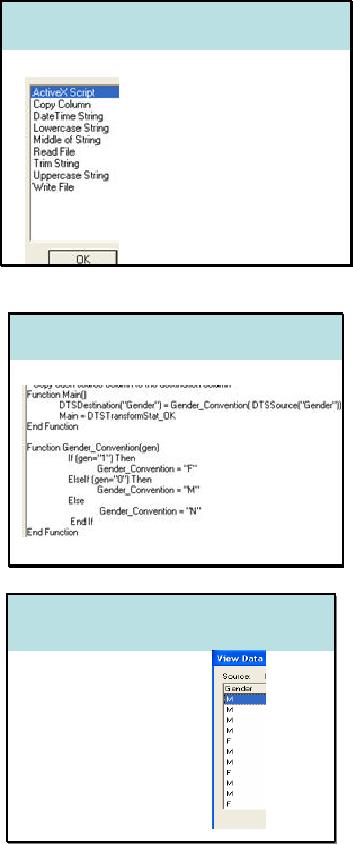
Slide 40
Gender
Transformation:
Script
Interface
· Select
ActiveX Script from the
menu
· Select `Properties '
from
the
dialog box
following
this
menu
Again
select ActiveX
script.
Slide 41
Gender
Transformation:
Script
· Write
following script
The
slide shows the activeX
script to standardize the
gender convention.
Slide 42
Gender
Transformation:
Test
Script
· Test
the script
457
Test
run shows that the
script is working
fine.
Slide 43
Address
Transformation
· Here in
this case we consider Address
transformation at
very coarser level
· Separate city
name from remaining address
· This
transformation resembles with
Last_Name
transformation
Now
comes to another common
example of one to many transformation
that is Address
transformations.
For real life purposes we usuallly
break address into many
columns like house #,
Street #,
City, State, Region etc. It
depends on the requirements of
the users and customers.
For
the
given example we will break
the address into two
column City and remaining
address. This
example
resembles to the separation of
last name from student
full name because in all
records
city is the
last part of the address. So we
can use the same
script with certain modification
of
column
names.
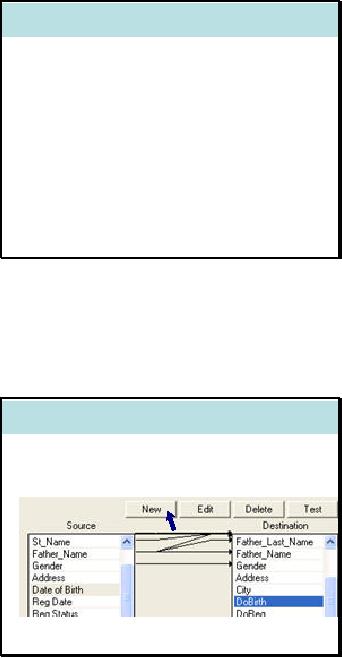
Slide 44
Date
Transformation
· Select DoB
from destination and [Date of
Birth]
from source and press new
Now we
need to transform the date of
birth column. Select DoB from
destination and [Date
of
Birth]
from
source and press New. Select
Date
Time String transformation
from the list of
available
transformations.
458
Slide 45
Date
Transformation:
Set
Properties
· Select
Date Time String
Transformation
from
the menu and then
set `Properties' as
follows
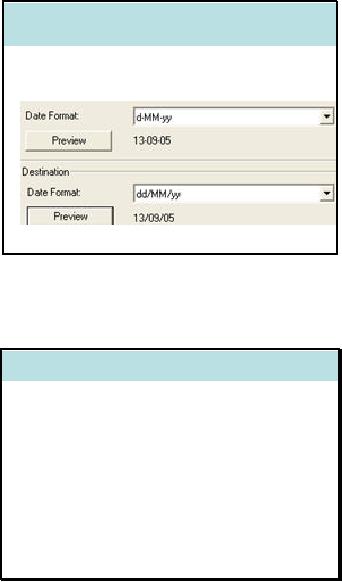
In the
properties of Date Time String
transformation we can see the
dialog box as shown in
the
slide. In
this dialog box we can see
two dropdown combo boxes
with title Date
Format. In
first
combo
box select or manually specify
(through typing) the format
of the date in the
source
column. In
the second box select
the format for destination
and click ok .
Slide 46
Remaining
Transformations
· Similarly
perform remaining
transformations
including
Registration
status
· Valid
values are
`A' for
admission
`T' for
transfer
Degree
status
· Valid
values are
`C' for
complete
`I' for
incomplete
Similarly
perform remaining transformations
including Registration
Status and
Degree
Status .
You
can generate scripts for
them easily by performing
little modifications in gender
transformation
script.
459

Slide 47
Standardization
· After
transformation there comes an
issue
of data
standardization
· As the
data is inconsistent due to
desperate
sources therefore we
need to standardized
data to
make it useful for analysis
· We will
perform following
three
standardizations
Name
standardization
Address
standardization
Last
degree standardization
By this time
all transformations are completed.
Now we are required to standardize
data. Like we
can
see in the name column that
there are a lot of
inconsistencies in names due to
variations in
spellings. We
can find many variations in
spellings of same name like
Mohd., Mohammed,
Muhammed,
Mohamad, etc.. For meaning
full analysis we must have
standardized data in
our
columns
because computer can not
recognize that Mohd. Khalid
and Mohammad Khalid is
the
same
name. Same is the case
with the names of cities.
Some people use abbreviations
in
addresses
while some others like to
write full names e.g. Lahore
or Lhr. In this example we
will
perform
standardization for Names,
Addresses and Last
degree.
Slide 48
Name
Standardization
· Name is transformed
into following three
fields
First
name (First_Name)
Second
name (Student_Name)
Last
name (Last_Name )
· We will
devise a simple strategy
to
standardized name
that can later be
followed by
any other column (city /
last
degree)
There
are no fixed strategies to
standardize the columns.
Again it depends on the project
designer
what methodology
he/she devises. We can
devise a simple methodology that
can later be used
for
other columns as
well.
460
Slide 49
Name
Standardization: Step-1
· Create a
new table `SNames' with
two
columns
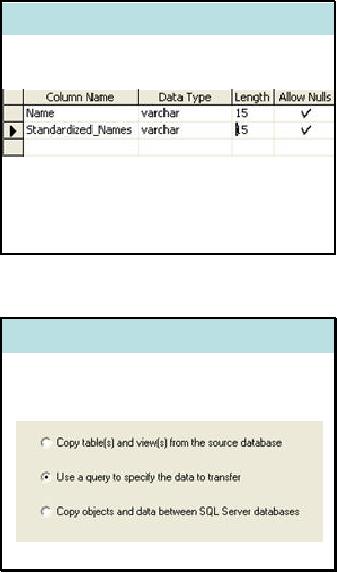
This methodology
some what looks like the
one we used to fill the
missing gender information
of
students.
Create a new table with two
columns `Name' and
`Standardized_Names'.
Slide 50
Name
Standardization: Step-2
· Use Data
Import/Export Wizard to
put
Distinct
values of names from
Student_Info
to
SNames
Create a
new package through wizard
to put the distinct names of the
students from
Student_Info
table.
Select second radio option
that is use a query to specify the
data to transfer. Write a query
to select
distinct names from Student_Info
table.
461

Slide 51
Name
Standardization: Step-3
· Write
following query
Select
Distinct First_Name
From
Student_Info
order by First_Name
· As a result
all distinct names in
ascending
order
would be inserted in SName
table
· Manually
write standardized spellings
of
names in
Standardized_Names column
Following query
can serve the purpose of
selecting distinct names
from Student_Info table
and
loading
them to SName table in
ascending order.
Select
Distinct First_Name From Student_Info
order by First_Name;
Load
all names to Name column of
the SName table and
against each name write
its standardized
spellings in
Standardized_Names column
manually.
Slide 52
Name
Standardization: Step 4
· Update
First_Name in Student_Info table
by
running a
join between two
tables
Student_Info
and SNames on the
column
First_Name
and Name
The slide
shows a screen shot of
SNames table. We can update
all first names in
Student_Info
table
just by joining it with
SName on the column First_Name
(Student_Info) and
Name
(SNames).
462
Table of Contents:
- Need of Data Warehousing
- Why a DWH, Warehousing
- The Basic Concept of Data Warehousing
- Classical SDLC and DWH SDLC, CLDS, Online Transaction Processing
- Types of Data Warehouses: Financial, Telecommunication, Insurance, Human Resource
- Normalization: Anomalies, 1NF, 2NF, INSERT, UPDATE, DELETE
- De-Normalization: Balance between Normalization and De-Normalization
- DeNormalization Techniques: Splitting Tables, Horizontal splitting, Vertical Splitting, Pre-Joining Tables, Adding Redundant Columns, Derived Attributes
- Issues of De-Normalization: Storage, Performance, Maintenance, Ease-of-use
- Online Analytical Processing OLAP: DWH and OLAP, OLTP
- OLAP Implementations: MOLAP, ROLAP, HOLAP, DOLAP
- ROLAP: Relational Database, ROLAP cube, Issues
- Dimensional Modeling DM: ER modeling, The Paradox, ER vs. DM,
- Process of Dimensional Modeling: Four Step: Choose Business Process, Grain, Facts, Dimensions
- Issues of Dimensional Modeling: Additive vs Non-Additive facts, Classification of Aggregation Functions
- Extract Transform Load ETL: ETL Cycle, Processing, Data Extraction, Data Transformation
- Issues of ETL: Diversity in source systems and platforms
- Issues of ETL: legacy data, Web scrapping, data quality, ETL vs ELT
- ETL Detail: Data Cleansing: data scrubbing, Dirty Data, Lexical Errors, Irregularities, Integrity Constraint Violation, Duplication
- Data Duplication Elimination and BSN Method: Record linkage, Merge, purge, Entity reconciliation, List washing and data cleansing
- Introduction to Data Quality Management: Intrinsic, Realistic, Orrs Laws of Data Quality, TQM
- DQM: Quantifying Data Quality: Free-of-error, Completeness, Consistency, Ratios
- Total DQM: TDQM in a DWH, Data Quality Management Process
- Need for Speed: Parallelism: Scalability, Terminology, Parallelization OLTP Vs DSS
- Need for Speed: Hardware Techniques: Data Parallelism Concept
- Conventional Indexing Techniques: Concept, Goals, Dense Index, Sparse Index
- Special Indexing Techniques: Inverted, Bit map, Cluster, Join indexes
- Join Techniques: Nested loop, Sort Merge, Hash based join
- Data mining (DM): Knowledge Discovery in Databases KDD
- Data Mining: CLASSIFICATION, ESTIMATION, PREDICTION, CLUSTERING,
- Data Structures, types of Data Mining, Min-Max Distance, One-way, K-Means Clustering
- DWH Lifecycle: Data-Driven, Goal-Driven, User-Driven Methodologies
- DWH Implementation: Goal Driven Approach
- DWH Implementation: Goal Driven Approach
- DWH Life Cycle: Pitfalls, Mistakes, Tips
- Course Project
- Contents of Project Reports
- Case Study: Agri-Data Warehouse
- Web Warehousing: Drawbacks of traditional web sear ches, web search, Web traffic record: Log files
- Web Warehousing: Issues, Time-contiguous Log Entries, Transient Cookies, SSL, session ID Ping-pong, Persistent Cookies
- Data Transfer Service (DTS)
- Lab Data Set: Multi -Campus University
- Extracting Data Using Wizard
- Data Profiling